Latest Comments

Beatrix Experiment!
23. April 2024
The video doesn´t work (at least for me). If I click on "activate" or the play-button it just disapp...
Katrin Spinning Speed Ponderings, Part I.
15. April 2024
As far as I know, some fabrics do get washed before they are sold, and some might not be. But I can'...
Kareina Spinning Speed Ponderings, Part I.
15. April 2024
I have seen you say few times that "no textile ever is finished before it's been wet and dried again...
Katrin How on earth did they do it?
27. März 2024
Ah, that's good to know! I might have a look around just out of curiosity. I've since learned that w...
Heather Athebyne How on earth did they do it?
25. März 2024
...though not entirely easy. I've been able to get my hands on a few strands over the years for Geor...
NOV.
20
0

Weekend Workshop: Understanding Tablet Weaving

Sometimes, things just line up, and then exciting things happen. Such as a weekend workshop on tablet weaving that I will give, on January 18-20 2019 - in a stunningly beautiful house in Méry, Belgium. I am utterly, utterly thrilled by this - and maybe you are too?

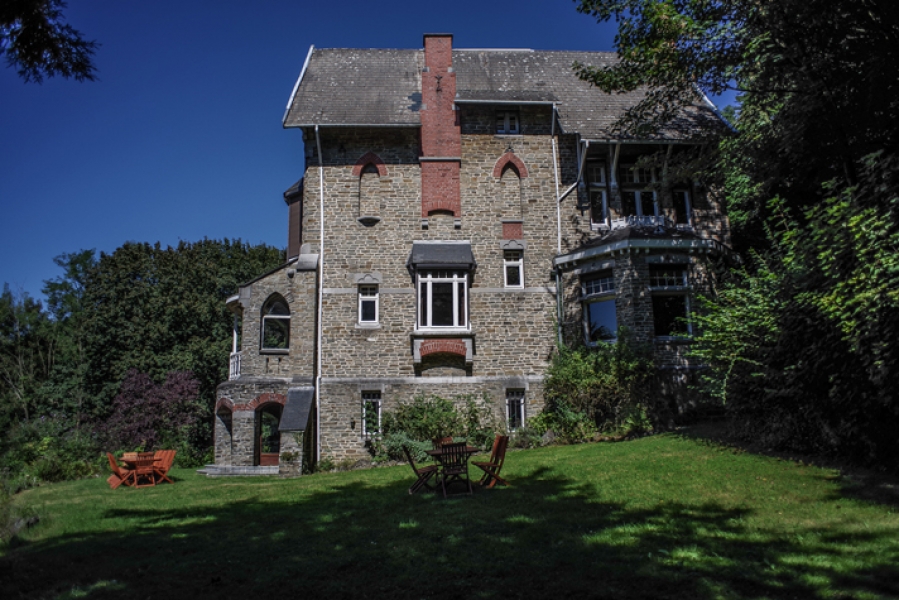
The house is the Merveille de Méry, a 19th century country house, lovingly restored and beautifully situated in woody grounds. It's near Liège, which means it is easy to reach by train (and there will be a shuttle service to the house).


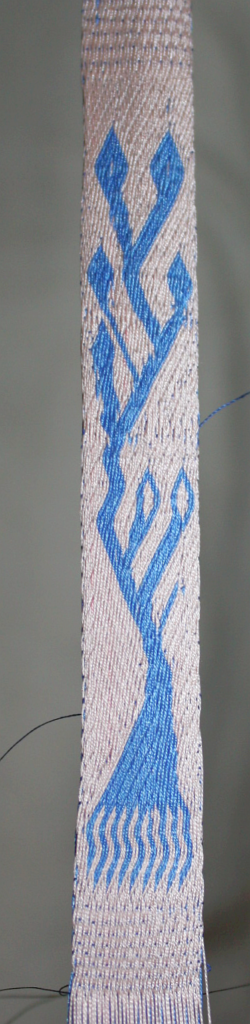
My workshop will run from Friday late afternoon to Sunday afternoon, and we will explore in depth the structures of tablet weaving. The aim is to give you a deep understanding of how patterning in tablet weaving works:

- the differences in s- or z-warping
- their relation to patterns and turn directions
- how to tell where you are in a pattern
- how to see which thread colours will appear next in your band
- how to fix mistakes
- how to transition from threaded-in patterns with two colours to doublefaced weaves

These things are taught as part of a system, starting with making a continuous warp. The deep understanding of how tablet weaving works, together with this system, will enable you to:

- analyse, understand, and copy bands that you see
- draft your own patterns with two or more colours
- weave patterned bands without any pattern draft, similar to how bands have been woven in the past.

This workshop may even take you to the basics of weaving 3/1 broken twill - the type of patterning used in the most complex of medieval tablet woven bands.

Workshop start is Friday, January 18, 6 pm; you can arrive at the house from 2 pm. The workshop ends on Sunday, January 20, at 4 pm. If you are travelling by train, a shuttle service from Liège to Méry on Friday and back on Sunday is possible.

I'm so delighted to be able to offer this - I've been wanting to do a larger tablet weaving workshop for a while now, and to have the opportunity to do it in such a stunning house, where we will have one room dedicated to our weaving and the rest of the house to relax between sessions, this is just awesome.

If you are interested, you can book your spot - including food and drink! - via my shop. If you book before December 10, you get the Early Bird Special Price of 395 €; after this, the regular fee is 425 €.

I'm already looking forward to this so much!
0
OKT.
23
13

Guinea Pigs needed.

I need some guinea pigs. Or, as the Germans call it, "Versuchskarnickel".

I have mentioned I was planning to make a video workshop on the pattern-free tablet weaving method, right?

Well, the "planning to" has progressed to "I have a script, and a camera, and I am getting started". Which is nice. However, since this is the first thing in that line of work, and since I want to make sure that what I am doing is going to work for those who will be watching the videos, I need some guinea pigs to give me feedback on the test runs of the lessons.

What does that mean? It means I will send you download links to the videos I have made, taking you through the course from start to finish, with probably some wait times inbetween as things get into the way or I get sidetracked or have technical issues. You will be getting test run videos that are probably badly cut (I will not invest oodles of hours into the test run) and contain the occasional verbal blunder. Some of them will not be made with the final materials.

Your task, if you are joining the merry band of furry victims, will be to watch the videos, follow the instructions, and tell me everything that was not good, not clear, not helpful, or otherwise shitty. (And yes, I fully expect to hear a lot of "this was shitty" - after all, it's first steps in many regards for me.) That starts with the instructions themselves, obviously, but goes on to camera work and camera angle, lighting, or maybe just the fact you find that my beheaded upper body is twitching too much while holding shears and bits of yarn into the camera. (I will also ask you to provide your full contact data, and sign an agreement form that you will not pass on or publicise the videos or parts of them in any way.) I'm not keen on hearing that I am doing a lot of things badly, but I much prefer hearing about them from a band of testers with minds steeled against weird takes than from the paying customers later on.

What do you need to join in? Basically, just the will to do it, and enough time for doing the tablet weaving according to the instructions. It will eat some hours, as it is a slow task, but if you are interested in this, you will probably find it fun and not tedious. You do not need to be an expert in tablet weaving - in fact, I'd be happy to have one or two absolute beginners in the group, and you will be able to follow along just as well, as we're doing the system from scratch.

You will also, apart from your general willingness, a way to watch the downloaded videos, and the time to do stuff and then give me feedback, need 30 tablets plus yarn to weave with... and two points to tie your warp to. There will be a video bit about tools and materials, so you'll be informed properly. (Or so I hope.)

I am aiming for about a dozen folks. So... if you are interested, let me know via mail, or contact form, or through the comments here - preferably with a short summary of your previous tablet weaving experience, so I can get a basic idea, and I'll get back to you with further info!
0
SEP.
28
0

Doggy done.

And the doggy is done - finally!

This one was actually inspired by an original published in Audrey Henshall, "Five Tablet-Woven Seal tags"(article behind paywall). It's not looking as elegant by far as the original, which has a proper eye and keeps its head up much more, and has a nicer jaw and slightly different paws... but it's a running dog-like critter, and, most important to me, was woven with only very slight residual muddling up of tablet directions and alignments.


As you can see, my version turned out a little club-headed and thick-necked. I'm still very, very happy with this, though; weaving it was an interesting mix of excitement and relaxation, with only very few "oh my goodness now I have to fudge this bit" moments. I'm also getting better at transitions between the different design elements and at getting the timing for these transitions right.

Now I'll have a think about what to do next... it might be time to tackle some geometric motif for a change, to see how that works. Or another peacock, in a different design. Or a phoenix (that might be really interesting, with flames and such). So many choices, so little time - it takes me about a full day of work to weave one of these critters, so it's still a time-consuming thing.

Speaking of time and time-consuming things, as usual, my autumn will be getting rather crazy, so I am taking a few days off before the final craziness that is preparing for the ETF. Which means a little blog break as well - I'll be back on the blog on Wednesday, October 10.  Have fun until then!
0
SEP.
27
0

It's the ass of the dog...

... that's appearing on this band.


Some more things have fallen into place, and I've invented some more mnemonic rhymes that are more or less silly, but all very helpful for me.

Now there's only (hah!) the torso and front paws and head to weave, and I will have a doggy on my band. Making the hind paws was exciting, especially the first one, and I was very proud to have gotten the distance to the second leg large enough. Which, on retrospective, would have been very hard not to - due to the structural rules when weaving. Anyways, it was a lot of fun up until now, and a very exhilarating feeling of "oh my goodness this all works as it's supposed to!" which is a nice change from "oh my goodness I've gotten totally muddled and this may look pink but it's all in the wrong direction and I'm out of the rhythm so I need to fudge this and hope it won't be too obvious".

So... half a dog done, half to go. Though I should probably also take care of some other things...
0
SEP.
26
3

...then I turned the cards...

...now I'm a Bee-Weaver...


This thing gave me an ear-worm. A slightly, hum, changed one... as now I am a bee-weaver, having woven a bee. Or something that should look more or less like one. (Thanks for the prompt, Christa!)

As you can clearly see, I'm still not the Queen Of Counting Correctly - else the torso would have been in the middle of the band and the wings the same size. I'm also not yet the Queen Of Getting Started Properly Right Away, and the two blue spots before the antennae start bear testimony to that.

The rest, though? I'm okay with how it went, seeing as it was all, again, made up as I went along. (My plans were slightly different, but at one point they had a chat with reality. Hence no incision between torso carapace and striped abdomen.)

If you look closely, there are slight irregularities in the stripey bit, and these are due to different twill direction. I was aware of these switches in direction but chose to ignore them. You might also be able to see the difference in appearance depending on twill/weaving direction - one direction has a much clearer, cleaner appearance than the other, and that is due to the ply direction of the warp threads, and a very common (and unavoidable) effect in this technique.

This was fun to weave, and didn't take a gazillion years (only half a gazillion). I've also learned a few more things, and got more used to some others.

Finally I noticed that my warp tension had crept up and up... so I've remedied that for the next part (I had to move the band along the loom-thingie anyways to have more free warp to work with). While I was concentrating so hard on getting all the turns correct, and being on the brink of going crazy at what felt like all times, it was very seductive to just up the warp tension for easier mechanical turning of the tablets... and I didn't really think about it. I just gave in to temptation.

So... while a relatively high warp tension means it's easier to turn the tablets without them getting caught in a neighbour tablet's threads, and the shed opens nicely all on its own, the downside to this is not only more friction on the thread (no issue at my tension and with my warp threads, though) but also rather acute angles in the diagonals, and stretched-out patterns. Which is not so nice. So now that I am a little more relaxed with the pattern-inventing, I want to go back to lower warp tension to have prettier designs. I just have to get back into the good habits of how to handle the tablets when turning so the getting-caught-issues are minimised.

Next up: Some doggy inspired by a medieval tablet-woven band used as a seal tag. And I hope you're not all sick and tired of hearing about tablet weaving already!
0
SEP.
24
0

More brain-wrecking.

I'm trying to get down pat how to handle the different design elements that can occur in a tablet-weave, and it's half fun and half frustrating and half exciting. Or something like this.

Basically, there are only about 10 elements that you need to learn to do anything, with the most straightforward being a diagonal line running in the main direction of your twill background. That one is really easy, while other things that are twisting things away from that straightforward thing are, hm, let's call it "more demanding". There are ways to do curves, and horizontal and vertical lines, and diagonals running opposite to the current twill direction, and they aren't that hard - but the challenges grow when you are doing multiple things at once and have to keep track of all of them (plus decide on the fly how the pattern should move on).

Also not helpful at all? Having a little reference sheet to help keep track of how the tablets should stand, and then discovering, after a long while of wondering why things occasionally go totally pear-shaped with no good reason whatsoever, that there was a lovely little mistake in that reference sheet. Bah. Duh. I did about a gazillion facepalms in my mind when I found out what had brought me down there again and again. (I had mostly looked at the bits left and right of the erroneous point, which were a-ok and really helpful, and only occasionally referred to the faulty part.)

So. Current status?


I have made a tree-like thing.

As you can clearly see, I'm still working on merging lines. I'm also still working on a lot of other things, such as starting diamond shapes out of nowhere in a timely fashion. Things are progressing, though, albeit slowly.

There is also still that occasional problem to keep left and right apart. It's getting better, though - having told myself so, so often by now that "towards the weft, slants up and left" that it starts to seep into the backbrain.

Next up: More new and exciting design elements - such as horizontal lines. Yay!
0
SEP.
21
0

Finding out things.

It's always nice to find out things... especially when they are connected to medieval textile tools. So when, a while ago, a colleague handed me a reproduction of a weaving knife (or beater, however you opt to call it) from Viking Age Dublin to try out, I was more than happy to do so. It fit in perfectly with my plans to do the tablet-weaving shenanigans... and so I sat down and wove and gave it a try.

Well. Before, I was firmly in the camp of "I just use my finger to beat in the weft, and that's good enough for me". Let me tell you, though: I am not ever going back to that. Well, maybe for a narrow, simple band, where weaving is fast and I'm handling the tablets with one hand and the shuttle with the other and it's more like just speed down the warp, and that's it. But for things like the twill patterning, or wide bands? Aaah. It does make such a difference - and it actually makes a huge difference, for me, to pressing the weft in with some other tool.

In the past, I had tried to use the shuttle edge, or a special small shuttle with a "beating sting" attached to it (which I have mislaid and cannot currently find, which tells you already how much I use it...), or a ruler, or a bone folding tool. None of them cut the mustard for me - they were one more thing to handle, and my finger did not need picking up and setting down in contrast to these all, and made about the same job.

The difference? Size and shape of the new thingie. This is how it looks:


You will note the very broad, very curved blade with the curious indentation at the very tip - things that my colleague found slightly weird. There is a second find from Viking Age Dublin with this shape, so one might surmise that it's not a fluke, but that there is some reason behind it. I had no clue about this possible reason, only a guess regarding the curved blade: It might allow to press the weft in very precisely yet gently, using a rolling motion of the curve across the fell.

Well. That guess certainly proved correct - the tool's form is just perfect to roll it across the width of the band, making sure all the fell is pressed back firmly and evenly. As there is only a smallish contact point, it is easy to apply a little more pressure where necessary and a little less where the warp is softer. Calling this thing "beater" does it no justice at all, by the way - movement and action are all nice and soft and gentle, as befits a delicate tablet weave. With the warp under just enough tension to work well, but not more, beating in the shed would not be a good idea, as it might disorder the tablets. It also puts more stress than necessary on the warp, as well as on the tensioning method - so the curved blade is a total boon.

[caption id="attachment_4054" align="alignnone" width="640"] 
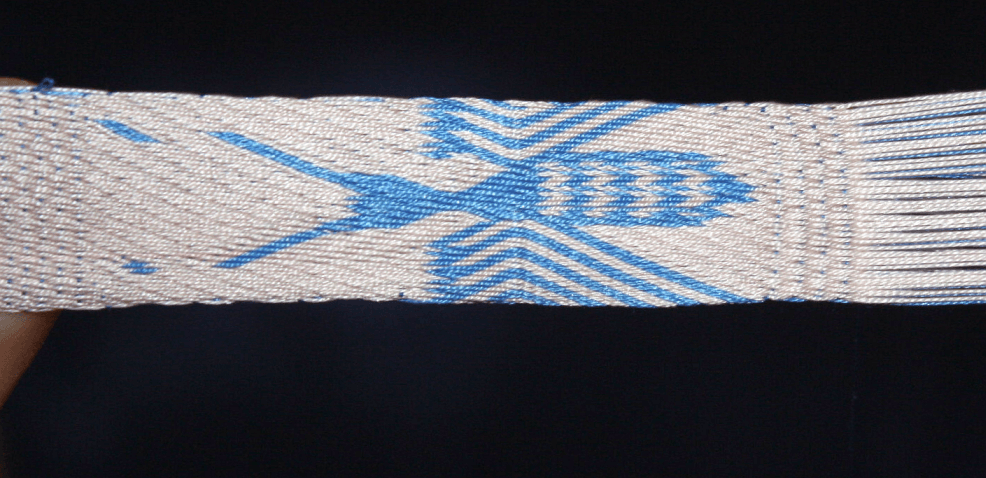
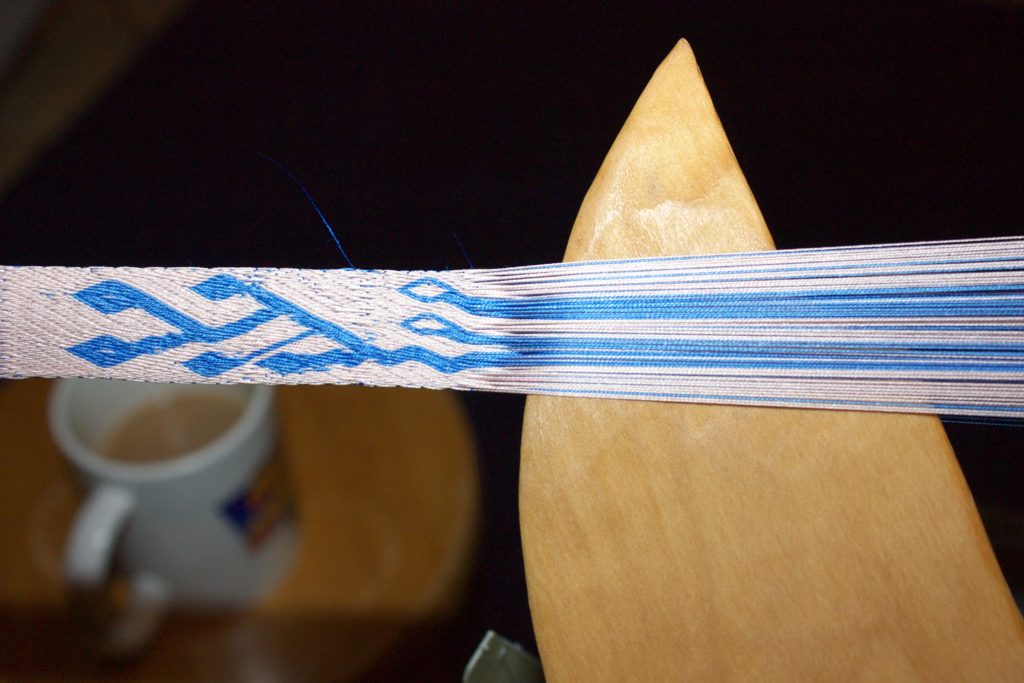
Gently pressing in the weft.


For this, a smaller tool would actually work for me - but I have also found it wonderfully useful for correcting mistakes.

When I need to go back a pick, I loosen up the last weft, pull it towards the tablets, and then I open the shed it runs through with my fingers. I then usually stuck something in there - my finger (which binds one hand, so not very good for longer or more complex corrections), some stick, or whatever (a bone folder, for instance). The purpose of this is to keep the old shed open to individually turn each tablet back the way it came, re-establishing the position before the mistake. Obviously, it's a) helpful if you see how the threads run over your tool, and b) important that it does not slip out too early. Both of these were, hm, let's call it sub-optimal with a stick or a bone folder.

With the almost 30 cm of total length, and the relatively long blade part, the tool easily accommodates my warp for these corrections. The back of the blade is wide enough to stretch the shed apart nicely so I can see what is happening, and the total length is just long enough to either set the handle's end on my knee or hold it between my legs, making sure it stays put.

[caption id="attachment_4051" align="alignnone" width="640"] 
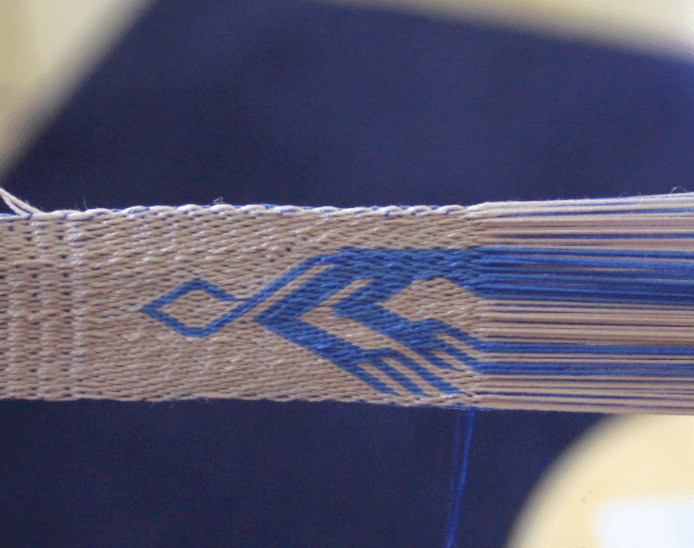
Fixing a mistake by weaving back - the crossings from the previous turn are carried towards the tablets.


Most often (fortunately!) the mistakes are not so bad that I need to go back for the whole pick - they are just one or two tablets that accidentally turned into the wrong direction. Or sometimes, I'm not sure whether the edge of a pattern section is where it is supposed to be. In these cases, I pick out the tablet cord in question close to the fell and follow it back to the stack of tablets. For this, something more pointy and accurate than a finger is very helpful. Bone folders will work, as will needles... but, guess what works even better?

Yes. The pointy tip of the tool. With the indentation making the tip of the blade effectively a lot narrower than the curve would dictate, it is just perfect to pick out the offending place, stick it in and follow the yellow brick road, excuse me, the tablet cord in question back to its origin.

[caption id="attachment_4053" align="alignnone" width="640"] 
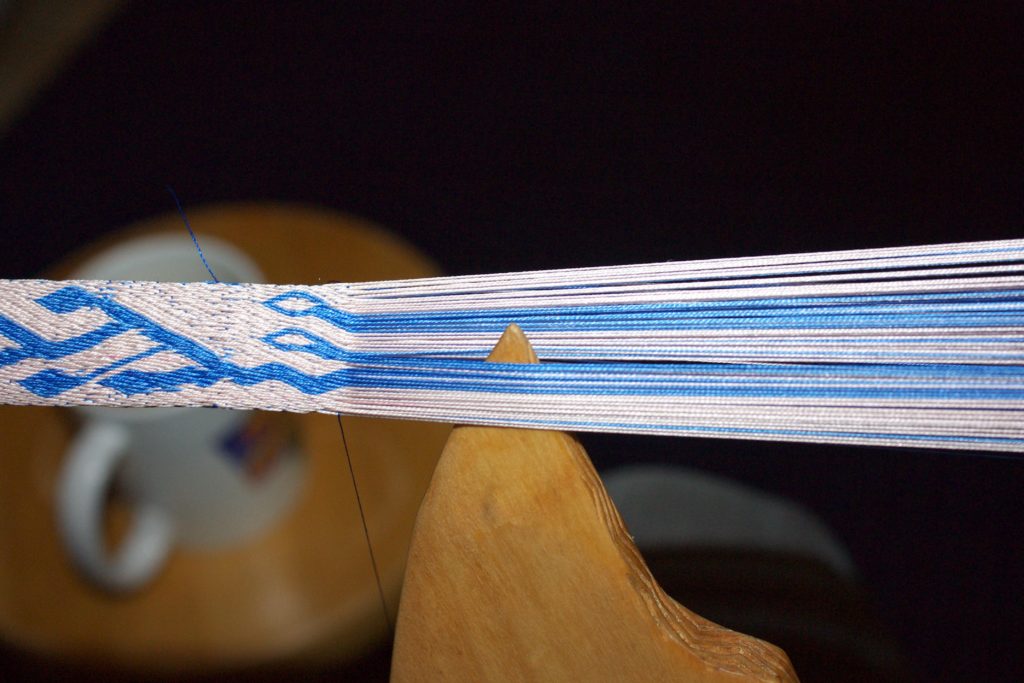
Catching the questionable pattern section edge to check whether the tablets stand correctly.


It works much, much better than the bone folder. Or a ruler. Or my finger.

It's also not a bad thing that this tool is totally beautifully made, and very smooth, and beautifully decorated with carvings, and made from service tree wood, which is my absolute favourite wood ever.

So worth the extra step of picking up the tool! And in the future, my fingers will not see that fell again... because I'm not going back, nothankyouverymuchindeed.
0

Kontakt