Latest Comments

Beatrix Experiment!
23. April 2024
The video doesn´t work (at least for me). If I click on "activate" or the play-button it just disapp...
Katrin Spinning Speed Ponderings, Part I.
15. April 2024
As far as I know, some fabrics do get washed before they are sold, and some might not be. But I can'...
Kareina Spinning Speed Ponderings, Part I.
15. April 2024
I have seen you say few times that "no textile ever is finished before it's been wet and dried again...
Katrin How on earth did they do it?
27. März 2024
Ah, that's good to know! I might have a look around just out of curiosity. I've since learned that w...
Heather Athebyne How on earth did they do it?
25. März 2024
...though not entirely easy. I've been able to get my hands on a few strands over the years for Geor...
APR.
20
2

Hairnet, current status

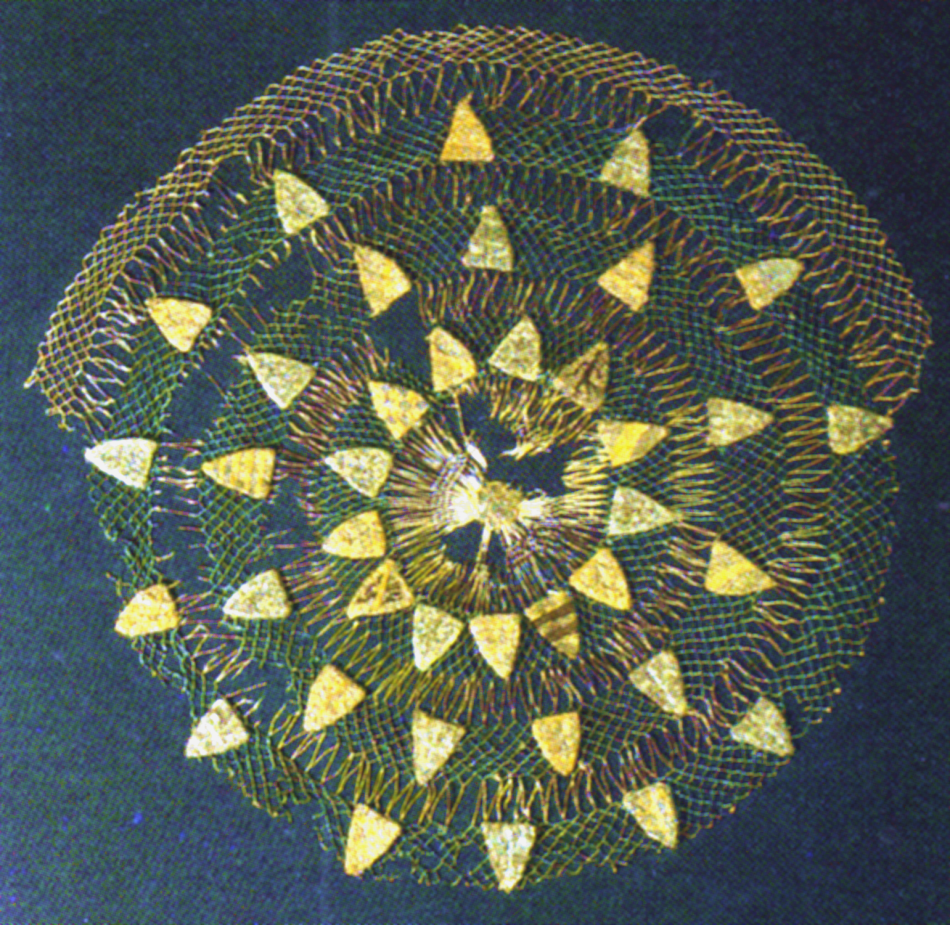
Here's a picture of the current status of the hairnet I'm working on. Only about three centimeters left to net, hooray!

Picture clickable for larger view


As you can possibly see (the photos are not that good), the net is worked in a spiral. The spiralling approach has its advantages, but also a fair share of disadvantages, in my opinon.
I like the fact that, when spiralling, you can just go on and on with netting. Once the spiral is properly established, there is no need to fiddle with the mesh size for the transit into the next row, there are no double threads or new knottings-in for this transition, just netting same size endlessly.
What I don't like is that you will get distortions in the first few rows, until the spiral is smoothed out. That can be achieved either by slowly lengthening the cast-on loops so that the first normal-sized meshes don't stick out so much, or by fiddling a bit with the mesh size in the first rows. And the finish of the net is, of course, also a spiral and will need some more fiddling to look smooth and well-rounded.
Spiral netting is also not too well suited to colour changes in the netting - exactly what I did in this piece, just because I felt like using two colours. Where the colour change is, you always get an abrupt change in one of the percieved "rows", and I think it looks a bit sloppy, or disorganized. It is technically not possible to change this when working spirals; there is no sudden change in one row when working circular. So for multicoloured nets, circular might be better.
And the last thing I don't like now that I'm nearing the end: There are no rows, and hence, there is no feeling of accomplishment on finishing a row. What can be seen as an asset of spiral netting - not needing to transit between rows - can feel tedious. I know that I need about 6 or 7 more rounds in the spiral, but it is awfully hard to keep track how much I have netted in one session.

Taking all this together, I personally feel that netting in the circular would be more appropriate for what I'm trying to get, while netting in the spiral might be the best way for a beginner to make a nice practice piece, only needing to concentrate on the act of netting nice even meshes. Therèse de Dillmont doesn't give instructions for spiral netting; her circular netting "recipe" says to knot in anew for every next row.

After this last stint of spiral netting, I'm not so sure whether it was used as an approach for net-making in the middle ages. It would be interesting to look at some of the extant nets in detail to see whether there is a shortened transit mesh or new knotting in of the thread for the next row, or if there are actually nets worked in the spiral.

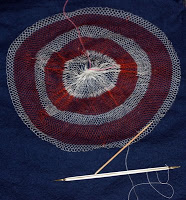
The last picture shows the size of the meshes in the net, with the net laid out on a normal 5 mm grid paper. Sorry for the bad quality of the picture.


You can see that the mesh size is approximately 4 mm. I think this is a nice size, still easy to work with a fairly sturdy netting needle, within the size spectrum of medieval hairnets and not so small-meshed that it would take ages to do it. However, netting is not a fast craft, and even with this mesh size, it will take its time. Practice speeds the knotting a bit, but there's a limit to how fast your hands can go. I'll give the exact time needed when I'm all finished with the net, but by now it has taken more than 25 hours.
0
APR.
09
0

Sewing again

After getting a good bit further on a woolen hood (quite similar to the Bocksten Man's hood) yesterday evening, I'll try to get started on the new dress today.

It will be a fitted dress with front lacing as closure, and the lining (that is used for fitting) is already fitted to me. So I'll just need to trace the basted lines, cut the surplus fabric back to a sensible seam allowance, and trace the pattern onto the fabric for the upper layer. There are some details I have to decide on, mostly minor, but I like to do that before really setting out, so I will probably take some time before cutting to study my source material - mostly the publication about the Golden Gown of Queen Margareta, but also pictures of similar dresses. Unfortunately, my little finger is hurting when I move it, and I don't have any idea why and what I might have done to set it off. I hope it won't get in the way of stitching.

Before rushing off to books, scissors, and (hopefully) lots of fun, though, there's still paperwork-y stuff to take care of. Sigh. At least it's nice paperwork today, where I don't have to think much, since most of it was prepared yesterday, waiting only to be printed and sent out today.
0
MäRZ
11
2

Hairnets, part IV

Time for another hairnet, again from the treasure of Abbey Sint-Truiden in Belgium (Dutch Wikipedia Entry about it).

This net has large mesh for the St.-Truiden finds, with only 9 mesh per square cm, so about 3 mm mesh size. It is dated to the 13th or 14th century and preserved in three fragments, the largest of which is 12 x max. 30 cm. The material for the nets is red silk, and the net is embroidered with silk in white and green, the latter coloured with Reseda luteola (and probably something else, undetected). Atached to the net are a band of textile with motifs in different colours and two tablet-woven bands.

The net is knotted in the round, and beginning and end of the work can not be distinguished. The net is embroidered all over with "hooks", made in linen stitch.

Hairnet before conservation.
Picture clickable for larger view.


There is unfortunately no "after-conservation" picture of the net.

Source: DECONINCK, E., GEORGE, PH., DE JONGHE, D., Y., VAN STRYDONCK M. J., WOUTERS, J., VYNCKIER, J. und DE BOECK, J.: Stof uit de Kist: De Middeleeuwse Textielschat uit de Abdij van Sint-Truiden. Leuven 1991. Catalog nr. 103, pages 348-349.
0
FEB.
26
0

Hairnets, part II

Hairnets. Yes.
Should you feel that the actual netting of rather large mesh is just not enough, even when combined with a bit of embroidery on cloth to sew on later - you can always do some embroidery straight on the mesh. Lacis, or filet lace, or however you want to call it, has a rather long history. The even ground made by the meshes of the net is a good groundwork for embroidery and allows for a nice contrast between open mesh and filled-in mesh.

A nice example for this is this fragmented net from the 13th or 14th century, with origin in West-Europe. There are two larger fragments and some smaller fragments preserved, with the largest piece measuring 13.5 by 43.5 cm. It is made from red silk for the knotted ground and embroidered with yellow and white silk.
picture clickable for larger version


On the bottom right side the large fragment has larger loops of thread, measuring 1.1 cm. The regular mesh size is 4 mm. If I read correctly, the red silk is dyed with madder, yellow was done with weld (Reseda luteola). The embroidered motif consists of alternating white birds and flower motifs, maybe fleurs-de-lis. Embroidery was done in rows, and three rows are still preserved. The flowers are embroidered by stitches around the mesh threads, while the bird motifs fill in the open mesh squares, using linen stitch.

With rather sparse embroidery, on a mesh that is a whopping 4 mm size, this would be a nice starter for your medieval hairnet collection, don't you think?

By the way, medieval silk nets really have small mesh sizes in comparison to later ones. A pattern book for lacis by Therèse de Dillmont is available on the net (German version of "Filet Guipure": Part 1 and Part 2), and she offers thread weight advice for mesh sizes between 7 and 11 mm.

Source for text and pictures:
DECONINCK, E., GEORGE, PH., DE JONGHE, D., Y., VAN STRYDONCK M. J., WOUTERS, J., VYNCKIER, J. und DE BOECK, J.: Stof uit de Kist: De Middeleeuwse Textielschat uit de Abdij van Sint-Truiden. Leuven 1991. Catalog Nr. 107, page 354.
0
FEB.
19
1

Kruseler and Hairdos, Part IV

Before this gets buried too deep in the stack of posts that have yet to be finished, here is part IV of the Kruseler and Hairdo series. My original plan was to illustrate the description with photos, but I'm not very good at taking pictures of my own back of head, and I won't get around to have some taken soon enough.
Should you try to follow these instructions and keep getting utterly lost, you can tell me in the comment section, and I will try to provide some crude illustration.

The updo I used as the kruseler foundation is commonly called a "log roll", or at least I only know it under this name.

To make a log roll, you do the following:
  • Grow hair. You will probably need mid-back hair or bottom-length hair at least. Fine hairs can usually do it with hair on the shorter end, thick-haired ladies (or guys, of course) need more length.
  • Gather hair together in a low ponytail, and hold the ponytail with one hand.
  • With the free hand, grasp the hanging end of the tail and wrap it upwards and towards your head over the hand holding the tail. Your first hand should now have hair looped around it.
  • Open the hand in the loop slightly, keeping the base of the loop together with the other hand. Now you twist the hand in the loop - this will form a sort of twine underneath the loop. While twisting, pull the hand gently and slowly away from your head, to elongate the twist below the loop.
  • Stop pulling and twisting when the twisted section is as long as the back of your head or only slightly longer. You should now have the twisted section, coming from the base of your starting ponytail, and a free-hanging tail of hair coming out of the twist.
  • With one hand, hold the twisted section up by the loop so there is some space between the twist and your head. With the free hand, wrap the tail of hair still free around the twist, covering it gradually from bottom to top. That is why you need the length.
  • Tuck ends underneath to hide them. Settle finished log roll on your head, going straight up the middle, and secure with your method of choice. Until the roll is firmly secured on your head, always keep hold of the loop, or the roll will uncoil, and you have to start over.

This is one of my staple updos, since it is fast and well-balanced and does not look bad. But for modern living, I do it only as a single bun worn on the back of the head, not with parted hair and put up on the temples. It is also possible to logroll a braid, something I also do pretty often, but this will not give the sleek look of the "hair horns" that can be seen on the Arnolfini wedding picture, and that was my model for this try.

My main problem is getting the two humps symmetrical and then fixing them securely. They must be firm enough not only to support themselves, but also the (admittedly light) veil, which I pin to the lumps.
I know I'm not the only person wearing or trying to wear a kruseler - so what are your experiences? Have you had problems with the symmetrical arrangement? How do you fix your fabric to the head? How long does it keep in shape?

And most importantly: If you had one single question to ask a medieval kruseler-wearing lady, what would you ask her?
0
FEB.
17
2

Hairnets, part I

I like hairnets. I also like making them - it is a nice thing to do with the hands, without much thinking. My nets, however, are a far cry from some of those medieval ones that are still extant.
A lot of people know the nets found in London - with mesh sizes between 3 and 9 mm, depending on the net. But they are really simple.

Now take this one, as one of the not-too-elaborate nets. We don't know where it comes from, unfortunately, since it was bought via art trade, but it has been dated to the last quarter of the 13th century. Nowadays, it is in the Art Museum in Düsseldorf.

(picture clickable for larger version)


Diameter is 33 cm, and it has been worked in green and white silk. I had to tune up the colours on the scan, and now it should be easy to see where the green and where the white silk was used. I would have expected the small, embroidered shields-with-arms on a white background. Shame on my modern mind - green it is. The arms are embroidered in spun silk and gilded silver wrapped around a textile core. The ground for embroidering was coarsely woven linen. Some of the arms have been identified: there's six times Sayn and eight times Geldern, pointing to the Middle or Lower Rhine region. The net might have served for a wedding or proposal ceremony. In addition to the 38 arms, there's a little six-petaled rosette in the middle of the net.

The netting should not be too hard to do, using two different-size gauges for the long white and the small green meshes. My rough estimate is 3-4 mm for the small green mesh and about 1.5 cm length for the long white mesh - which is "not very small" for green and "exceptionally large" for white. It would be very interesting to see it close up, and in good detail, to see whether it was worked in spirals or in rounds, and whether the colour thread not in use was cut off or just led down for the next colour change. Any odd joints caused by this could be covered up easily with the embroidery bits sewn on later.

Source for the net picture and information: FANSA, MAMOUN (Hrsg.): der sassen speyghel. Sachsenspiegel - Recht - Alltag. Beiträge und Katalog zur Ausstellung "Aus dem Leben gegriffen - Ein Rechtsbuch spiegelt seine Zeit". Bd. Beiheft 10, Band 2, Archäologische Mitteilungen aus Nordwestdeutschland. Oldenburg 1995.
0
FEB.
10
2

Kruseler and Hairdos, Part III

Now as promised, the problems I have with this version.

First of all, the kruseler. It consists of multiple layers (I think eight layers) of fine silk fabric, woven in tabby. It's the thin quality you can buy for painting scarves, Pongé 05. The "ruflles" consists of the selvedges of the fabric. All cut edges are sealed with beeswax.
The ruffle, to me, does not look voluminous enough. This might be due to not enough layers, or it could be possible to seal/impregnate the edges in the ruffle with (bleached) beeswax and form it, still warm, into the characteristic wavy form. The next one will be better, I hope.

Then, the hairdo. I am pretty content with how it looks on the photos (though the right "horn" has uncoiled slightly), and it is actually comfortable to wear once it is arranged symmetrically and fixed securely. And that is the snag. I find it enormously difficult to do the two lumps of hair, both securely, both similarly tight and starting from the right spot. Then these two horns have to be pinned to the head. I have a lot of experience nowadays with the simple, u-shaped pins that have been used in the middle ages (and are still available today, thanks to the powers that be), but while the first one is always more or less agreeable, the second horn invariably droops. Or wanders. Or uncoils, if it is really cross.

So while putting up the hair in this way is technically no problem for me - the motions for making the horns are easy, and the single-roll-on-back-of-the-head version of the updo is one of my staples (and I wear my hair up all days, all the time, with only a handful of exceptions a year) - it is still a problem to get it symmetrical, and both twin horns secured firmly. That is probably something to come with practice, but the updo without the veil looks pretty... hmm... let us settle for weird, and the same is true for modern eyes when worn with the veil. And that is the reason why I am not running around with this updo every day. (Plus it won't fit under a bicycle helmet.)

And last of all problems, the pinning. Kruselers worn on the pictures are shown either with a rounded look or with an angular look (the one I'm aiming for). While both can be achieved with changing the hairdo, I haven't yet found any pins shown on the kruseler paintings. Some way of holding the veil to the head must have been used, and I'll assume it was not hot glue straight out of the glue gun. So the big question is: Where and how was the veil fixed (pinned, probably) to the hair? Or was there some other solution? I have had lots of problems, and I always need several tries, to find the right place and right angle for the (bronze) pins to really hold the veil, and for more than some seconds. And it's not only holding it down: the veil should cover the hairline on the forehead, show some of the hair bump beneath and then fall down in a nice, straight line.

I'll happily try out suggestions the next time I wear this, so please shoot!
0

Kontakt