Latest Comments

Beatrix Experiment!
23. April 2024
The video doesn´t work (at least for me). If I click on "activate" or the play-button it just disapp...
Katrin Spinning Speed Ponderings, Part I.
15. April 2024
As far as I know, some fabrics do get washed before they are sold, and some might not be. But I can'...
Kareina Spinning Speed Ponderings, Part I.
15. April 2024
I have seen you say few times that "no textile ever is finished before it's been wet and dried again...
Katrin How on earth did they do it?
27. März 2024
Ah, that's good to know! I might have a look around just out of curiosity. I've since learned that w...
Heather Athebyne How on earth did they do it?
25. März 2024
...though not entirely easy. I've been able to get my hands on a few strands over the years for Geor...
MäRZ
08
0

Egtved Update. Rings.

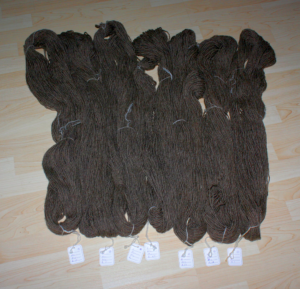
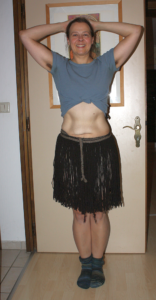
You're long overdue an update on the Egtved Project, right? It has slipped into the background a bit with all my writing about the website stuff and issues - though there was work on it going on in the background. Spinning and weaving have both been finished by now, but today, you're getting an update on the corded skirt, and especially my friends the Endless Number Of Rings.

Looking at the cords, it is relatively clear how they were made. There was no such thing as a cord twister back in the Bronze Age, after all, so the possible methods of getting the cords twisted are a) by hand or b) using a stick or something similar to twist them up strongly and then countertwist them together. For the rings, it's not quite as obvious. 

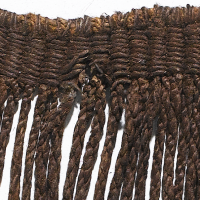
The rings at the bottom are completely covered by wool fibres, wrapped around a core and looking very smooth, tight, and orderly. Similar rings can be found at the bottom of the belt tassels of the Trindhoj and Egtved finds. In Hald's publication about the Egtved skirt, she assumes that there is a knot (a single overhand knot) at the end of the cords, that they are then sort of closed into a ring shape, with the ends touching at the bottom, and this ring is then wrapped with fibre.

I have tried a few different methods to get a nice, tidy, tight ring, and to me it looks like there's quite a number of different ways to achieve this. The method I've settled for now is a two-step process, and I'm not sure how plausible it would be for the Bronze Age, but it's at least not completely out due to not having the tools available in that time.


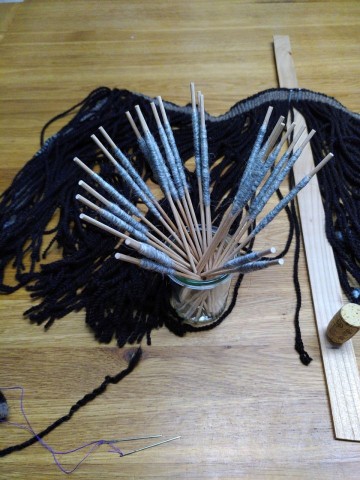
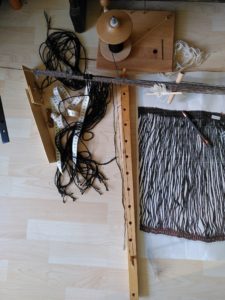
I'm winding my fibre around a little stick, forming a nice, tidy, tight roll. Not too tight, though, and considerably longer than the actual circumference of the little ring, as that seems to work better than making a thicker, shorter roll. I do make a single overhand knot in the cord as Hald suggests; for me, this mostly serves to make sure the ring will sit at the correct height. Measuring the cord to get it to the length it should have is one of the things that gave me a bit of a headache, by the way - these cords are really stretchy.

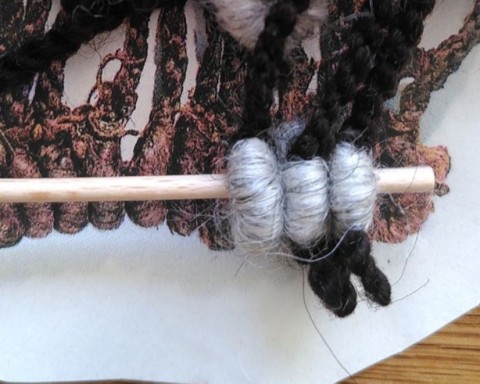
I then slide the fibre roll off the stick and pull the cord ends through the roll, in opposite directions. The ends come out at the top, and I go over to the other side and back down into the wool roll with each end, aiming to go about a third to a bit more than a third downwards. I will cut off the remaining cord end later on, and the ring will close up. 

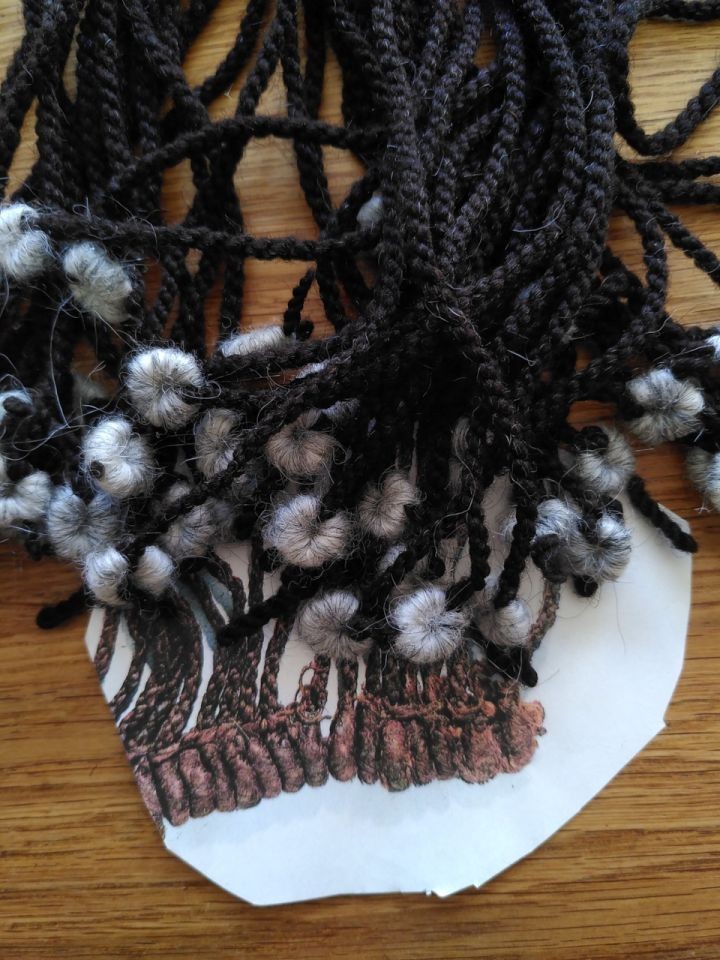
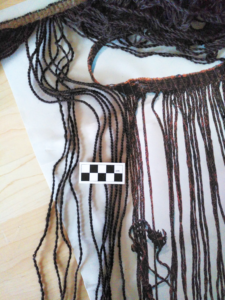
On the picture, you can still see the ends of the cords sticking out of the rings; you can also see the rings hanging out on top of the printed-out Egtved Skirt image that I use as a reference and size guide. Getting the rings the correct size is something that felt, and still feels, like a real challenge, as there's only limited information from the picture. They are only seen sideways, apart from the very last one on the very leftmost end of the skirt, which is sort of half-visible - so I don't know how closed they look, or how their tops really look, or how thick they seem from their front. 

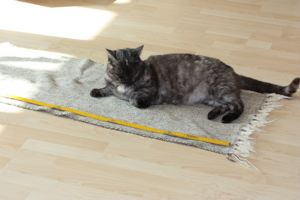
The sides of the rings look a bit squashed up in some places, but after a few hundred years of snuggling up to each other, well, I'd say that can be expected.

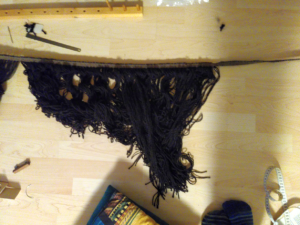
This is how my rings look right now, lined up on a stick for a comparison: 

I'd say that's close enough for all practical purposes. And I'm really looking forward to what it will look, and feel like when everything is strung up properly! 

0
FEB.
16
0

Favourite Place.

I'm participating in an Instagram challenge initiated by the group Hochwaldkelten - and today, they are asking about the favourite place for (or of) Living History.

Uh. That was a really hard question for me, and got me thinking very hard about all the things I did in all the places that I did them... which were many, and varied, and about all of them were utterly wonderful and I have fond memories of them. Of sitting in the train, and in the car, and even in the plane or the airport, travelling to an event or a conference or a museum or a research project, with all the anticipation involved. Of hotel rooms and hostel rooms and pensions and the homes of friends and colleagues, where I stayed for a while. Of sleeping spaces on floors in open air museum houses and of my own medieval tent and one time even in an old jail cell. Of museums, both the parts open to the public and the places behind the scenes, the depots and cellars and staircases and offices and - very important, of course - the break rooms and tea rooms. The markets and fairs, with all their hustle and bustle and the challenge of fitting everything into the space provided, which is different every time. The workshop places and demonstration places.

So, so many different places. So many wonderful meetings with colleagues, with friends, often times both. So many wonderful teaching experiences, and demonstration sessions, and getting close to actual medieval objects.

In the end, though, I ended up posting this as a picture of my favourite place:


Because this part of the floor in our place has seen so much action, and so many things, and when it gets involved, something fun is about to happen. This is where I set up work tables for larger projects that need a table, or where I sit for works like weaving the Egtved skirt.


This is also where I take photos of things for my documentation - like the Bernuthsfeld tunic reconstruction:


or the reconstruction of this late medieval fabric:


The cat, of course, was not sent off to the museum along with the cloth.

So in the end... that's my favourite place in regard to work, in some way. How about you? What's your favourite place for Living History, or for crafts, or both?

 
0
JAN.
25
0

Spinning Done.

What you see here...


is the rest of the weft yarns spun for the Trindhøj man's garments. They've taken their bath and they have dried and they are en route to being woven... and I am very, very curious on how the finished fabric will turn out!

Each time I spin for a weaving project, I'm amazed at how much yarn is eaten up by a puny bit of fabric. Well, in this case, it's not so puny, with about 170 cm on 275 cm. That makes it a fairly good thing that the thread count per cm is not as high as in a medieval medium-fine fabric, but at only about 3-4 threads per centimetre.

Altogether, I've spun about 6400 m of yarn for this piece of fabric. The loom eats a generous portion as loom waste, which accounts for some of the extra yarn needed; then there's of course a bit of shrinkage after weaving, when the raw weave is wet finished. Finally, there's always need for some leeway just in case, it's not nice to run out of yarn right before the end. I've also added on a bit more of the weft yarn as one of the batches turned out to be rather thinner than intended.

Spinning consistently to the same thickness and the same amount of twist over a longer time - I still find that challenging. Though admittedly my comfort zone regarding yarn thicknesses has grown quite a bit in the past years compared to when I started spinning, and my tendency to gravitate towards a certain thickness of yarn has diminished with all the practice that I've been getting spinning yarns to specification for weaving projects. I think in that regard it did help a lot that some of these projects - like this one - required yarns that were a lot thicker than my default thin yarns.

Have you done spinning outside your comfort zone thickness? And/or spinning in bulk for a larger project?
0
DEZ.
09
2

Because, Obviously, That's What You Do.

So. Let's assume that you happen to have a corded skirt replica... which is not quite finished yet, but all the cords are done, and it has been wet-set, and has dried completely again, and now it only needs the rings at the bottom.

What do you do?


Obviously. Right?

(Yes, I am wearing something underneath the skirt. Yes, it is surprisingly non-see-through as long as one is not moving. With the unfinished cords, it will swing outwards a lot when you twirl, but that will be much different once the bottom ends are held together.)

 
0
DEZ.
07
0

Dripping Dry.

The cording marathon is done - and the skirt has taken a nice warm bath, and currently it's hanging out in the basement, where it is nice and warm and the drying racks are.


It does look quite nice, and sort of fun, hung onto that modern drying rack and held up with modern clothespegs. Now it gets to dry in peace, and then it will have to wait for a bit until I've finished the spinning marathon before I'll settle down to the ringmaking marathon.

Speaking of the spinning marathon - the warp yarn has also been done, and now I can progress to the weft yarn. Hooray!

 
0
DEZ.
06
2

The Egtved Cords.

Here's a fun fact on the Egtved corded skirt: These cords are thin. Really thin. And they are not fluffy at all, being twisted really hard.

The diameter of the individual, finished cords, consisting of four threads, is about 4 mm, often a little less - so a spun yarn thickness of a tad less than a mm was what I was going for. I did spin "normal twist" for my personal feeling, which is a rather firm yarn, but most of the final appearance is decided by the cording and the twist added then and there. (I tested that with the corded tassels on the belt, as there was a slight twist difference between the cut off warp yarns and the extra yarns inserted for the tassel.)

Here's a photo of the skirt in progress, with yarns and cords:


On the left, there's the sort-of-plied-up loops drawn through the band part while weaving. I used "fresh" yarn, so each loop plied up naturally quite a bit, resulting in a loose two-ply with a closed lower end. To the right of these, lying underneath the little scale gadget, you can see finished cords - and because the two-plied loops are a loose ply, and the finished four-element-cords are twisted very hard, they look only a little thicker than the two-ply loops.

To the right of those, there's the printout of the skirt in original size, for comparison. Like in the original, my cords vary slightly in thickness and twist density, but they are quite similar-looking overall. I do hope that this will not be affected a lot when giving the whole thing the finishing wet treatment. Though with the hard twist, I suspect there won't be a lot, if any, blooming/thickening of the cords. I do expect a bit of shrinkage of the whole band, bringing the cords a little closer together, perhaps. Things that keep those projects exciting!


0
DEZ.
03
0

Egtved Progress.

Another week has flown past - but yes, there is some progress. Apart from some more spinning, the weaving bit of the corded skirt is finally finished, after a bit of a hiatus. But there's just so much spinning that I can comfortably do in a day...


So the corded part is woven. I had to spin a bit more after all, as there'll be some takeup when I'll be wet-finishing, and I only did the maths after spinning... of course. Duh. The corded bit is followed by a bit of plain band, which is also done, and the final finish is a braided bit. The latter might get slimmer in the original, so I'm planning to possibly un-braid again and finish it properly when I'm nearer the completion of the whole piece. For now, there is more cording to do; after that, I'm planning to give the whole thing its nice warm bath, then finish off the cords with the rings.

The bit you see in the picture, by the way, is all the two-ply loops drawn through that are waiting to be corded. Lots and lots of twisting coming up!
0

Kontakt