Latest Comments

Beatrix Experiment!
23. April 2024
The video doesn´t work (at least for me). If I click on "activate" or the play-button it just disapp...
Katrin Spinning Speed Ponderings, Part I.
15. April 2024
As far as I know, some fabrics do get washed before they are sold, and some might not be. But I can'...
Kareina Spinning Speed Ponderings, Part I.
15. April 2024
I have seen you say few times that "no textile ever is finished before it's been wet and dried again...
Katrin How on earth did they do it?
27. März 2024
Ah, that's good to know! I might have a look around just out of curiosity. I've since learned that w...
Heather Athebyne How on earth did they do it?
25. März 2024
...though not entirely easy. I've been able to get my hands on a few strands over the years for Geor...
NOV.
03
2

Cording...

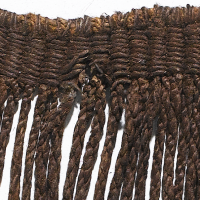
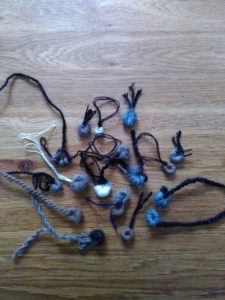
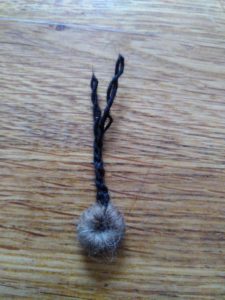
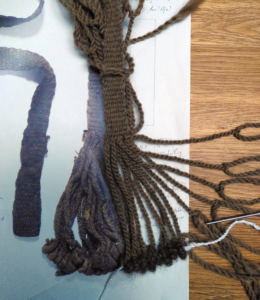
The Egtved Skirt is surprisingly short, with only about 40 cm overall length. Subtract about 2 cm for the waistband, and another c 2 cm for the felted rings on the bottom, and you end up with approximately 36 cm of cords for the actual skirt part.

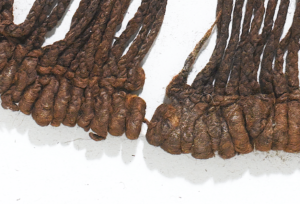
That does not sound like a lot, right? Well, it quickly adds up, however - after all, there's about 350 or so cords in the complete skirt. These cords are very hard twisted, and one way to make this type of cord is to use the twist-and-cross method that was also employed for making bast proto-fabrics, like the mat Ötzi had with him.

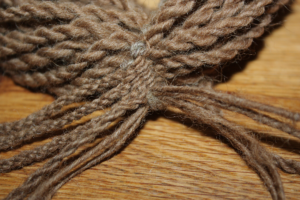
Twist-and-cross means you twist each of your elements in one direction, then cross it over the other in the opposite direction. This gives you very good control and enables you to make a very hard cord with lots of twist and countertwist. Accordingly, the ply angle can be very high. The downside is that it takes a rather long time...

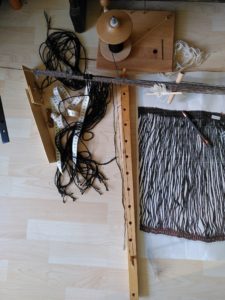
You can see how I do the twist-and-cross on one cord of my skirt in this video:

Datenschutzhinweis

Diese Webseite verwendet YouTube Videos. Um hier das Video zu sehen, stimmen Sie bitte zu, dass diese vom YouTube-Server geladen wird. Ggf. werden hierbei auch personenbezogene Daten an YouTube übermittelt. Weitere Informationen finden sie HIER

I've come a bit further than when I filmed this, but there's still about one metre to go... with the cords. That is a lot of twisting left to do!
0
NOV.
02
0

More Weaving.

There's been some more weaving - I've progressed to about 106 cm from the 155 cm of the section with cords in the corded skirt.

Weaving this skirt, like all kinds of weaving or, indeed, about all kinds of craft work, has its own specific rhythm. I'm vastly enjoying it to settle down into that rhythm when working. Because there's three loops drawn through each shed, and I'm doing two sheds as one section at a time, it's a longer and somehow different sequence than "normal" weaving of a band, or even normal weaving of a starting border (which is what doing the corded section resembles quite a lot).

I'm only doing two sheds at a time to have as little difference as possible in loop length, as I find it makes the following steps easier. The weaving itself is a specific two-hand operation, with my right hand holding the shed open, holding the foundation cord for the loops a bit away from the band with the middle finger, and the first finger hooking the weft and handing it through the shed to the left hand, which pulls the loop and places it over a post on my measuring stick thingie. Repeat this two more times, then change shed, do another three loops, change shed and press in the weft before plying up the individual loops. This starts with the last of the loops from the previous sequence, which was stored and held under slight tension on my left pinkie toe - because otherwise, the tension from pulling the next weft loop will eat this one, and that is not good.

So - first loop to go is the stored one, freeing the pinkie toe to take the first loop from my post. Then the five others get plied up, everything gets placed behind the measuring gadget so this sits right next to the stored loop, and the next sequence starts.

These things are like a kind of a dance, using hands and fingers and in some cases also the feet, or other parts of the body. They take a while to develop, and the motions of different people working may be similar, but everyone will have their own specific movements and quirks and solutions. That, too, is lovely to watch when looking at someone crafting.
0
OKT.
28
0

So many tests.

One of the things when doing a reproduction or reconstruction that always happens? More testing and trying out methods and materials than you'd have anticipated.

There's often that nagging feeling that there might be a better method. Or a better material. So you're looking at different ways of doing stuff, sometimes completely different, sometimes just a slight variation of what you tried before. At some point, though, there's a working method that does, yes, work - and then it's best to stop messing around and stop looking for something even better, even neater, even closer to the original... even though it may be tempting.

The optimal outcome is when you get to do enough testing beforehand that you end up with a really nice method when starting the actual piece... and that, usually, means more preliminary tests than planned for. Especially when it's a small but important thing that, on its own, is made rather quickly, testing it once more, practising it again, and trying out another fibre can be sort of addictive.

Case in point? The wool-wrapped rings on the bottom edge of the Egtved skirt. Yes, I did get some practice in with making such rings on the belt tassel... but they were still rather awkward to make, took a long time, and I was not overly happy with how the fibre behaved while working the rings.

Especially "took a long time" is a key thing here. With more than 300 rings, each minute that one of the rings takes will make a difference of more than 5 hours total work time. One minute adds up. The rings on the original also look very nice and neat... which can be achieved by picking the right wool.


There's a lot of different possibilities to make these rings, starting from what happens with the ends of each cord to how they are inserted into the fibre wrap or how the fibre is wrapped around them. My current favourite process involves a skewer stick, two needles, and longer ends to work the rings, and its end result looks like this:


Here's a picture of some of the original rings for comparison:

[caption id="attachment_6529" align="alignnone" width="300"] Detail from this image from the Danish National Museum.


So... what do you think? Is it a match?
0
OKT.
22
0

Egtved Progress.

There I am, making slow but steady progress! The belt has been finished, and now I'm back on the corded section of the Egtved skirt:


Yes, I'm working on the floor - I put the warp there on a hunch, and I'm very glad now that I took that decision. While it may not seem as comfy for working as seated at a table, it gives me the possibility to use my foot (or, to be precise, my left big toe) to assist with things. The wooden piece you see in the middle of the photo is used to measure off the cord lengths, and I hold both this measuring thing and, on top of it, the last loop pulled through the previous shed, in place with my toe. That way I don't have to do too many loops at once, which results in loops crossing each other, and me having to sort them out again, and/or in distortion of the weave or changes in loop length. This way, I do each shed's loops as a separate batch, pulling them out, then letting them ply up. Then they are put out of the way. After a while of weaving, I've taken a break from that and started twisting the cords; to have something else to do for a change, and to prevent huge tangles from having too many cords to deal with at once (though I suspect that would not happen, really).

The cords are much longer than the ones on the belt end, and quite a bit thinner, so they do feel and behave rather differently. I'm also not yet happy about the rings, there will have to be some more tests to find the right amount of fibre to wrap around to arrive at the proper size and thickness for the rings. Unfortunately there's no picture showing them clearly from all sides, so part of this will remain guesswork.

To the right of my measuring and weaving tool, you can see the to-scale-printout of the original skirt, which serves as my guideline and to check if I'm about right. This is immensely helpful to have, it's so difficult to work just from descriptions and written measurements!
0
OKT.
21
2

Fibre Thickness Measurements.

I've been trying to practice using my digital microscope - by doing some fibre thickness measurements. Like so many things, this takes a bit of getting used to, and is not quite as easy or straightforward as one might expect... starting from getting things focused properly, to taking a good measurement of the rather fine fibres. It would help to have a greater magnification to have less margin for error (one pixel in or out does already make a difference), but then it's even harder to get a proper focus, and there's fewer fibres per image...

Anyway, here's a picture for you so you can see how that looks:


This is the fibre I'm using for the corded skirt, the cord part. I suspect that the measurements I took are a little bit high, because I have another kind of fibre where I know the micron count, and my measurements were consistently higher than the count that was listed... so, well, probably needs some more practice, and some calibrating of my own eye, and possibly I need to move that one pixel inside instead of outside.

Also... taking these measurements is quite time-consuming! Especially regarding the fact that you need to take measurements from about 100 fibres, randomly selected, to get something like a proper histogram of the fleece (or fleece part) that you are looking at. I only took a random sample of some few fibres, and I probably won't go for the 100 for now. There's other things to do that are more important right now (and I know already that the fibre profile of the stuff I can get does not match the Bronze Age sheep...)
0
OKT.
20
0

The End. Of the Belt.

Of course, I got sidetracked - so the belt is not quite finished yet. It is coming along nicely, with its lovely ends, though:


The little rings with their wrappings are quite fun to make, but I think I may have mis-estimated the amount of time they will take... which is not so big a deal for the 28 rings on the Egtved belt, but will add up in an entirely more uncomfortable way with the 340 or so rings on the corded skirt. Well. I will have plenty of opportunity to practice, and hopefully will be quicker as things progress!
0
OKT.
19
0

Cords, Next Step.

Those fancy cords with the wool-wrapped rings at the bottom are not only finishing the bottom of the corded skirt from Egtved, they are the fancy finishing touch for belts as well - for several different belt finds, in fact.

Which means they also adorn the ends of the belt found in the Egtved grave... and I've finished weaving the reproduction of that, and now I'm at the cord-making stage:


The lighter grey thread is the weft thread, visible at the edge of the band; then there's single threads (that is the rest of the warp) and the thicker plies on the upper edge are the extra threads inserted to make the fringe full enough - because the paltry 20 warp threads are not enough by far for a proper, nice, bell-shaped fringe or tassel or however you might call it.

Making these was an enormous amount of fun. It was, however, also a series of movements I'm not quite so accustomed to, so in spite of it being a lot of fun, I had to stop before the thing was all done, because my wrists and fingers started to protest the repetitive twisting movements. Tomorrow, though, will see the thing done and completed!

This smaller amount of shorter cords has also confirmed my suspicions about how the yarn for the corded skirt should be spun and dimensioned in order to make cording as easy as possible, and that is quite, quite hard spun!
0

Kontakt