Latest Comments

Harma Blog Break .
29. April 2024
Isn't the selvedge something to worry about in a later stage? It seems to me a lot more important th...
Beatrix Experiment!
23. April 2024
The video doesn´t work (at least for me). If I click on "activate" or the play-button it just disapp...
Katrin Spinning Speed Ponderings, Part I.
15. April 2024
As far as I know, some fabrics do get washed before they are sold, and some might not be. But I can'...
Kareina Spinning Speed Ponderings, Part I.
15. April 2024
I have seen you say few times that "no textile ever is finished before it's been wet and dried again...
Katrin How on earth did they do it?
27. März 2024
Ah, that's good to know! I might have a look around just out of curiosity. I've since learned that w...
APR.
01
0

Riding Slits, Part 2.

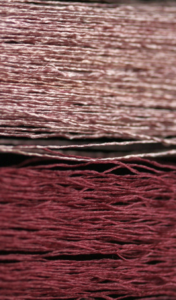
Here's a comparison of a mockup tunic with slits cut in, with and without middle gores around those slits: 

Simple tunic with riding slit cut in, from left to right: front view without middle gore, with middle gore, back view without middle gore, with middle gore.

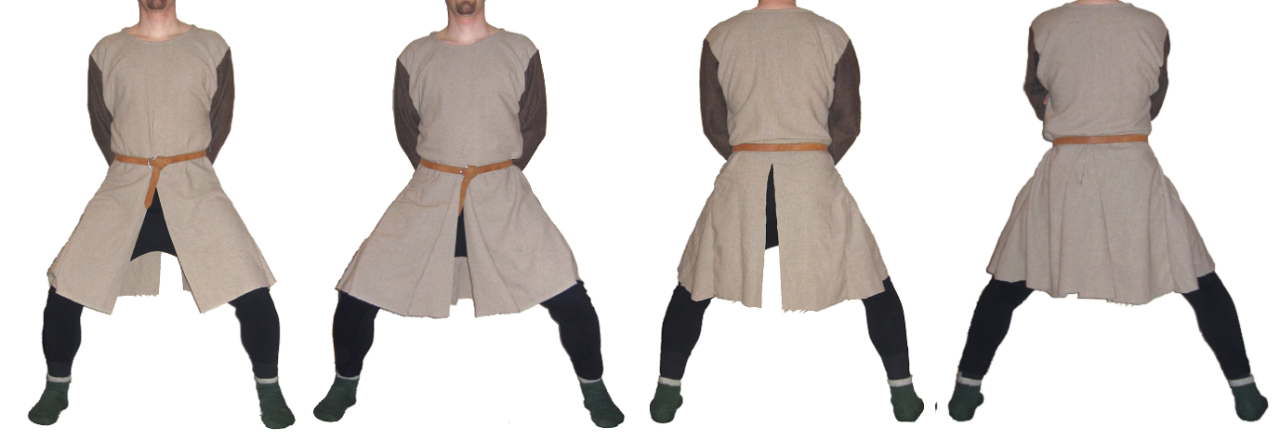
Well, the horse is missing from those images (due to lack of handy horses around here), but you can see that the slit functions, of course, in both instances - with and without a middle gore. However, the version with gores remains much more "closed" even in the riding position. Especially noticeable in the view on the back, where the slit is not visible even in this leg position.

The whole issue gets properly interesting, though, when you are standing normally:

From left to right: front view without gore, with gore, back view without gore, with gore.

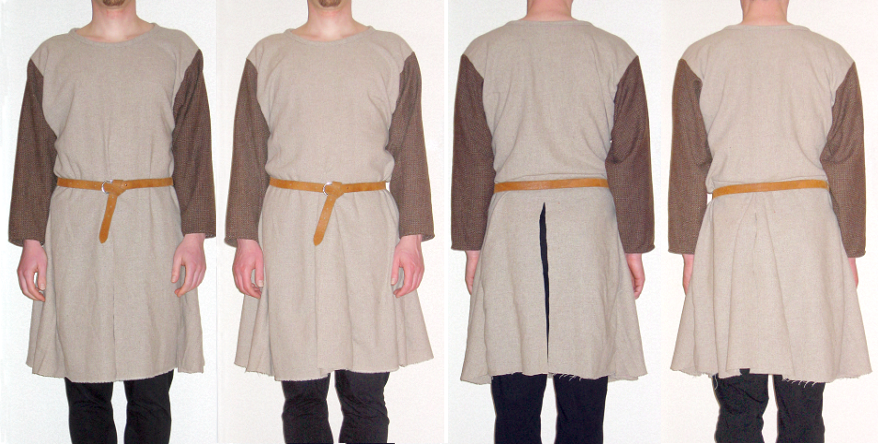
As you can see, the tunic does not close properly at the back if there's no middle gore inserted. This is standing position; the slit issue gets worse, and more noticeable, once the wearer starts to move - when walking or running, the slit will gap open, unless you insert the middle gore.

So that's something you'd definitely want to do for your coverage. Not only to avoid flashing your undies, but also because the slit, staying open, will make things rather drafty in cooler weather!

What you can also see in those standing position pictures is that the fall of the tunic changes with the insertion of the gores. This is significant because riding slits are closely related to riding, which means horses, which is an expensive and status-y thing to have not just today, but also in the Middle Ages. Owning a horse that is used for riding is not something everyone can afford.

Consequently, if you're wearing a tunic with riding slits, that indicates that you have a certain amount of wealth, being a horse-rider. If that changes the fall of your tunic... it's not a big thing to insert a middle gore, with or without slit, leading to the same fall of the tunic regardless of being a horse-rider or not. So that could be an explanation for the middle gore to be found in men's tunics, whether slitted or not, but not in women's dresses. 

From the archaeological record, I know of no garment that is certainly associated with a woman with middle gores set in. There's piecings for panels in some of the later dresses (like the Golden Gown of Queen Margaret) that sit in the center front, but they do not change the fall and drape of the garment away from the straighter, more slender silhouette in the front. The fall-changing middle gore is never present. There's also no example of a slit tunic without a middle gore. 

To me, this makes perfect sense - you do not need a riding slit in a woman's dress (the bunch-up problem is solved differently, if the woman does ride a horse), but you want the slender look that is easier to achieve with a straight front and back panel in your dress. In men's garments, if you cut in a slit, you definitely need the gore to cover up the unmentionables; that changes the tunic to give it a different fall and drape. That, in turn, may have been associated with a "manly" look, or with higher status, or both, and said associations probably led to the universal adoption of the middle gore in men's garments.

1
FEB.
22
0

Ponderings on Patterns.

From time to time, I get asked if I have a pattern for this or that piece of clothing - to which my usual answer is "No, because there were no patterns in the modern sense used in the Middle Ages". Exceptions may apply for items such as hoods, where it's easy to take the pattern from an archaeological find, and which fits a range of head, neck, and shoulder sizes, and not-really-fitted garments such as high medieval breeches, which are rather huge and don't need a lot of measuring.

For dresses and other fitted items of clothing, though, such as hose? In my opinion, it does not make any sense to offer a pattern in the modern sense for these - because their construction, as it can be reconstructed, did work completely different. To get a result close to what the original garments were, it makes much more sense to follow the procedure that was probably used for the originals than to try and use the industrial, post-19th-century approach to clothes, in graded sizes on paper patterns.

Generally speaking, for the historical construction of garments, you take some key measurements and transfer them to the fabric straight away. It's not even necessary to have a measuring tape for this, you can do it with a piece of string (measuring tapes are a rather late invention as well, at least I was not able to find any evidence for them from earlier than the 17th century). Your building bricks for the garments are geometrical shapes, which means they are easy to cut out of the fabric, and final tweaking takes place straight on the body. In case of the more involved, very tight-fitting garments used in the late Middle Ages, or in case of really expensive fabrics, this cut-then-fit approach can be done first on the lining, and then the lining fabric used as a template for the upper fabric.

The huge advantage of this approach (apart from being much closer to the original method, and thus much better suited to get results that look and fit more like the originals fit their original wearers)? Different body shapes pose a much smaller problem than when you have graded pre-made patterns. Human bodies are quite different from start, and they tend to take on even more different shapes if weight is put on, which is definitely an issue today (it would be interesting how many overweight people there were in the Middle Ages, but that's an entirely different topic and not really relevant for now and here). These very varied ways on where extra fat is stored is one of the reasons why it's much harder to find well-fitting garments for people that are overweight or adipose; some people carry most of the extra weight in the legs, some in the butt, some around the middle, and these differences make for very different shapes, so basic pattern grading will not work properly anymore.

So I'm always a bit to very sceptical when I see "patterns for medieval dresses" somewhere. In my personal experience, a lot of the patterns will not work properly, because - as explained above - the approach is just too different. It's especially, um, "interesting" if the pieces in question have not been published completely yet... as is the case with the Lengberg bra. Apparently this skirted bra has been turned into graded patterns which are now available at a site called Reconstructing History. Apart from the fact that if you use the search engine of your choice to look for reviews of patterns from this place, you'll find a lot of people telling you that they are badly documented, badly graded, and come with not-so-great instructions, I can tell you that the members of the Lengberg research team do not endorse this pattern. It was produced without their co-operation or consent, and they do emphasise that it was made without direct knowledge of the original garments or their patterning.

The Lengberg research team is working on a publication on the garments, and as far as I know, they are also going to make their reconstructions as accessible (and re-tailorable) as possible. I know that patience is hard... but it's probably very well worth it here.
0
FEB.
10
2

Gummy Silk - The Adventure Goes On.

Well, I definitely got your attention with the gummy silk thing yesterday!

First of all, here's a better picture of the two silks side by side:


Now to the answers to all the comments yesterday...

Jessica's comment was:

That's really interesting! And it probably explains the deep colours we see in medieval embroidery. And how they were able to do couching over padding with a relatively thin thread and still being able to force the gold threads into place and keep them there. How does this partly gummed silk compare to modern Chinese flat silk? That's my go-to silk for medieval projects as it produces embroidery with a slight wavey texture as seen in medieval embroidery.
The gummy silk is quite a bit stiffer than the de-gummed one. The flat silk that I know is much more prone to snagging on anything that looks like it might be rough, but I haven't been able to do a proper comparison with similar silks yet. The gummy sample was a bit of the Texel stocking silk, which is a four-ply silk with slightly twisted singles, the de-gummed was flat silk (my embroidery silk). I have flat gummy silk here, but it's much thinner than the embroidery silk. On my list is trying to make a thicker thread from it, similar in size to the embroidery silk, and see how that compares. That will involve some winding first, though, and fortunately-unfortunately I'm a bit too swamped with other things right now to sit down and do that.
My guess would be that the textures the gummy silk will result in will be a bit different from the degummed one, but how much? That would need some investigation...
Beatrix wrote:

I wrote an article a while ago where I came upon twisted medieval silk. This is from my article:
Lisa Monnas and Roberta Orsi Landini wrote on S-twisted silk threads: ´fourteenth-century velvets usually have Z-spun main ends…but from the late 1420s their [i.e. Italian velvets] main warp threads were generally S-twisted. In contrast Ottoman velvets of the late 15th and 16th centuries generally have Z-twisted main warp threads´ (Monnas 2012, 15); ‘the finest silk thread was used for the warp: strong shiny silk organzine, generally made up of 2 S-twisted ends’ (Orsi Landini 2017, 15-16).
Monnas, L. (2012) Renaissance velvets. London: V&A Publishing.
Orsi Landini, R. (2017) The velvets in the collection of the Costume Gallery in Florence / I velluti nella collezione della Galleria del costume di Firenze. Riggisberg and Florence: Edizioni Polistampa.
So even reeled silk seems to have been twisted - at least a bit.
There's definitely silk with twist - sorry if my post sounded like there was only the untwisted version. Organzine, which is a 2-ply from more or less twisted singles, is also still used today as fine silk for weaving. It's much less prone to snagging than untwisted single, and still has a very nice shine to it.
The silk with very little or almost no twist is an exception, usually there's at least a bit of twist in there. Some is already added (or can be added) when reeling it off the cocoons. Usually, that small amount of twist makes no difference whatsoever - unless you're doing something like the Albecunde belt, where there will be an optical difference between the two tablet turn directions. That belt only works as wonderfully well as it does. Embroideries also usually seem to use really flat silk with no appreciable twist, though a little bit of twist there will not have too much of an impact, at least according to my experiences - plus you can always twist the needle to add or remove twist if it does.

Finally, Florence asked:
How does one de-gum silk?
There's several different ways to do it; you can read more about how the process works here (where different methods used in the industry are given).

The classical method is to boil it off with soap, typically Marseille soap, which is based on olive oil. Which is also what I used for the de-gumming test I did today with a bit of the Texel silk.

[caption id="attachment_6739" align="alignnone" width="300"] 
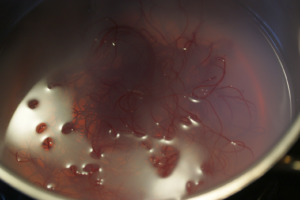
During the de-gumming process - it's starting to lose some of the colour to the soap soup.


It's hanging out to dry right now, so proper colour comparison may only come later. I'm just as curious as you are!

0
NOV.
09
4

Modern Tools For Reconstruction Work?

Following up on the cording and cording tool use discussion - here's a few thoughts about modern tool use for reproducing ancient or old things.

In an ideal world, if you're doing a reconstruction, everything would be as it was in the original - same materials, same processes, same tools. However, that is usually not possible - due to a number of reasons.

Sometimes, getting materials that correspond to the original material is not possible. That is especially the case when working with plant or animal materials that have been undergoing selective breeding for a few hundreds, or thousands, of years since the original item was made. You don't get the medieval varieties of food crops these days anymore (maybe with a few very rare exceptions), and if we're looking at animal materials, whether bone from cattle or wool from sheep, there's been a huge lot of change as well. So compromises may be necessary starting with the material, which will, of course, have an influence on the finished piece.

Using the original tools and processes is the next part that can turn out to be more difficult than one thinks at first. First obstacle is that we often don't know how, exactly, something was made. With a lot of textile work it's possible to use different processes and different tools to arrive at the exact same outcome. You will not be able to tell whether a yarn was spun on a spindle or on a more modern spinning wheel if the spinner takes care to match the properties of the original thread, for example. Same thing applies for a woven fabric - if there's no tell-tale things like a starting border, how could a bit of fabric let you know what loom type it was woven on?

For purposes of research and experiential archaeology (and in some cases, if there's a question to answer and the setup is done accordingly, even experimental archaeology), it would of course be preferable to use tools and processes that are known for the period the original item comes from. However... when a reproduction is commissioned, there is often a limit to the amount of time available before the thing has to be finished, and - even more important - there is also a limit to the amount of money that can be spent on a single item. Both these constraints will make speeding the whole thing up a very attractive, or very necessary, thing.

So while I enjoy working with old methods and reconstructed tools, personally, I have no problem whatsoever with using modern gadgets for my reproduction work if there will be no perceivable difference in the end product. Using an e-spinner for making yarns, or a modern cording tool for making cords, or a treadle loom instead of a warp-weighted one for weaving plain fabrics, these are all things that can still result in a reproduction that is as close as possible to the original while cutting down on costs a lot. And I personally do prefer to make these compromises in the process to make repros more affordable, thus getting more of them out into the world, for people to see and touch and experience, than having a "perfect" replica made once in a blue moon.

Though if you should know of someone wanting to have something made using all old reconstructed methods only - do send them my way, I'd be happy to be part of such a project, too!

 
0
OKT.
29
0

The Answer... Once More.

I've made more progress on the corded skirt, even though it's not very visible. That is mostly because most of the time spent on this project today went into spinning more yarn for the cords...


but there was a bit of weaving, too. I'm now at about 42 cm (the Answer!) of 155 for the corded part. I'm also making "progress" on my podcast backlog list, because both spinning and weaving are a very good opportunity to listen to all these stories and discussions that I have in my subscription list.

It is a lot of fun to weave, and cord, this skirt, but it is taking its sweet time. Also, after a while of sitting on the floor in the weaving or cording position, I really need to remember to take a break to stretch and move a bit. Otherwise I'm feeling it when I finally do get up... it's a slightly weird working position in both cases, and it does take its toll on the hips after a while.

It also does take a good bit of concentration to get everything done as it should be - so I am looking forward to the extended weekend a lot now. We have a bank holiday on Monday here in Germany, so I'll be back on the blog on Tuesday.
0
OKT.
28
0

So many tests.

One of the things when doing a reproduction or reconstruction that always happens? More testing and trying out methods and materials than you'd have anticipated.

There's often that nagging feeling that there might be a better method. Or a better material. So you're looking at different ways of doing stuff, sometimes completely different, sometimes just a slight variation of what you tried before. At some point, though, there's a working method that does, yes, work - and then it's best to stop messing around and stop looking for something even better, even neater, even closer to the original... even though it may be tempting.

The optimal outcome is when you get to do enough testing beforehand that you end up with a really nice method when starting the actual piece... and that, usually, means more preliminary tests than planned for. Especially when it's a small but important thing that, on its own, is made rather quickly, testing it once more, practising it again, and trying out another fibre can be sort of addictive.

Case in point? The wool-wrapped rings on the bottom edge of the Egtved skirt. Yes, I did get some practice in with making such rings on the belt tassel... but they were still rather awkward to make, took a long time, and I was not overly happy with how the fibre behaved while working the rings.

Especially "took a long time" is a key thing here. With more than 300 rings, each minute that one of the rings takes will make a difference of more than 5 hours total work time. One minute adds up. The rings on the original also look very nice and neat... which can be achieved by picking the right wool.


There's a lot of different possibilities to make these rings, starting from what happens with the ends of each cord to how they are inserted into the fibre wrap or how the fibre is wrapped around them. My current favourite process involves a skewer stick, two needles, and longer ends to work the rings, and its end result looks like this:


Here's a picture of some of the original rings for comparison:

[caption id="attachment_6529" align="alignnone" width="300"] Detail from this image from the Danish National Museum.


So... what do you think? Is it a match?
0
OKT.
25
0

The Belt, Finished.

The belt has finished drying after its final soak now - so it is all done and ready now!


It was not hard to do - not the weaving, nor the cord-twisting, nor the ring-making, though all parts had a little tendency to be fiddly. The wool was slightly sticky (which was remedied with the application of some size), twisting the cords took a bit of time until my fingers got back into the smooth action, and wrapping the end rings with fibre did turn out to be the fiddliest thing of all of the process.

I will definitely look into improving my method for the many, many ring ends on the skirt! At least after some more tries now I know that the fibre has an immense influence on how the wraps look, and how easy they are to make. Which means that I might end up using a different wool fibre than the one I had planned to use, as the results are just so, so much better.

It's amazing how sometimes small differences between materials can have a really, really huge impact. Have you had a similar experience with two kinds of wool that appeared not so very dissimilar at first glance showing very different behaviour, or very different outcomes?
0

Kontakt