Latest Comments

Guest - Aislinn Dyestuff Citizen Science.
09. Oktober 2026
This is a great project. I look forward to the results. Thanks for letting us know.
Guest - Aislinn Time for...
09. Oktober 2026
Looks delicious!
Guest - Katrin Sprang Discussion
18. September 2026
Hi Rachel, I have looked for more photos of you, but that was not very successful. I found a link on...
Guest - Beatrix Sprang Discussion
15. September 2026
That lozenge pattern element is not a photograph, but a scan. So it should be to scale. But I pinned...
Guest - Katrin Sprang Discussion
15. September 2026
I was not referring to Rachel's reconstruction (is the reconstruction you refer to the one photograp...
MAI
24
0

The more you look...

I've been looking, again, at headwear in medieval women - a thing I already did what feels like ages ago. Back then, I ended up with a reconstruction on how to do a barbe and fillet that I found satisfactory. I also looked at headscarves or kerchiefs or however you want to call them.

There's so, so many of these images in manuscripts that it's probably impossible to look at them all. Many of them show similar styles, with some rather typical arrangements of the ends of the headwear, and typical arrangements of the folds - so it seems like there were a few more or less common types, or common (or similar) ways to arrange the cloth on the head.

In some cases, you can see very nice regular folds on the forehead and at the sides. My interpretation of this is sewn-in folds - which will form a rectangular piece of fabric into something more bowl-shaped so it will fit (and sit) nicely. I've sewn folds into my headcloth for a long time now, and it really works very well.

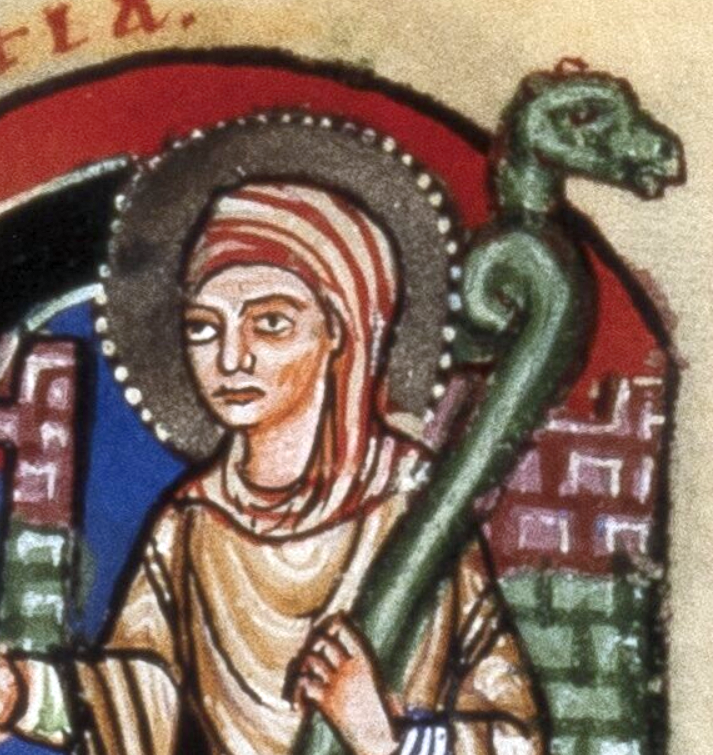
But then, there's also images like this:

Fol 14r of Ms 105 Noviss 2f, Wolfenbütteler Digitale Bibliothek.

The image is from the Evangeliar Heinrichs d. Löwen und Mathildes von England (Cod. Guelf. 105 Noviss. 2°), and there's a lot of similar headdresses in there. Which makes me wonder... what material was used? How would you get folds like this? How are they fixed? Is that cloth tucked behind one ear, or is it just coincidence? So many questions.

Some trials may have been going on here... I've not arrived at a good solution yet, though.

0
MäRZ
01
0

The Syke Presentation is Online.

If you'd like to watch the presentation I gave in Syke - here you go! It's all in German (sorry English-only speaking readers).

It wasn't possible to do a livestream, but I'm delighted that there was the possibility to make a recording, and put that online. I hope you'll enjoy it - I certainly did!

0
NOV.
29
0

Tales from Forum, Part II

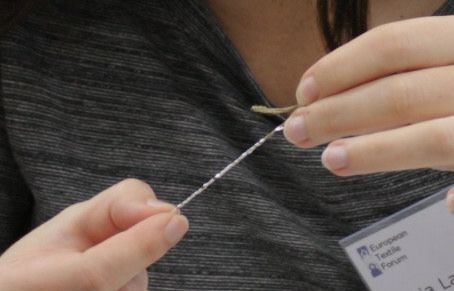
Not all that glitters is gold - sometimes it's just gilt silver, hammered into leaf metal, attached to a thin animal membrane and then wrapped around a thread core.

You might know about medieval gold thread, which was usually a strip of metal (often gilt silver, very rarely pure gold) wrapped around a silk core. Well, that's the "good" version, high-quality and rather pricey. And as always, if there's something posh and fancy and expensive, someone tries to get the same effect but for cheaper.

Enter the membrane threads. These are usually not around a silk core, but around a thread made from vegetable fibres, and the metal strip is replaced by animal membranes or, in other places, by a thin leather strip or by a paper strip. These are metallised with leaf metal, and here again, you can make it cheaper by reducing the amount of gold. How? By using "Zwischgold" - silver hammered out, then covered with a thin layer of gold, and this then hammered into leaf metal. 

Gold leaf is really, really thin, so thin that you cannot touch it with your hands. It will instantly cling to your skin and then dissolve. Medieval gold leaf was thicker than modern gold leaf, but it would still not be handle-able without gilding tools. Gold was expensive - so having the cheaper silver as the main metal and just adding a bit of gold would reduce costs considerably. New research about Zwischgold shows how it looked, and the thicknesses given are about 30 nm of gold in the Zwischgold as opposed to c 140 nm thickness of the regular gold leaf. 

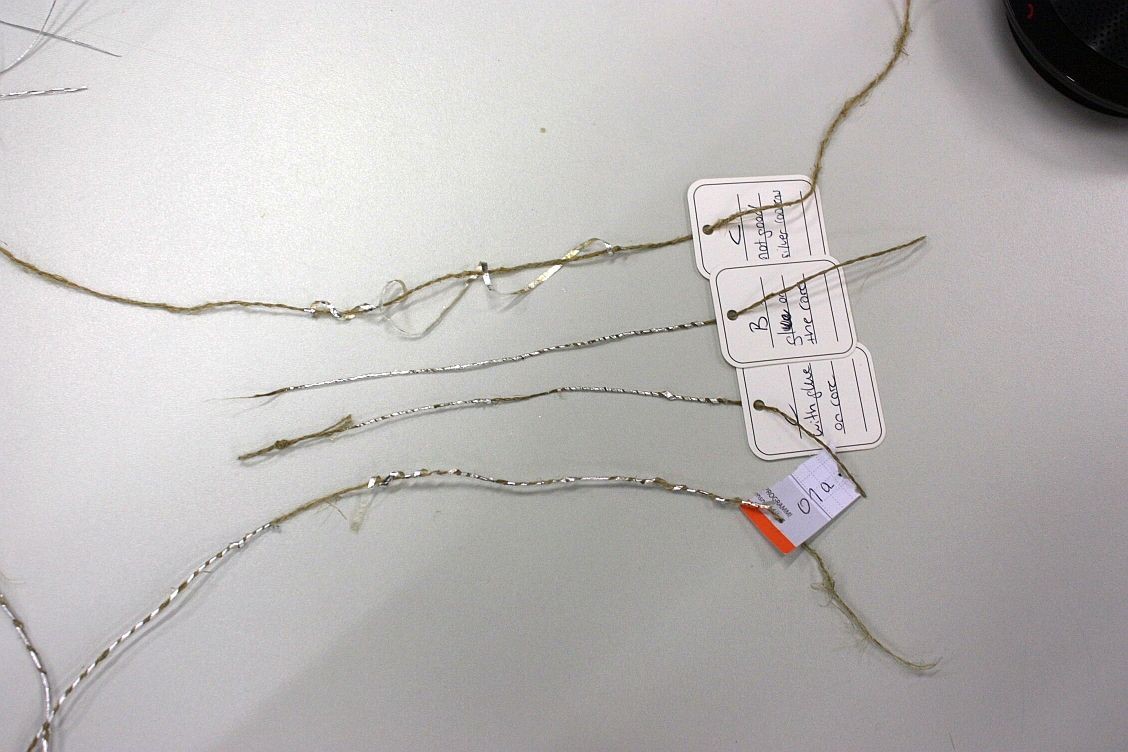
This superthin stuff needs something to cling to, so it is stable enough for further processing. In the cheap gold threads that we were aiming to reproduce, animal membranes were used - to be more precise, a layer of membrane from bovine guts. 

So we had a go at silvering them - using not proper Zwischgold, but leaf silver, since that was a lot cheaper to get and is closer to the medieval original material. Then the membrane has to be cut into strips, and the strips then wound around a core, all of which proved to be do-able, but with a lot of room for improvement.

Both the gilding and the wrapping did require a lot of concentration! It also took us a while to puzzle out a method with which a longer piece of thread could be wrapped without getting too much of a twist buildup. 

A final very important part of making these threads, as we also found out: Time. Once the metal is on the membrane, it needs sufficient time to dry out properly, or it will come right off the membrane and right onto everything else - fingers, faces, tables, you name it! With enough drying time, it is much more stable.

Just like with the purple dye imitation, a good bit of work remains to be done on this, but we're very, very pleased with our preliminary results.

0
OKT.
25
0

More on the Cloak.

With all the many things going on, I never got around to posting a photo of the Trindhoj cloak after sewing on the many, many, MANY loops of thread.

Did I mention there were a lot of them? There were a lot of them. The cloak is rather large, with about 3 m width along the straight edge, and it is all over covered with these loops. Oops. (Sorry. I still get a little silly when I am reminded of all the loopy stitiching.)

The original cloak shows the remainder of stitched- on threads, spaced apart but not very widely spaced. There's not too much left, and it's not described in detail in Hald's publication, so I mostly went by the image available from the Danish National Museum website and some photos I was sent by a colleague. 

Because there's only bits of the threads next to the stitches left, we don't know if they were loops, or individual threads, and we also don't know how long they were. I wound the thread around my hand when stitching to have a similar length for all of them, and to have the loops long enough to overlap the next row below.

A test piece that I made, with loops cut open and loops left closed, looked quite differently after washing in the two parts. The opened loops had acted like you could expect of single yarns and fluffed up considerably, but also lost a good bit of their twist, so they seem quite vulnerable to wear and tear to me. The loops that had remained closed had mostly plied together, keeping the individual loops stable.

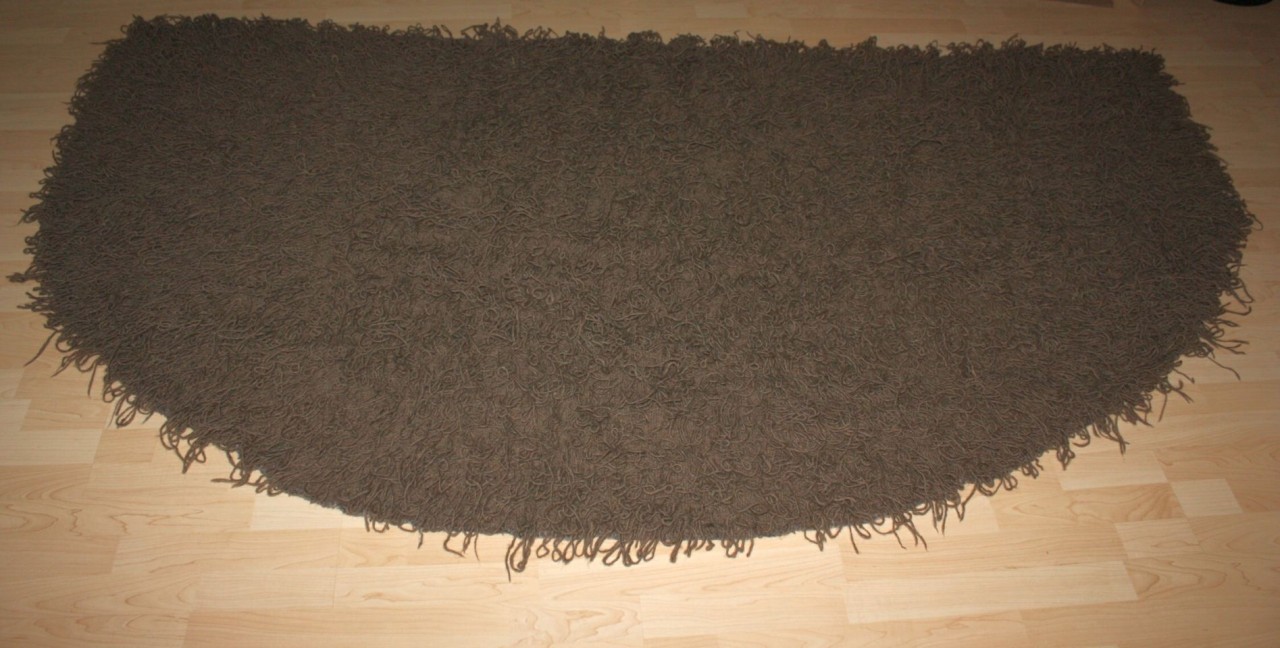
The photo above shows the cloak after finishing the sewing work, but before its final bath. It looks a bit like one of those shaggy carpets that were in fashion a few decades ago... 

It's also, not-really-surprisingly-but-still-surprisingly heavy. Unfortunately I completely forgot that it might be interesting to weigh it before and after stitching all those loops, but I used up almost all of the extra yarn that I had spun, which was a generous amount, and it's quite heavy now. It will settle nicely on shoulders, though, and I can absolutely imagine somebody showing off his (or her, maybe, though this item was found in a male grave) riches.

It is a lot of spinning time and a lot of weaving time that went into this piece, and then a lot of stitching time as well. We know from weft crossings in the original that several weavers worked on this together, and I can well imagine that several spinners worked on the yarn for this (or one spinner for quite a good bit of time).

0
AUG.
12
0

Revisiting, Re-Making, Part 2.

There is, of course, also the issue of... underwear. With the dress I wrote about goes a specific underdress, also a reconstruction, and also one that was probably not made of one hundred percent good choices.

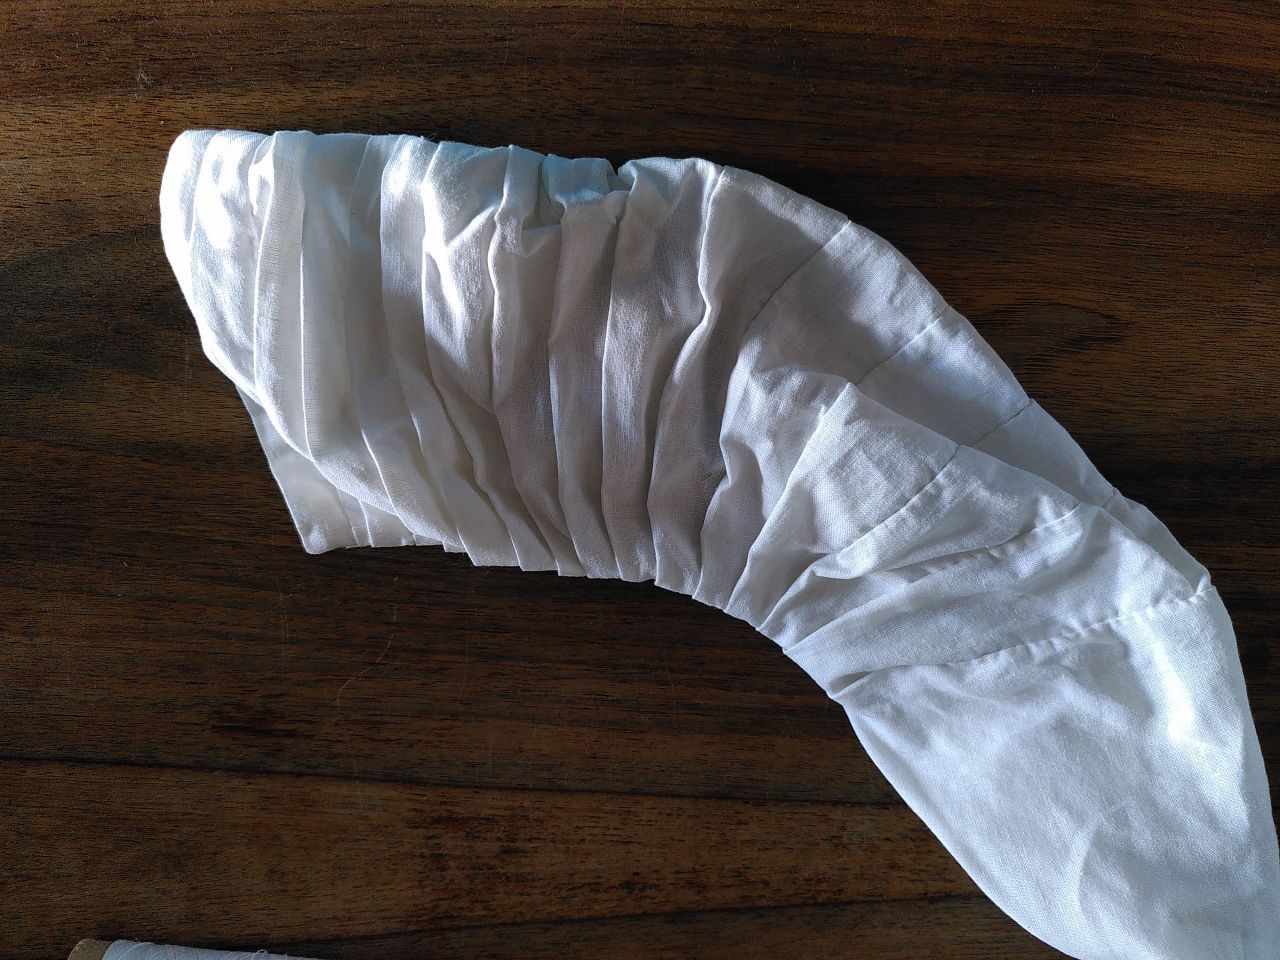
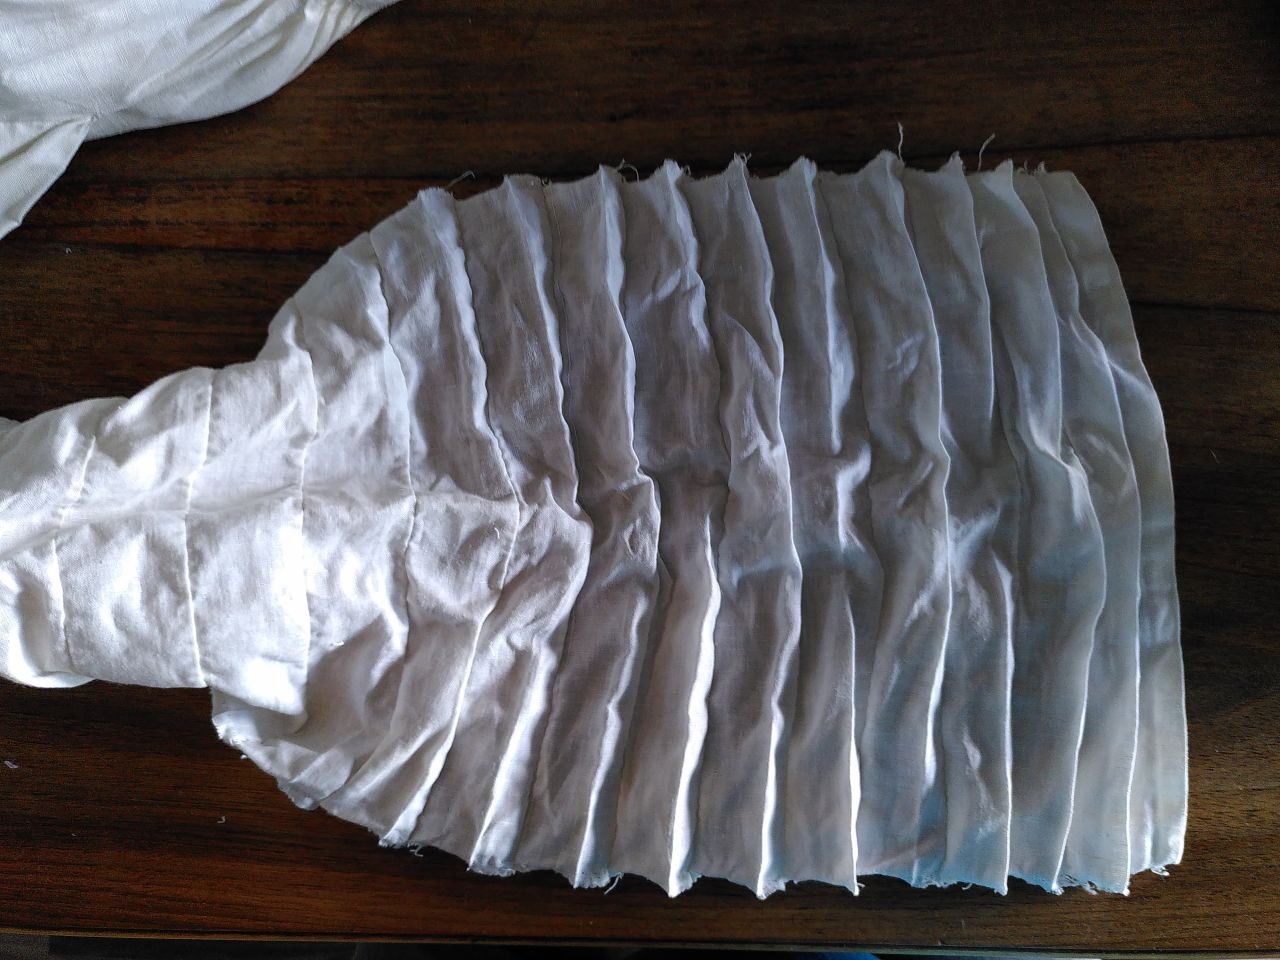
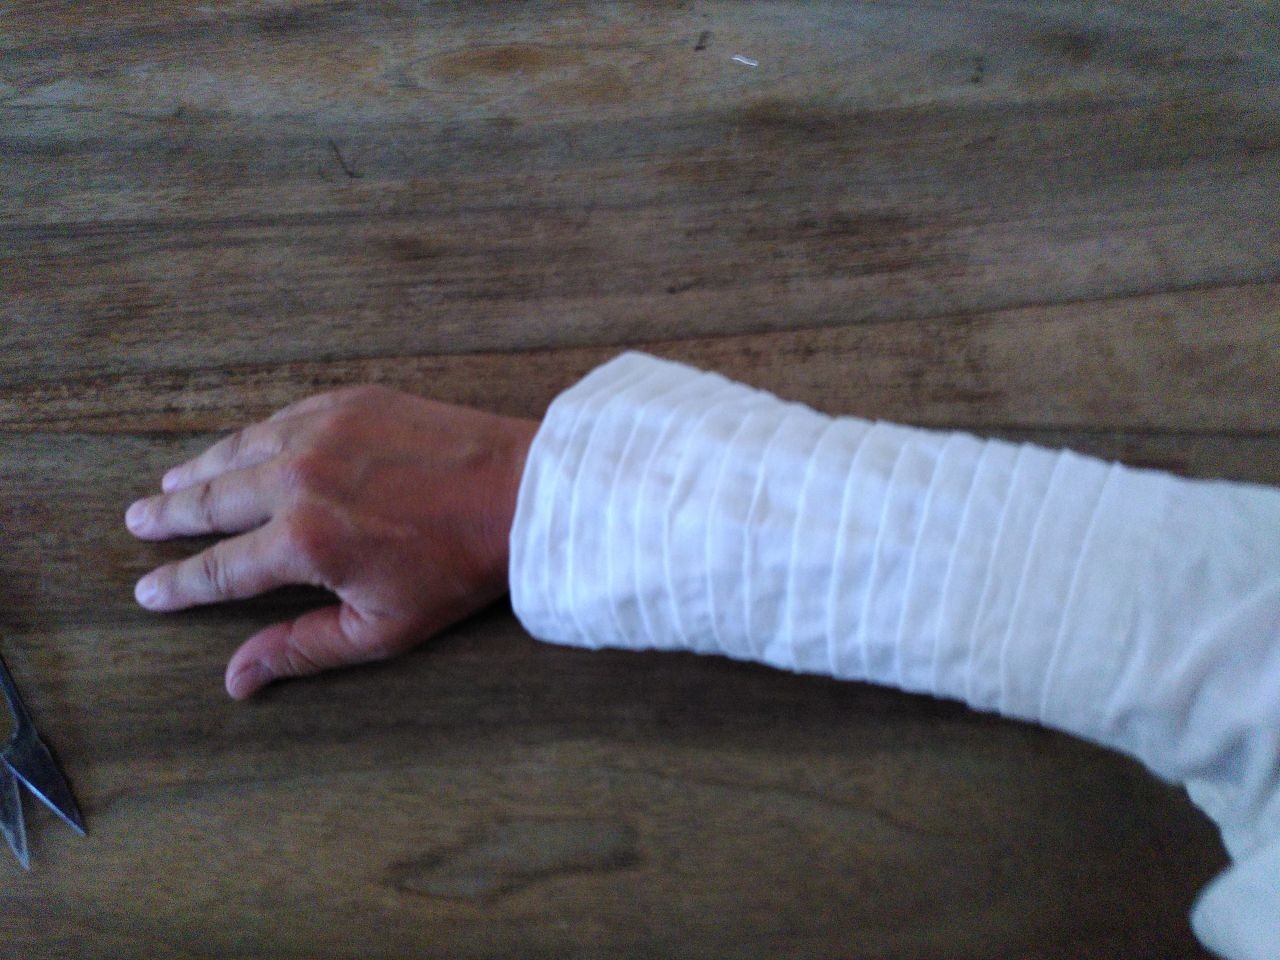
When I looked at images of the dresses with the pendant sleeves back when I did the reconstruction, most of them showed a kind of pleated sleeve on the women's underarms. So I went and did a pleated underdress with a pleated sleeve - preparing the pleat lines by drawing a needle tip through the fabric and then pressing the pleats in with a glass slickstone.

It did work quite well, but after washing, the pleats do mostly fall out. That's not such a horrible thing on the body of the underdress, as the pleats are only, if at all, visible at the neck opening, but the sleeves... well.

After fiddling around a bit with re-pleating them, trying out various methods and sequences and even using a (modern) iron, I did come to the conclusion that the easiest and nicest way to get the problem fixed would be sewing in the folds.

There was a bit more fiddling and then the additional insight that it would be much easier to get the folds in properly with less fiddling and more space to work. So I un-did the seam holding the underarm part together, unfolded all the thing, and then set to work sewing in the pleats.

It was still a little fiddly to sew them in, especially towards the top (where, thanks to the still complete seam, the sleeve wanted to curve) but it was much less obnoxious than trying to get everything sorted with the seam in. And in the end, I was successful - the pleats are not completely regular, but I don't really mind. They are in, they are fixed, and I will be able to wear a properly pleated thing on the weekend of the demo... 

1
AUG.
11
1

Revisiting, Re-Making.

Many years ago,back in the twothousands, I did a reconstruction of a dress from c 1200 with long pendant sleeves - a variation that can be seen in illustrations from that time.

Back then, I was still a student, so the budget was limited. That led to the use of a chemically dyed fine wool fabric. That is still something that I'm fairly okay with; the colour may not be the perfect woad blue, but the fabric is, altogether, something I'd still see as acceptable for a dress in that style. It's a very fine wool fabric, densely woven, and dyed an expensive colour - it will pass.

What would not pass, however, is the decorative band that I had sewn to the edges of the sleeves and the neck opening. It was a tablet-woven band. That, per se, might be okay... but it was woven in linen (chemically dyed, of course). Even worse, it was a very simple threaded-in pattern in the typical modern 4-forward-4-backward-sequence... so not acceptable at all.

The dress got a bit of wear when it was fairly new, and then it spent a lot of years in the wardrobe due to different reasons. One reason was that I'd wear more practical, more common-person dresses for my work at the market stall. The posh dress is surprisingly comfortable and it's perfectly possible to move in it, but it's still not the thing I'd choose to wear for getting the housework done. So simple, plain dresses got worn instead. There also was a timespan when I would not have fit into that dress... which I now do again.

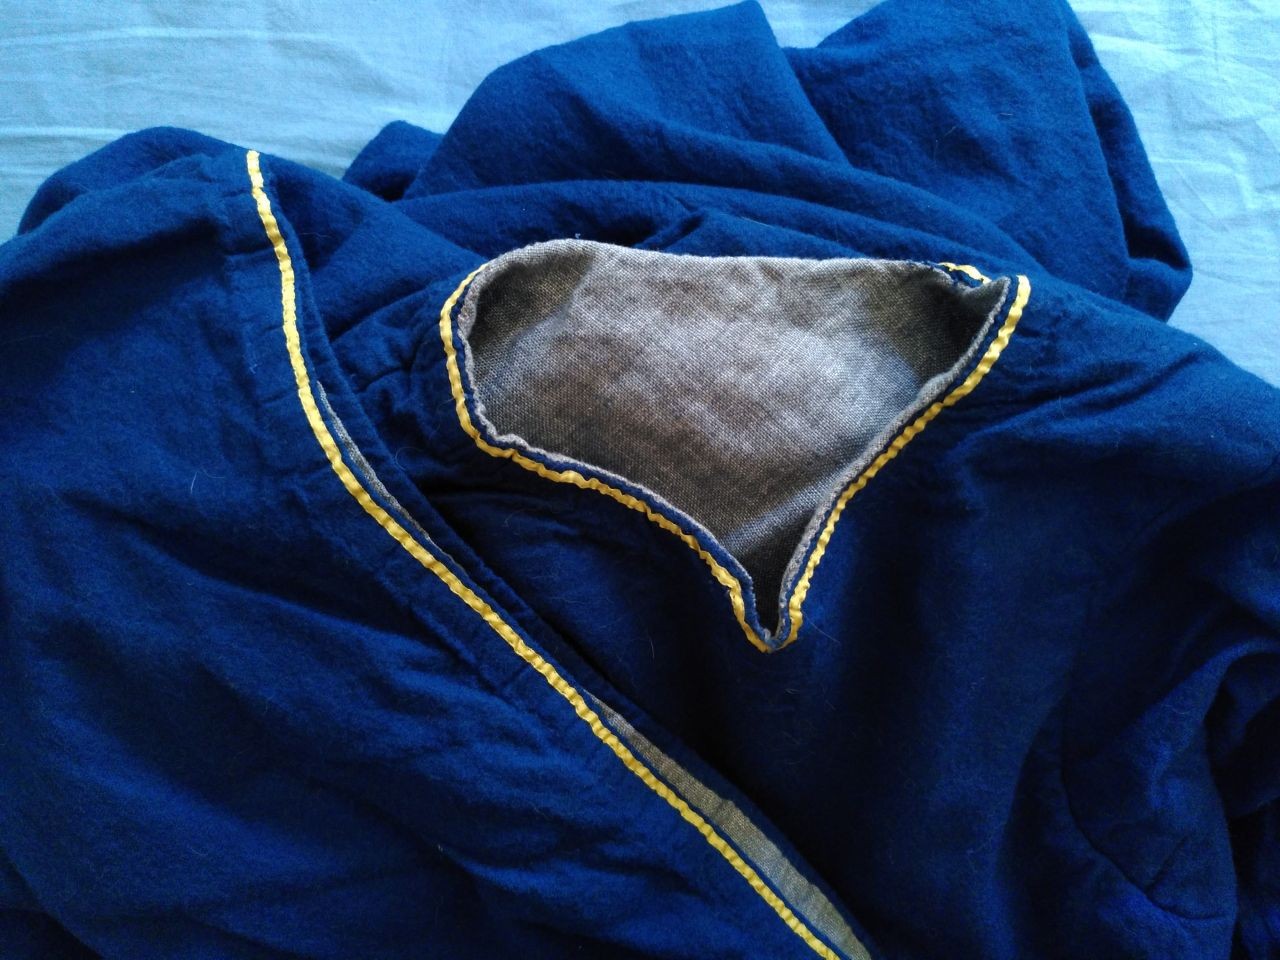
As this year's Archäotechnika is about the medieval elite, though, I took the dress out of its storage, and got ready for a little bit of updating. The old band was removed, and instead I stitched a plant-dyed silk band onto it. 

The updated neck opening and part of the sleeve. The yellow is a really nice contrast for the deep blue...

There was the temptation to decorate it with a band woven in silk and gold, but the one I have was, sadly, a bit too short. Plain fine silk is not as posh and valuable as the gold-and-silk band, but that sort of fits in with the dress itself being wool and not silk, if you ask me. I'm going for "noble, but not filthy rich" here, sort of. 

I'm still debating if I should add a second band with a little gap in between the two...  should I?

0
MAI
06
0

Egtved Update.

Here's a little bit more about the Egtved project - which is sort-of-half finished now. Sort-of-half because there are the men's garments to be finished, and they might be more than half the complete work time altogether. I strongly suspect that, actually. (I also should probably get them their own tag, as it's not Egtved but Trindhøj, and it would be a little weird to list them under Egtved.)

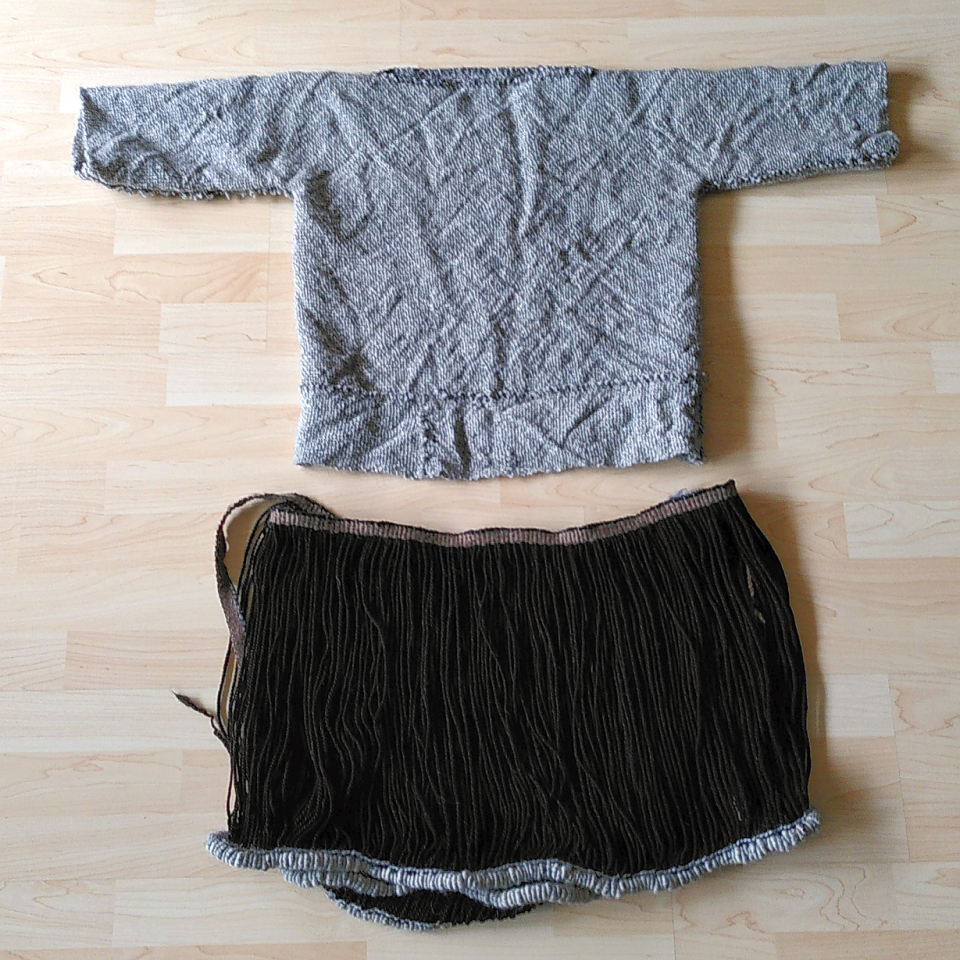
So... the blouse is finished, and with that, the whole set of garments is ready to be photographed for a final documentation, then packed up and sent off to the museum. It's been very interesting to sew that blouse, and it's also interesting to wear (because of course I tried it on...)

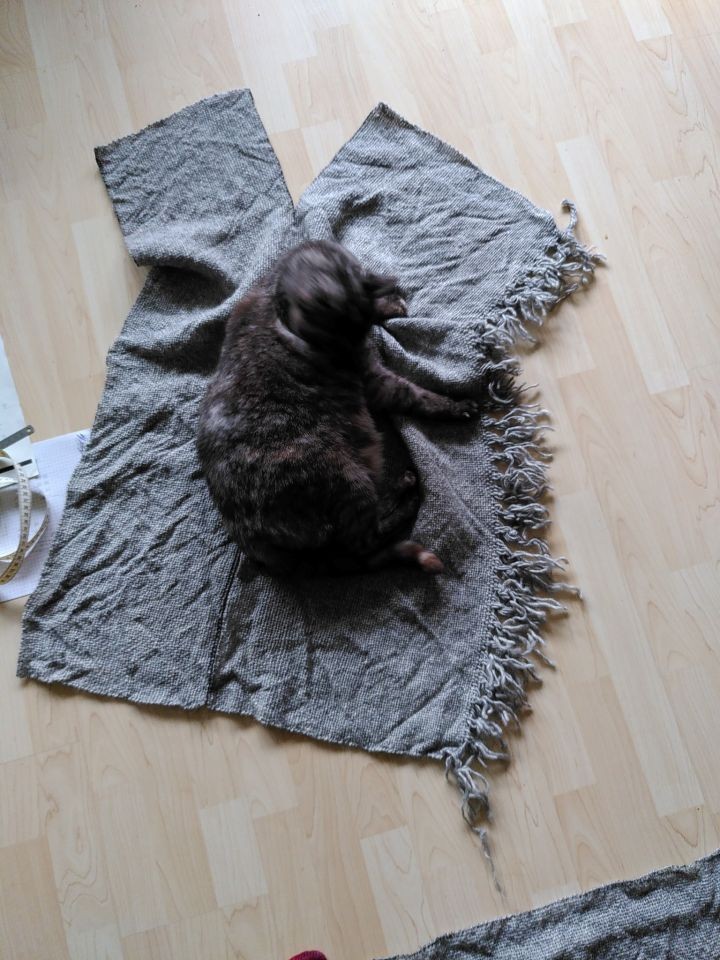
I had gotten all ready to cut the piece, with the measurements taken off the Egtved documentation, and then that nagging feeling got the better of me, and I cut and sewed a mock-up first, using the original measurements. Turns out it was a good thing I did, because the Egtved girl was just that: a girl, aged 16 to 18 years according to estimates from her dental status. Meaning that she was not so tall, and also must have been quite slender, appropriate to her age. 

She's estimated to have been 160 cm tall, and I am 163 cm. I can just fit into the mock-up blouse, though it takes a bit of wiggling to get in, and it's not wide enough to comfortably fit me, especially since my breast circumference is a bit more than the approximately 86 or so cm the original has. (It will squeeze in, as breasts are squishy to a good extent, but it's not really fitting well that way.)

That means the piece would not be wearable or try-on-able for a lot of people... and comparing it to the two other finds of similar blouses, the one from Egtved is by far the smallest. The other two have about 98 cm circumference in the torso part. So after checking back with the museum, we decided on using the Skrydstrup measurements as basis for the piece, making it large enough to fit a German size 42, approximately. I stayed with the slit-like neck opening, though.

The wool is somewhere between soft and scratchy to me, and that is also how the fabric feels when worn on the skin. When I was younger, I used to wear wool sweaters from Iceland on bare skin, though I might be somewhat, um, hardened against scratchy stuff. I'm also quite able to ignore a bit of scratchy feeling. What I'm not able to ignore is a neck opening that is close to the front of my neck, I find that really uncomfortable and irritating, so that would be one reason for me, personally, to not wanting to wear the blouse for an extended amount of time. (Or, if it were mine, I'd just make the neck opening a little bit deeper in the front.)

Of course there was assistance provided when I was cutting the fabric...

Sewing the garment was an interesting experience. The seams, according to documentation by Hald and Broholm, were about 1 cm wide, with the two layers of fabric simply overlapping and whip-stitched together from both sides. Now we only have a few threads per cm here, about 3 to maybe 4... which is not much to anchor stitching. 

I solved this problem by stitching through the threads of the fabric instead of between them, which was easy to do with these large and relatively soft yarns. Made like this, the seams feel reliably sturdy. 

Sewing the blouse was overall also the part that took least time - spinning the yarns, weaving the fabric, weaving the skirt, these all took a lot longer than the actual cutting (not much) and stitching.

Overall, I'm rather happy with all of this - even though, like always, there are quite a few compromises that had to be made...

0

By accepting you will be accessing a service provided by a third-party external to https://pallia.net/

Kontakt