Latest Comments

Guest - Aislinn Dyestuff Citizen Science.
09. Oktober 2026
This is a great project. I look forward to the results. Thanks for letting us know.
Guest - Aislinn Time for...
09. Oktober 2026
Looks delicious!
Guest - Katrin Sprang Discussion
18. September 2026
Hi Rachel, I have looked for more photos of you, but that was not very successful. I found a link on...
Guest - Beatrix Sprang Discussion
15. September 2026
That lozenge pattern element is not a photograph, but a scan. So it should be to scale. But I pinned...
Guest - Katrin Sprang Discussion
15. September 2026
I was not referring to Rachel's reconstruction (is the reconstruction you refer to the one photograp...
MäRZ
02
6

Spindles, detachable whorls, and why they might fall off.

Yesterday I received an email, asking about spindle whorls slipping off the spindle stick while spinning - and I suddenly realised that this issue is not that uncommon, and that I should maybe write a little info thingie to go with the spindle sticks and whorls. So here you are - it's coming to the blog first, so please feel free to comment and ask further questions!

Medieval-style spindles, as opposed to modern spindles, don't have the whorl attached permanently. Instead, the shape of the two pieces makes it possible to attach the whorl to the tapering stick by just pushing it on. This means easier storage of the spindles plus more flexibility, as you can use one whorl with several sticks, or exchange the whorl for a lighter one to account for more weight of the yarn on a partly-filled spindle stick. You could also use the filled spindle stick directly as a shuttle for weaving on a warp-weighted loom, if you were so inclined.

This method of fitting the whorl onto the spindle stick relies on enough friction between the two parts. To avoid the whorl falling off, there are two things to take into account: Firstly, fitting it securely enough when you place it on the stick, and secondly, making sure that there is no downward pressure onto the whorl while working.

To fit the spindle whorl to the stick, I recommend sliding it up the stick as far as it will go up easily, then give a light twist to the whorl and gently pressing it upwards at the same time. Gentle pressure will suffice, and just a few millimetres of twisting of the spindle against the whorl. It should now sit quite firmly on the shaft. You can test the fit by gently tugging downward on the whorl; it should not budge.

If you have mounted the whorl like this, it should stay there throughout your spinning. If you drop the spindle, the whorl might come off - that is perfectly normal, just put it back into place as before, and carry on.

If the whorl falls off even though you have not dropped the spindle, there are two possible reasons for this.

If you have used the spindle stick a lot with the same whorl over and over, there might be a compressed spot where the whorl grips the wood. This is especially an issue with spindle sticks made from soft wood (such as pine or fir, for example). If that is the issue, you can usually see a ridge where the top of the whorl usually sits. The compressed part of the spindle can't provide enough friction with the whorl anymore, and the whorl cannot slide further upwards over the ridge, so it will not sit securely anymore. Should that ever be a problem, you can revive the stick by placing it in water; the compressed wood fibres will soak up the liquid and swell back into place. Let it dry thoroughly before you use it again.

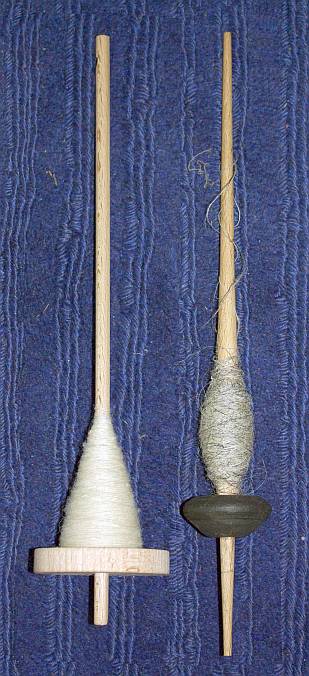
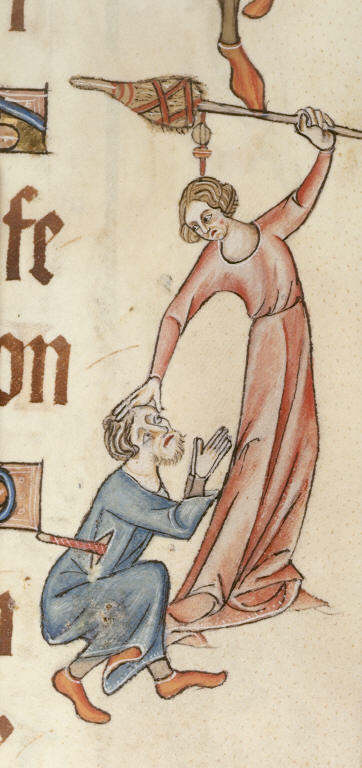
Most times, however, the spindle whorl slips off because the cop of yarn is pressing against it. If you look at medieval images of spindles, you can see that the yarn is in a sort of rugby-ball-shape or spindle-shape, and it is usually quite clearly wound onto the middle of the spindle stick, with a distance to the whorl. (Sometimes there is no whorl discernible at all, especially when the spindle looks like it's quite full already, but the cop is always this rugby-ball-shape or spindle-shape.)

[caption id="attachment_2257" align="alignnone" width="362"]British Library MS Additional 42130, f.60. A woman striking a man with her distaff. Note the very round cop of yarn on the spindle - it is keeping its distance from the whorl. British Library MS Additional 42130, f.60. A woman striking a man with her distaff. Note the very round cop of yarn on the spindle - it is keeping its careful distance from the whorl.


Many modern spinners are used to whorls that are glued onto their spindle, and there's a habit of winding in a sort of cone that rests against the whorl. This cone can put a surprising amount of pressure onto the whorl, so if you wind in this modern way with a medieval spindle, it will definitely press the whorl off the shaft at some point.

[caption id="attachment_2254" align="alignnone" width="309"]Modern-style winding on the left, medieval-style winding on the right. The modern, cone-shaped cop rests against the (permanently fixed) whorl. Modern-style winding on the left, medieval-style winding on the right. The modern, cone-shaped cop rests against the (permanently fixed) whorl.


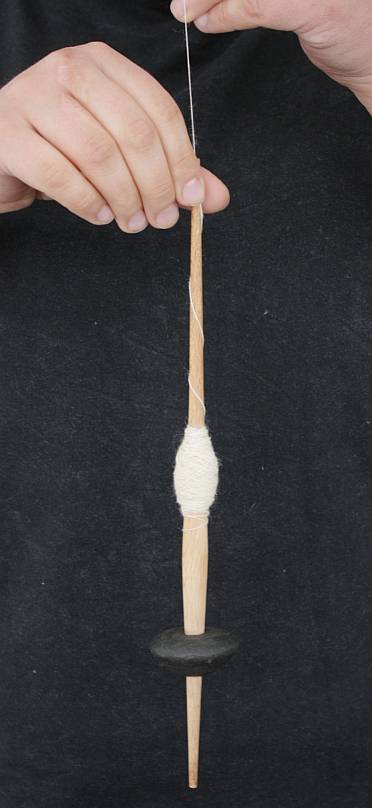
So you need to build a yarn cop that is stable enough not to need support by a whorl. You can achieve this by winding in a criss-cross fashion, instead of winding in a right angle around the spindle shaft with the windings parallel to each other. Start your yarn cop at a good distance to the whorl; this makes sure that you will have enough space to build up a sizeable cop before running into the whorl.

[caption id="attachment_2253" align="alignnone" width="372"]Starting the yarn cop in the middle of the spindle stick leaves lots of space to build it up. Starting the yarn cop in the middle of the spindle stick leaves lots of space to build it up.


You can alternate winding parallel and criss-crossing the yarn over the cop; winding the yarn in these two fashions lets you build a stable and dense cop.

[caption id="attachment_2255" align="alignnone" width="371"] You can see the parallel winding on top of a criss-crossed layer here: At the top of the cop, the criss-cross structure is still visible, but the middle part is wrapped over in parallel.
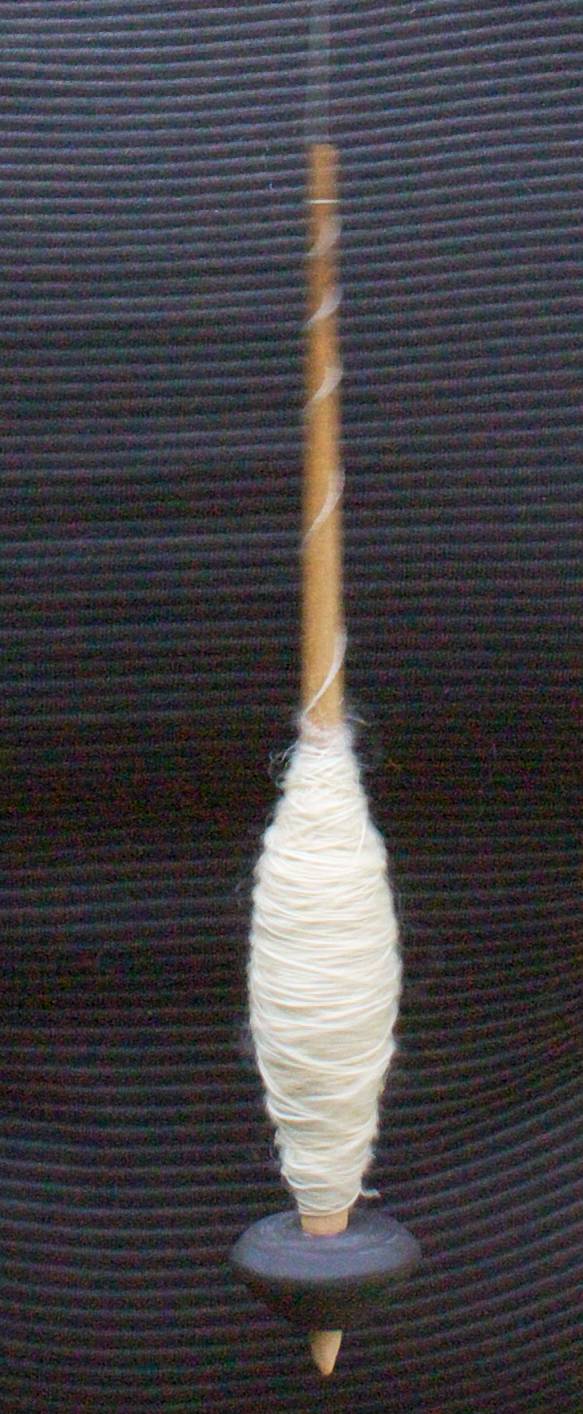

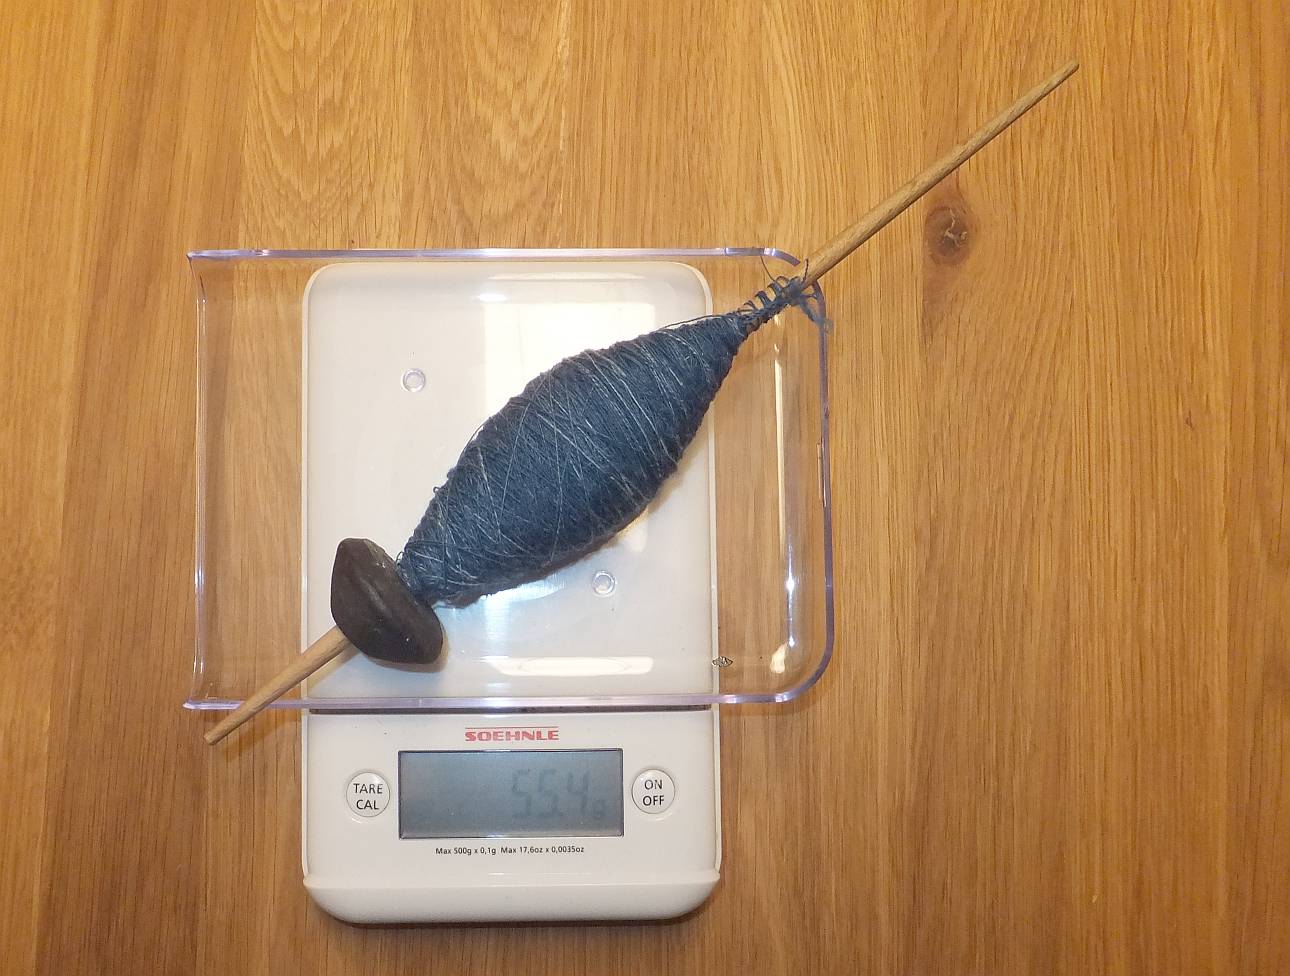
Eventually, your yarn will start to touch the whorl. You can then go on spinning until the yarn pushes the whorl off the spindle; you might be able to fill it even further if you try to wind more towards the top of the cop than towards the bottom.

[caption id="attachment_2256" align="alignnone" width="640"]The yarn cop has grown so much that it now touches the whorl. Empty weight of the spindle was 35.4 g, so there's about 20 g very finely spun yarn on this spindle. The yarn cop has grown so much that it now touches the whorl, though there is still no pressure onto the whorl, and the cop could be built up more towards the top of the spindle. (Empty weight of the spindle was 35.4 g, by the way, so that's 20 g very finely spun yarn.)


In any case, once your whorl comes off, you can either declare the spindle as full, or you can leave the whorl off and continue spinning either with a (typically lighter) whorl that sits further down the spindle shaft, or without any whorl at all.

Happy spinning, and happy winding!
0
AUG.
26
0

Spinning Instructions in English finally available!

Finally, the spinning instructions that I wrote a while ago have been proof-read and are available in English as well as in German. Putting them into the shop and blogging about it has been delayed a bit by the summer break, but now, finally, they are here.


They are either a part of the starter kit handspindle if you order it via the English version of the website (I then get all orders in English, too, so I know to put in the right printed version), or you can get them as a pdf file directly from my shop, for free! (You will need to register if you don't have an account yet.)

There should be a download link in the pdf "invoice" that is attached to your order email (the link is not directly in the email, so please make sure to open the pdf and look for the link there).


0
JUNI
26
1

And that's why you need maths.

When I was starting to study archaeology, I was happy to leave some of my less favourite school subjects behind me. Those included chemistry and maths.

One of my companion subjects with archaeology was heritage conservation, though, and that included "Bauforschung" - documentation and analysis of historical buildings. For that, one of the things you do is draw an accurate plan of floors, walls, and so on. Which means you will need to measure. Everything.

And then... there was this complex process of taking the distances and the angles you had measured, along your main lines or around the outside of the building, and calculate whether your measurements were accurate enough or not. It included things like sinus and cosinus and tangens, and when the prof explained it, you could hear half the room go "aaaaooouuugh". There I was, thinking I'd happily escaped those numbers and calculations... until said day.

Guess what I needed these days? More of those old and slightly dusty maths skills, especially that stuff about angles. So much of maths skills, unfortunately, that I also needed the assistance of the Most Patient Husband of Them All, who graciously agreed to help me tackle a complex formula to calculate the typical spinning angles of industrially-spun warp yarns from wool. (To my great delight, my calculations were not completely wrong. In fact, all I had not done was an additional, and not-really-obvious step to transform kilometres into metres. That step was so non-obvious that it also took my husband a while to track down the cause of the impossible result and figure out why it had happened.)

Oh, and the result of that formula-cracking? Warp yarn angles run between about 14.7° and 17.1° - while medieval yarns usually are above 30°, and very frequently at about 40°. No wonder modern spinners tend to spin soft stuff, it's the only thing we are used to!


0
OKT.
27
4

Gaah. Sometimes it just won't work.

I have worked some more on the spinning wheel tuning project - and it was frustrating. Sometimes, you sit down and try things and make a prototype and do the maths and then you go for the real thing and everything works beautifully. This, however, was not one of these times. About nothing in the current setup worked as planned.

The two whorls I 3D-printed are too slippery to give good traction to the drive band. (3D printing is still very cool.) So... I tried to make the drive band less slippery. I had had wonderful de-slipping success some years ago with using Seamgrip, a sort of glue originally intended to fix holes in outdoor stuff like tents. Unfortunately, the new tube of SG that I ordered made the thread I had planned to use stiff and slick, not supple with a rubbery outside.

So, after a while of fiddling and some more fiddling and lots of cursing, I have now switched back to the prototype setup from before, which was always intended to be temporary. For the current spinning tests that I have to do, this is what I will have to use - provided it will work well enough.

After that, I will have to sit down and plan again. I have not given up yet - but it looks as if there has to be some more fiddling and making of parts before my original plan can be implemented.
0
SEP.
30
0

News from the Wheel.

The spinning wheel test yesterday was... half successful. I took the measurements for the new whorls from my previous prototype hack of the original flyer and whorl, and in theory, there should have been next to no pull on the thread, thus resulting in a lot of twist being delivered while the yarn winds on to the bobbin very slowly. I had significant pull on the thread and thus by far not enough twist to suit my taste. Due to the temporary fixings of the new flyer, it was also not possible to just hold the thread tight until enough twist was delivered. I've tested the flyer whorl before, with the hacked old spool from the old flyer, and it did work quite well, so the excess winding speed is probably due to too much friction between the bobbin and the axle.

The new flyer and bobbin arrangement sits differently on the axle than the previous one, so the wheel and the whorls are out of proper alignment. This, in turn, means that I have to adjust the alignment; I fiddled with it yesterday, but did not arrive at the best final solution yet.

The orifice end of the axle also needs some kind of stopper. The old flyer had a snap ring to prevent it from going too far through the leather bearing, and the new one will need something similar. That, too, is on the list of things to do.

And finally, the bobbin itself was in need of some smoothing out of the insides, to reduce the aforementioned friction on the axle. Because it's difficult as whatnot to drill an absolutely straight, absolutely centered hole through a round dowel, I decided to laser-cut a lot of small rings and glue them on top of each other, stacked on the axle. That did work, mostly, with a little leftover snaggyness. Taking a round file to the insides, though, did take care of it, and it now spins much nicer.

The next steps in the process are thus clear. Now I only have to do the drilling, clamping, glueing and smoothing connected to them...


0
SEP.
29
0

Almost done.

The spinning wheel tuning is almost finished - I had planned to do the remainder of the work, not easily done in the FabLab, yesterday, but then a large-scale cooking session got into the way of that plan.

All that remains to do, however, is glue the parts of the flyer together and then test if the setup works well enough for a good, long test-run. I might have to make a new holder for the flyer, too, but for the moment there's a temporary contraption on the wheel consisting of the old holder and an array of clamps holding it in its new, better-aligned place.

So. Ten minutes for this glue batch to set, then I'll glue the next one. Then the wooden parts need to be fixed, permanently, to the metal axle. And then comes the moment of truth.

Hopefully it will all work out as planned!
0
SEP.
25
0

Spinning wheel tuning.

Part of this morning was spent on preparing another session at the FabLab (planned for this weekend). I've finalised the 3D printing data for the whorl bit on the bobbin, and finalised the lasercutting data for the bobbins themselves as well as the flyer "wings". The previous incarnations have already proven that the numbers and setup do work, and that I will be able to quickly spin thin, high-twist yarns with the tuned wheel.

Unfortunately, it seems that I will also have to replace the part that holds the flyer and the bobbin, because the new arrangement of bobbin and flyer and flyer whorl results in a slightly shifted alignment between drive wheel and whorls. Slightly, in this case, being big enough to cause trouble.

A bit more planning is thus necessary. But if everything works out as it should, I will have a functioning, fully-tuned wheel on Sunday.
0

By accepting you will be accessing a service provided by a third-party external to https://pallia.net/

Kontakt