Latest Comments

Harma Blog Break .
29. April 2024
Isn't the selvedge something to worry about in a later stage? It seems to me a lot more important th...
Beatrix Experiment!
23. April 2024
The video doesn´t work (at least for me). If I click on "activate" or the play-button it just disapp...
Katrin Spinning Speed Ponderings, Part I.
15. April 2024
As far as I know, some fabrics do get washed before they are sold, and some might not be. But I can'...
Kareina Spinning Speed Ponderings, Part I.
15. April 2024
I have seen you say few times that "no textile ever is finished before it's been wet and dried again...
Katrin How on earth did they do it?
27. März 2024
Ah, that's good to know! I might have a look around just out of curiosity. I've since learned that w...
AUG.
06
2

To Loop or Not to Loop?

I'm sorry this blog post comes so late, but I seem to have caught some kind of summer flu or similar illness. There will be no blog post tomorrow, but I hope to be fit and blogging again on Monday.

I have long been fascinated with fingerloop braiding (or loop manipulation braiding, if you prefer). It is an amazing technique with some disadvantages, but many advantages - the two most important, in my opinion, being ease of working and speed.

There has been a discussion recently in Cathy's costuming blog concerning the manufacture of a six-ended braid in red and yellow to go on a viking apron dress. And I'm afraid I haven't convinced the participants yet that fingerloop would be the thing to use...

What makes braiding difficult is the number of strands. Everybody who has done some single-end braiding knows this: While three ends are easy to handle, five ends demand considerably more attention and practice, and more ends even more so. For a braid with six ends, this means it will be quite time-consuming.
Here enters Fingerloop - to the rescue! With a loop-braiding pattern, it is possible to create almost any* traditional braiding pattern, with exactly half the amount of "ends" to handle. A six-end conventional braid becomes a very fast and easy three-loop-braid, resulting in the same braided pattern as the single-end version. For uneven numbers of ends, the solution is nearly as simple: for a five-end braid, just braid a normal five-loop pattern without turning any of the loops, and you'll end up with two five-end braids.

Because I find that the loops are much easier to handle than single ends, I personally do prefer the loop-braided version. The disadvantages are there - like a tendency to get a tighter braid towards the end, the stubbornness of mistakes (they are very hard to undo) and some technical difficulties for longer braids (though you can enlist somebody to carry the shed, or carry it with your toe, or even build a contraption for beating), but to me, they are far outweighed by the ease and speed of loop-braiding versus single-end braiding.

And to come back to Cathy's problem with the six-end braid, here are some possibilities for a three-loop braiding solution:

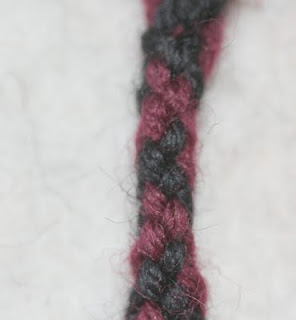
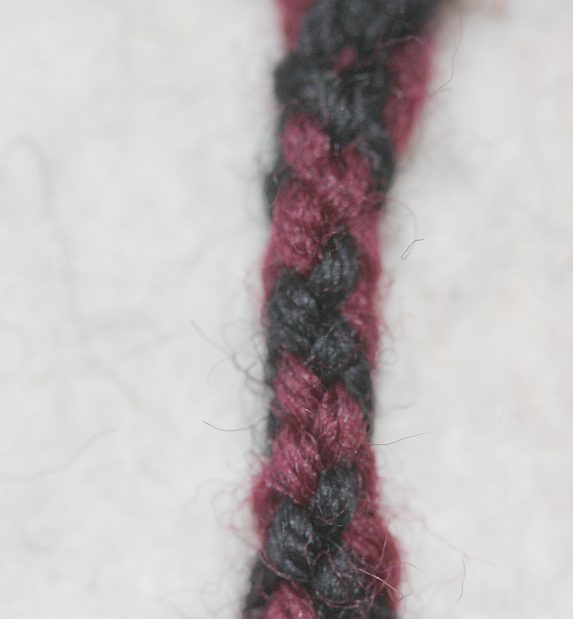
This is a simple three-loop braid, with loops consisting of one black and one red shank, both hands taking the loop turned (the lower shank becomes the upper shank on the other hand). It's quite firmly braided, bringing out a nice pattern of triangles in red and black.


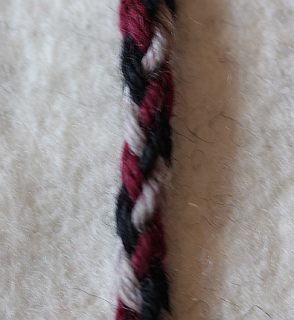
This is the same setup, braided more loosely, with the loops turned 360° instead of 180° (so the same colour stays always on top).


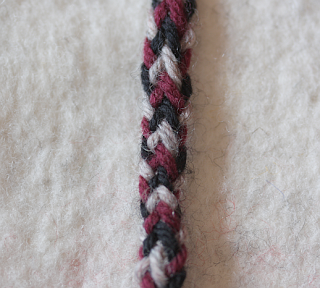
This is a 3-loop braid made with 3 differently-coloured loops - one red, one black, one light gray, to show the structure better. Both hands taking their loop turned.


And this is the same setup, but only one hand taking the loop turned - resulting in a double-width band.


Such a double-width band with parted loops (half red half black) will result in a band that is black on the left and red on the right (or vice versa) if the loop taken turned is turned 360° and a kind of "checkered" band with black left and red right, then changing to red left and black right after a while and so on.

There are actually lots of variations using only two colours. And that's another thing I like with fingerloop - even if the colour scheme will not be intuitive, by changing the loop colours, making them from two differently coloured ends, or changing the turning sequence, many different variations can be produced.


*The exception to this is four-end whipcording. It's not possible to recreate this, but then, it's not necessary: whipcording is easily done with bobbins, and quite fast with two persons working.
0
AUG.
04
0

Experiment Business as Usual

It never ceases to amaze me how experiment preparation develops. Even the loosest schedule will tighten up towards the end because of unforeseen complications. And in addition to that, every experiment planned will always take more time, effort and money in preparation and actual execution than planned - I've never had one running differently.

As you can probably guess from this, I was occupied with preparations for the Spinning Experiment yesterday. I spent about four and a half hours making the special spindle whorls, all shaped as cylinders. The reference whorl - a flat disc-shape - was by far the easiest to make, once I had found out how to best do it, while the two other clay shapes - tall, rather slim cylinders - each took much longer. I ended up with the planned 20 whorls for each shape plus two extras for the tall ones, and a few more extras for the reference whorls that will go into my teaching/demonstrating stack if enough survive the experiment. Now the only thing I have to do is to keep my fingers crossed that all the whorls will dry and fire well and without accidents - and after they are finished, I can do the necessary weighing and measuring to fix measurements for the two types of whorl still left to do (but those will be plywood whorls). And then the spinning experiment can start!
0
JULI
28
2

Do we have a Video?

For the exhibition in Bad Staffelstein, I made video snippets to demonstrate both how the textile techniques look "in action" and to give a small impression about how time-consuming textile works can be. Here's one of the four snippets I made, showing tablet weaving in twill structure, done with modern weaving tools (also known as butchered playing cards). I translated the text into English - it's German in the exhibition, of course.

It's no teaching video, but it does show my weaving setup and work procedures - so tablet weavers might be able to see what I'm doing and how, and others hopefully still get an impression of how long such work takes, and that it's not the tools or any machinery that make the pattern, but the brains and hands of the person working.

0
JULI
23
3

Back to earth.

After yesterday's high aspirations to luxury thread, today it's back down to earth in the Market Stall. I proudly and happily present to you the most basic of tools for the textile trade:

The Abysmally Underestimated and Neglected Spindle Stick!

While spindle-whorls are common archaeological finds, and while there are hundreds of dozens of spindles in all kinds of homes, working or not, the spindles themselves - that is, the sticks - are not something commonly seen for sale on markets. And I asked myself: Why? While there are not so many conserved wooden spindle sticks (I could write just "spindle", but I want to prevent any misunderstandings) around, the situation is still much better than that on textiles. And there are textiles on any medieval event.

I found out soon why they are not commonly for sale. Medieval spindles are usually rather slender with a double-conical form. With as little as two or three millimetres diameter at the ends, and not much more than a centimetre at the thickest place, they are too slim to be turned on just any lathe - the thin stick starts to wobble, making an efficient production difficult or impossible. But spinning with a much thicker double-conical spindle stick, which would pose no problems when turning, will not work as well. And, even more important, that stick won't fit the whorls so smoothly. And you want your spindle to fit your whorls, all of them, so you can just change. For example, have three spindle sticks, spin on one until it's full, spin on the second until it's full, and then ply both singles together on the third stick before removing your ball of plied yarn from that spindle, freeing all three again. And that will work only if you can change your whorl from spindle stick to spindle stick - and preferably, if you have more than one whorl, this would work with any of your stash.

In contrast, most modern spindles are seen differently, with the whorl and the spindle stick firmly belonging together. And most spindle makers just have their own method that will cut out the need for double-conical spindle sticks - often they use a stick that is firmly fixed to the whorl and not conical in shape. So the market for spindle sticks seems to be not so large. And if you want just one single stick, you can always take a knife and whittle it down to fit your whorl(s). If you are like me, that is possible yet not pleasing, because I'm not so good a whittler, and most of my "make a spindle" efforts were not so successful. Whittling down some wood to get a rounded, conical and slender shape is not too easy, I found.

So after searching a while, I finally found a workshop that accepted the challenge. And now they are back: Double-conical spindle sticks, made from beech wood, modeled after a find from Bergen in Norway. They are 11 mm thick at the fattest part, 3 mm at the ends, and 27 cm long. Need I say they are a pleasure to spin with?

0
JULI
20
0

Workshops at Cave Gladium

Today is an exception to my normal posting rules, since you are finding mostly German text here - it's the info for the workshops at Cave Gladium. Our idea was to offer a learning space and opportunity at the Cave, since that is a time and place where lots of living history people are already together, so travel costs and extra organisation time for the participants would be really, really low.

Since the info about the workshops seems to have gotten a little lost in the forum pages at the Cave website, I'm posting the description here again. So if you are interested in attending a show fighting workshop, or would like to learn how to dye with plants, or how to forge a knife, or how to weave 3/1 twill on tablets without counting and sticking to a pre-made pattern, or learn a few new loop-braiding patterns, you can Diese E-Mail-Adresse ist vor Spambots geschützt! Zur Anzeige muss JavaScript eingeschaltet sein.. At least the forging and textile workshops should also be possible in English, if there should be any language problems.


Schaukampf - aber richtig
Unter diesem Motto freuen wir uns, in diesem Jahr einen Workshop anbieten zu können, der zeigt, dass es nicht einer blutigen Nase und ein paar ausgeschlagener Zähne bedarf, um auf höchstem Niveau einen Zweikampf zum Besten zu geben. Dabei werden alle Aspekte der Sicherheit und Erhaltung der eigenen Gesundheit beachtet, ohne damit der Begeisterung der Mitwirkenden und der Zuschauer Abbruch zu tun.
An drei Tagen werden die Grundlagen des unbewaffneten Kampfes, Fallen und Rollen bis hin zum Schwertkampf vermittelt. Das Ergebnis wird am Ende des Workshops in einer kleinen Choreographie dem Publikum präsentiert.
Voraussetzungen: Es ist durchaus hilfreich, wenn der Teilnehmer bzw. die Teilnehmerin über eine durchschnittliche körperliche Fitness verfügt und schon einmal ein Schwert in der Hand gehalten hat.
Mitzubringen sind: sportliche Kleidung, festes Schuhwerk (Trainingswaffen werden gestellt)
Kursgebühr: 140,- € pro Person
Zeiten: Freitag: 16 bis 20 Uhr
Samstag: 9 bis 12 Uhr
Sonntag: 9 bis 12 Uhr

Brettchenweben mal anders
Keine Lust mehr, einem festgeschriebenen Schnurbindungsmuster zu folgen? Neugierig, was sich mit Brettchenweberei und einem ganz einfachen Aufzug alles anfangen lässt? Im Workshop webt jede/jeder ein Band zum spielerischen Ausprobieren in zwei kontrastierenden Farben. Der Kettaufzug lässt verschiedene Diagonalenmuster und Köperbindung zu, die mit etwas Hintergrundwissen zu den Grundlagen der Köperbindung frei kombiniert werden können.
Voraussetzungen: Der Kurs ist kein Anfängerkurs, sondern richtet sich an Brettchenweberinnen und -weber, die bereits etwas Erfahrung gesammelt haben.
Mitzubringen: Zum Aufziehen der Kette werden helles und dunkles Garn benötigt; empfehlenswert sind nicht zu dünne Webgarne, etwa in Stärke von Sockenwolle. Das helle und das dunkle Garn sollten jeweils auf zwei Knäuel gleicher Größe aufgeteilt werden, weil dies den Aufzug stark vereinfacht. Pro Knäuel werden mindestens 25 m Lauflänge benötigt (reicht für eine zwei Meter lange Kette). Mitzubringen sind außerdem, falls vorhanden, 12 Vierlochbrettchen.
Kursgebühr: 70,- € pro Person (ganztägig)
Material bei Bedarf bitte vorbestellen
Zeiten: Samstag 15.08.2009

Schmieden bei David Schütze
Der Einsteigerkurs ist für Menschen geeignet, die von der historischen Technik der Metallverarbeitung fasziniert sind, sich aber bisher nicht aktiv damit beschäftigt haben. Vorkenntnisse sind nicht erforderlich. Werkzeug- und Materialkunde werden ebenso vermittelt, wie die grundlegenden Techniken des Schmiedens und ein kurzer Einblick in die Geschichte des Handwerks. Die Teilnehmer stellen ein einfaches Messer selbst her.
Voraussetzungen: Einsteigerkurs (keine Vorkenntnisse notwendig)
Fortgeschrittenenkurs (mit Vorkenntnissen)
Mitzubringen sind: --
Kursgebühr: 140,- € pro Person (Einsteiger)
210,- € pro Person (Einsteiger)
incl. Material, Werkzeug und Versicherung
Zeiten: Samstag 15.08.2009

Färben bei Sabine Ringenberg
Pflanzenfarbe ist ein faszinierendes Thema. Wie wird sie auf der Faser haltbar gemacht? Welche Unterschiede gibt es beim Färben von Seide, Wolle oder Leinen? Auf diese Fragen gibt der Einsteigerkurs von Sabine Ringenberg Antwort. Mit selbst gesammelten Pflanzen wird die eigene Wolle oder Seide gefärbt. Dabei werden die gängigsten Beizverfahren ebenso behandelt, wie die Nachbehandlung und weitere Verarbeitung des Färbeguts. Vorkenntnisse sind nicht erforderlich.
Voraussetzungen: Einsteigerkurs
Mitzubringen sind: Eigene Wolle kann gefärbt werden
Kursgebühr: 85,- € pro Person (eintägig)
zzgl. Färbegut
Zeiten: Samstag 15.08.2009, Beginn 09.00 Uhr
Sonntag 16.08.2009, Beginn 09.00 Uhr

Fingerschlaufenflechten
Flechten mit Schlaufen statt mit einzelnen Fäden hat in den letzten Jahren an Bekanntheit gewonnen - ist aber immer noch nicht sehr verbreitet. In dem Kurs werden verschiedene Flechtvarianten, zum alleine oder gemeinsam Flechten, erlernt und geübt.
Voraussetzungen: Einsteigerkurs
Mitzubringen sind: ---
Kursgebühr: 45,- € pro Person (halbtägig)
incl. Material
Zeiten: Sonntag 16.08.2009, Beginn 09.00 Uhr
0
JULI
17
4

Hairnet: Finished and Reloaded

Though I hadn't posted about it anymore, I have obviously continued working on the blue hairnet, since it's finished now. I have sewn it to a drawstring made from birch-leaf-dyed silk (a thin silk ribbon), using one of the handmade steel needles (which worked like a dream).
Here it is, already brought into shape on a styrofoam head. That is also the form in which this net will be exhibited at Bad Staffelstein.

It took me about 30 hours to net (again); the large meshes with the pearls in the middle did obviously save some rounds, while fiddling on the pearls took up that time again.
The large mesh is something that has to be worked with utter and extreme care, though, or they will come out slightly uneven, resulting in netting problems further down.
It took me another hour for the finishing works - sewing on and inserting the drawstring and rinsing the net as well as bringing it into form over the styrofoam head. It has about 30 cm diameter; because it is cast on with rather few meshes (only 68), the circumference at the bottom is not too great.


Altogether, I think that the next time around, I'd rather attach the pearls afterwards by sewing them over individual knots of the mesh. I'm not too content with some of the parts of the net, where there are irregularities and where you can see how often the thread broke at places, I guess because of increased friction with the pearls. Overall, I'd say it looks quite nice, though - and my respect for the medieval net-makers is growing and growing!

Because I've grown quite fond of netting as a show-and-tell procedure (as the regular readers here know already), and I want to include netting in the demonstrations at the exhibition vernissage, I have spent yesterday evening doing the cast-on for another net. And this time around it's really close to an original net, found in London and published in Crowfoot et al's "Textiles and Clothing". Ages ago, I had already done some analysis and counting for one of the nets, coming up with 210 loops for cast-on, doubled after about 14 rows of mesh. After misfiring the first cast-on start (the loops grew nastily in length), I have now finished about 210 meshes and their connecting row successfully. I'd love to know how often I have mis-counted during the three hours I needed, but I'm much too lazy to count the loops again. I can however tell you that 210 loops is a lot.


The netting is done in extra-fine silk thread, and with a gauge of 2 mm diameter, resulting in meshes with 3 mm side length. This just fits with the large netting needle - which in turn fits in well with the fact that 3 mm seems to have been a quite common mesh size. If it comes out like the find (read: if I have not mis-counted ages ago when doing the analysis), it will have a lower edge circumference of a whooping 960 mm. That is almost one darn metre to net for about 50 rounds! I'm really curious to see how this net will turn out. And I can promise you that it won't take only 30 hours to complete, this time, since I have about tripled the mesh count...
0
JULI
08
2

More Sewing Necessities

Today's choice for the blog presentation: Beeswax. Everybody needs beeswax! Each sewing bag, pouch, chest or other sewing-goods-container needs a piece of beeswax! And because carrying a candle for that is not the most practical of things, and because there are not so many nice chunks of good-quality beeswax on the market, these are the latest addition to my product line:


In case you don't know why beeswax is a sewing tool: It is invaluable to wax threads for sewing, especially linen threads. It makes them much more durable, they are less prone to fraying where they rub against the needle's eye, and the thread will not kink itself into knots as easily. Plus it smells heavenly! Just draw the thread across the chunk of wax once, and you are all set. Use of beeswax in textile work is documented for medieval times through different accounts, and once you are used to lightly waxing threads, you won't want to be without it anymore.

You can also use beeswax to neaten the edges of fine cloth - though that does take quite a bit of practice, and of course that will eat up your chunk of beeswax much faster than drawing threads through them.
0

Kontakt