")
")


Friday evening, I finally finished the tabletweave I was hinting at - and here's the virtual unveiling now:
(click to enlarge)
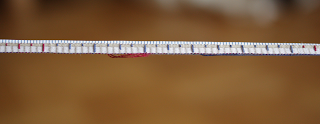
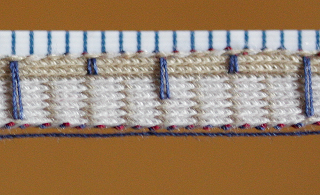
Yes, I have woven a measuring tape.
Now, first of all I need to get my disclaimer in. The first surviving measuring tapes are dated postmedieval, and there is no evidence at all for the use of scaled measuring tapes of whatever material and manufacture during the middle ages. So why have I spent hours weaving a wild speculation?
The tape is for a friend and colleague in medieval crafts, a shoemaker who would like to use something a little less blatantly modern than a plasticised shoemaker's measuring tape. A good while ago, we chatted about the difficulties and the possibilities, and I thought about an overly long warp that I still had lying around. We agreed that I would try to weave him a scaled measuring tape, since he has to write down the measurements he takes to work with them at home, thus needing a reliable scale. The measuring implement should be rather stretchproof and, if possible, flat - so a piece of string with knots in seemed to both of us to be not really suitable. We also agreed, though, that a nice slim tablet weave might do the trick. So after straightening out the warp and re-threading the weft in the tablets in a different pattern, I started out on the preliminary tests for weaving an inch-scaled tape.
Technically, this is very, very simple. You just need to find a material and pattern that will be fine enough to give you bars across the weave at suitably small intervals, find a way to brocade the markings for quarter, half and full inches so that the additional or missing brocade thread will not distort the pattern, and then weave while turning the tablets in one direction only to get an undistorted and firm pattern band. Since even a tablet weave will stretch slightly under tension, you have to keep the tension on the warp so low that the stretching is not noticeable.
I had a bit of luck, because the warp that I had would give me the bars at one eigth of an inch with very little persuasion. I figured out a way to brocade with no distortion by looping parts of one weft thread over the surface of the pattern (essentially a Munter Hitch over the threads on top of the weave) and set markings at quarter, half and full inch intervals, with a colour change every five inches. And then it's just weave, weave, weave - and unweave once in a while.
The main problem with the piece were tension and regularity of the weaving, as you can probably guess. I had to unweave several bits during the weaving, which is a pretty frustrating experience. Every glitch has to be rectified. Left out a weft, accidentally? Disturbs the pattern way too much. Warp tension too high? Same thing, unweave and re-weave with the (hopefully) correct tension. Not beaten the weft in enough? Undo and re-weave.
Now I hope that the tape will do a proper job for measuring feet and marking out patterns for new shoes. I have already decided that I won't make a full length tape for my own use, thank you very much: 24 inch of technically simple, but demanding full attention weaving has been enough for me. I'm happy that it turned out okay, though.
(click to enlarge)
Finally, for those of you who are interested, here are the gory details: Both warp and weft threads are Gütermann Silk No. 100 (comes on blue plastic spools). Warp in colours white, light and dark beige, weft threads in blue and red. 17 tablets, threaded alternatingly s and z, turned in one direction only for the whole band. Length are 24 inch plus a little (as a "handhold" for better handling) at the start and at the end. Accuracy was helped by a regular plastic measuring tape that I clipped to the weave with foldback clips.
Should you repeat this stint, please send me a note about how you're doing and maybe a photo - I'd love to hear how you find it.

Yes, I have woven a measuring tape.
Now, first of all I need to get my disclaimer in. The first surviving measuring tapes are dated postmedieval, and there is no evidence at all for the use of scaled measuring tapes of whatever material and manufacture during the middle ages. So why have I spent hours weaving a wild speculation?
The tape is for a friend and colleague in medieval crafts, a shoemaker who would like to use something a little less blatantly modern than a plasticised shoemaker's measuring tape. A good while ago, we chatted about the difficulties and the possibilities, and I thought about an overly long warp that I still had lying around. We agreed that I would try to weave him a scaled measuring tape, since he has to write down the measurements he takes to work with them at home, thus needing a reliable scale. The measuring implement should be rather stretchproof and, if possible, flat - so a piece of string with knots in seemed to both of us to be not really suitable. We also agreed, though, that a nice slim tablet weave might do the trick. So after straightening out the warp and re-threading the weft in the tablets in a different pattern, I started out on the preliminary tests for weaving an inch-scaled tape.
Technically, this is very, very simple. You just need to find a material and pattern that will be fine enough to give you bars across the weave at suitably small intervals, find a way to brocade the markings for quarter, half and full inches so that the additional or missing brocade thread will not distort the pattern, and then weave while turning the tablets in one direction only to get an undistorted and firm pattern band. Since even a tablet weave will stretch slightly under tension, you have to keep the tension on the warp so low that the stretching is not noticeable.
I had a bit of luck, because the warp that I had would give me the bars at one eigth of an inch with very little persuasion. I figured out a way to brocade with no distortion by looping parts of one weft thread over the surface of the pattern (essentially a Munter Hitch over the threads on top of the weave) and set markings at quarter, half and full inch intervals, with a colour change every five inches. And then it's just weave, weave, weave - and unweave once in a while.
The main problem with the piece were tension and regularity of the weaving, as you can probably guess. I had to unweave several bits during the weaving, which is a pretty frustrating experience. Every glitch has to be rectified. Left out a weft, accidentally? Disturbs the pattern way too much. Warp tension too high? Same thing, unweave and re-weave with the (hopefully) correct tension. Not beaten the weft in enough? Undo and re-weave.
Now I hope that the tape will do a proper job for measuring feet and marking out patterns for new shoes. I have already decided that I won't make a full length tape for my own use, thank you very much: 24 inch of technically simple, but demanding full attention weaving has been enough for me. I'm happy that it turned out okay, though.
Finally, for those of you who are interested, here are the gory details: Both warp and weft threads are Gütermann Silk No. 100 (comes on blue plastic spools). Warp in colours white, light and dark beige, weft threads in blue and red. 17 tablets, threaded alternatingly s and z, turned in one direction only for the whole band. Length are 24 inch plus a little (as a "handhold" for better handling) at the start and at the end. Accuracy was helped by a regular plastic measuring tape that I clipped to the weave with foldback clips.
Should you repeat this stint, please send me a note about how you're doing and maybe a photo - I'd love to hear how you find it.