Latest Comments

Guest - Aislinn Dyestuff Citizen Science.
09. Oktober 2026
This is a great project. I look forward to the results. Thanks for letting us know.
Guest - Aislinn Time for...
09. Oktober 2026
Looks delicious!
Guest - Katrin Sprang Discussion
18. September 2026
Hi Rachel, I have looked for more photos of you, but that was not very successful. I found a link on...
Guest - Beatrix Sprang Discussion
15. September 2026
That lozenge pattern element is not a photograph, but a scan. So it should be to scale. But I pinned...
Guest - Katrin Sprang Discussion
15. September 2026
I was not referring to Rachel's reconstruction (is the reconstruction you refer to the one photograp...
JAN.
30
0

Travel Stuff.

I've had a beyond wonderful time up in Scandinavia - but I can't tell you anything specific about the details of the project part at this time, as the team wants to have good, solid results from their tests before anything gets written about it on the internet. So for now, you're stuck with the abstract available on the CTR website... and the short video there. The team, by the way, was a group of utterly wonderful people, and it was pure pleasure to work together with them.

What I can tell you, too, is that learned a few interesting things about my spinning - for instance, that I move very little apart from what is necessary, and that I can actually spin decent yarn with a very small, very light spindle. The moment this small spindle clicked for me was a total delight, and I spent the rest of the day, and a good bit of the next one, marvelling about how workable it was. Mind you - I don't think I will become best friends with tiny spindles now, but we will be able to develop a good working relationship. Plus it made me reconsider park-and-draft as a production technique, something I had only seen as a method to use while learning and before progressing to "proper" spinning.

I've also learned that Swedish cinnamon rolls are the originals, with a different dough than the Danish ones; that the Danes are utterly incredibly good at making marshmallow puffs; that Scandinavia is so much more of paying with card and not cash than Germany; that both Copenhagen and Lund are very bicycle-friendly; that public transport there is, compared to Germany, quite affordable and very good; that there is a really nice bouldering gym in Copenhagen; and that bringing a tiny immersion heater and a few bags of tea along with my trusty thermos mug (that travels with me about anywhere) makes a huge difference to my comfort levels in the evenings, sitting on my own in a hotel room somewhere.
0
JAN.
29
5

Funky New Knitting Project.

Now that the current sweater is finished and I'm travelling a bit as well, I obviously needed a new project, something nice and small to take along with me...

...and it didn't take me long to find one: I'm making toe socks.

A bit of background for that? Here you go.
I love walking with bare feet, and I rarely wear shoes or socks at home when it is warm enough to go without. In autumn and winter, though, it's not so nice to have free but cold feet, so I walk in socks without shoes most of the time. I also have a very slight tendency to develop a bunion, as some orthopedic guy told me years ago, so I try to walk shoe- and sock-free as much as possible and consciously spread out my toes, countering that tendency.

Most socks still tend to slightly mash the toes together, and they don't grant the full freedom of toe movement that you have barefoot. The solution? Toe socks. These are a funny-looking thing, and they are a little weird to wear at first, but I like the toe-spreading freedom they grant. Except... I only have one pair up to now, and that was given to me by a friend who knit these socks for herself, then found out they don't fit her at all. They do fit me better than her, but the little toe is a total mis-construction, as it is too small and the start of the toe sits way too far at the front of the foot. Basically, that sock construction starts all the toes on one straight line. That works with fingers for gloves, but toes are much shorter, and they do start along a curved shape on the foot, so starting them on one line will not work properly with foot anatomy.

Fortunately, someone else has already thought deeply about it and came up with a really smart pattern for toe socks, where you start in the middle of the foot, knit towards the toes, then pick up stitches and knit the rest of your sock toe-up. Here's the pattern on Ravelry, called Funky Five-Toe Socks.


It's a little fiddly (I use thin yarn and 1.5 mm needles), it involves a generous amount of hedgehog wrestling, the yarn has lovely colours, and I'm having a bunch of fun with it.
0
JAN.
16
0

Getting there.

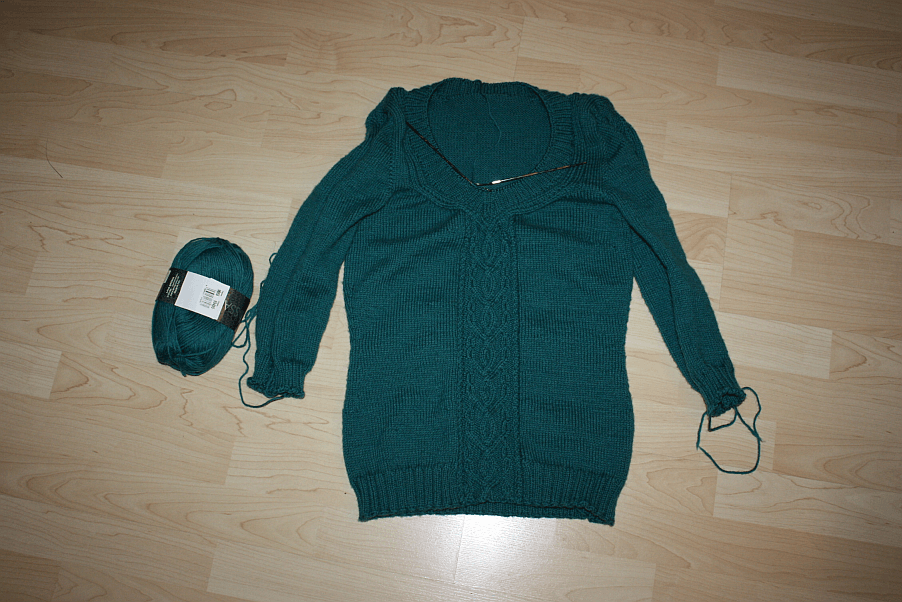
Over the last weeks, I'v finally gotten around to get some more knitting done, too, taking the needles into hand in the evenings. So after working on it on what feels like ages, my Moyen Age sweater is finally nearing completion - yay!

moyen_age_almost_done

With the shorter sleeves that I opted for and the rather large neck opening (which is part of the pattern), it will be a summer sweater more than a winter thing. It is a pleasantly written pattern, and it was nice-ish to knit. Nice-ish only because I did discover that I don't care much for sweaters knit all in one piece; I find the huge chunk of stuff it becomes towards the end fairly cumbersome and annoying on the needles. So the next ones will definitely be knit in pieces again; I'll take the bit of seaming them up over handling a gazillion tons of wool on each round any day.

 
0
JAN.
10
1

Exciting things!

Did I say back to the usual stuff yesterday? Well, this year is starting off with exciting things only; for one thing, getting the Bernuthsfeld stuff to a close. (There's just a few more patches to decide upon and to sew in, and the shirt to make. I've already cut most of it, and the rest will be done once I get confirmation on the measurements so it will actually fit the figurine. Nothing worse than sewing something and then finding out it won't go onto the body it is supposed to dress!)

But wait, there's more!

When I was at NESAT last year, Eva Andersson Strand gave a presentation about one of the current projects at the CTR, called "Capturing our intangible past". You can read a bit of an introduction on the CTR website.

One of the aims is to get a better idea of craft knowledge and how to capture it. If you've ever tried to learn a craft skill from a description in a book, you will know that this can be rather difficult - and the motion capture might be helpful in isolating relevant motions without having too much data. If this works, it might also be a good method to record practical knowledge. There's still more, though - plans are to combine the motion capture with an EEG to get an idea of brain activity while doing the craft.

The research group is currently focusing on spinning as a craft, and you can imagine my delight on being asked if I'd like to participate in their study. So I'll be travelling to Lund later this month, to get lots of recording bitsies stuck onto me and to do some spinning. I'm beyond excited, and still can't believe something this cool is coming my way!

 
0
DEZ.
12
2

Faking it, Part Two.

So let's say you need to have a starting border on a fabric that doesn't have one.

Traditionally, you have the two obvious usual suspects for doing this: rigid heddle weaving or tablet weaving. In both cases for the Bernuthsfeld Project where we were lacking a starting border, the originals had a rigid heddle border.

So for faking a border, you set up the warp of your band just like you would for a normal band - the necessary length plus a bit more for the loss of yarn at start and end. Then you take the edge of your finished fabric and make sure that there is a warp fringe long enough to go through the width of your band twice, plus a little extra to grab. How much of a little extra you need depends on your fingers and your love of fiddlyness.

You weave a few picks to get a proper start to the band, with a normal weft thread, and then you start using the warp fringe as weft. For this, you pull one warp through the shed so it sticks out of the band at the far side of the fabric, change shed, and go back towards the fabric with the same warp. Into that same shed, you also put the next warp thread in line so that it sticks out at the far side of the fabric. Repeat ad nauseam, or until you reach the other edge of your fabric, and take care not to switch warp threads or miss some. It's not difficult to do, but it is fiddly, and it is time-consuming - as you can see on this video:


You will also have to pay close attention to the growth rate of your band (in length) as compared to the spacing of your warp threads - and here is where the difference between the fake and the real really comes in.

When you make a real starting border, you have two ends going through each shed, as you do with the fake starting border. However, both ends in each shed in the real border are functional warp ends of the main fabric - in contrast to one functional warp end in the faked border, which is accompanied by its colleague going back. So you effectively have to fit double the amount of weft threads into the length of the band if you're doing a fake border.

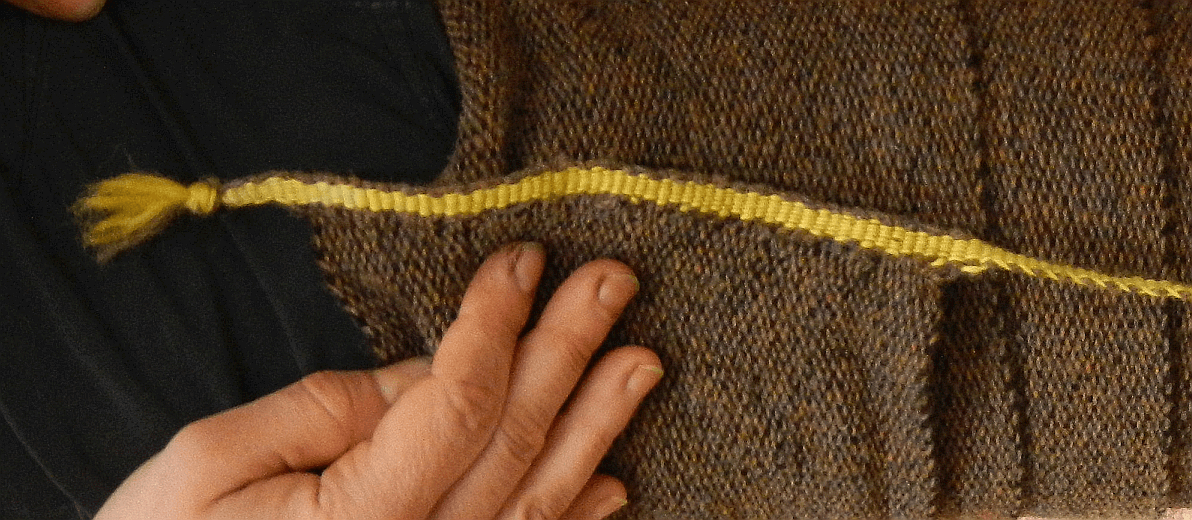
Can you smell the problem already? If you use a band warp yarn that is as thick as the original starting border warp yarn, the distance between your sheds will be large enough to spread the band out way too much in the faked border. You will have to remedy this by occasionally placing two or more live warp ends into a single shed. This is the way I did the starting border for one of the leg wrap edges:

startingborder_legwraps2

This is not nice to weave, and the slightly too high spread is still visible. You can also see a tiny hint of the trimmed fringe that is left underneath the border - a telltale sign that it is a faked one.

The alternative is choosing a warp for the starting border that is a lot thinner than it would be in the original. This reduces the distance between sheds along the band, so you can fit all your warp threads one by one into the band. This is the solution I chose for the border faking shown in the video, as the border was much longer. Obviously, using thinner threads also means a narrower border, so you'll have to use more warp ends for the starting border to get it a similar width as the original.

In both cases, you might be able to see a hint of the fringe sticking out of the band. So if you're looking at a replica fabric, or a reconstruction, and it has a starting border - fibre ends sticking out between border and fabric will tell you it's a faked one. If you cannot see fibre ends, look at the thickness of the starting border threads; if they are significantly thinner than the yarn of the main fabric, it's probably also a faked one. It's definitely also fake if the yarns are similar in thickness to the main fabric warp, but there are more than two ends in individual sheds. All that is assuming you can get close enough to the piece, of course!
0
DEZ.
08
1

Looking for ideas?

It's the season of people looking for ideas - things to give to others, things to wish for. So in case you're one of the many, many folks on search of good ideas, here are three things - all of them related to tablet weaving, and all of them guaranteed not to catch dust:

If you're interested in tablet weaving, especially in the brocaded kind, you have probably heard about the book "Ecclesiastical Pomp and Aristocratic Circumstance". It's a nice collection of tablet-woven bands, even though there's not a lot of images of the original pieces in the book. It appears that this has gone out of print, but it's now available as a pdf download from Nancy Spies' Etsy shop. At 12 USD, it's also quite affordable!

The same thing has happened to Anna Neuper's Modelbuch, also originally published as a paper book, also out of print and now available as pdf. In this case, you have to invest 5 USD.

Louise Ström has written a booklet about how to do tablet-woven patterns without a pattern draft. The motifs are fairly traditional Scandinavian ones, where you have variations in each pattern section, resulting in a band with non-repeating (though similar) motifs. This, too, is available as a pdf download via Etsy and will cost you about 18 USD.

Disclaimer: I do own the paper version of Pomp & Circumstance, but know neither of the two other books. They have ended up on my list, though...

Oh, and by the way - it's Blogiversary today! Nine years of blogging!
0
OKT.
31
1

Just surfacing for a blip.

I'm here, back from a little break, and I'm still working on stuff. Like the tablet weaving thing - here's the current status:

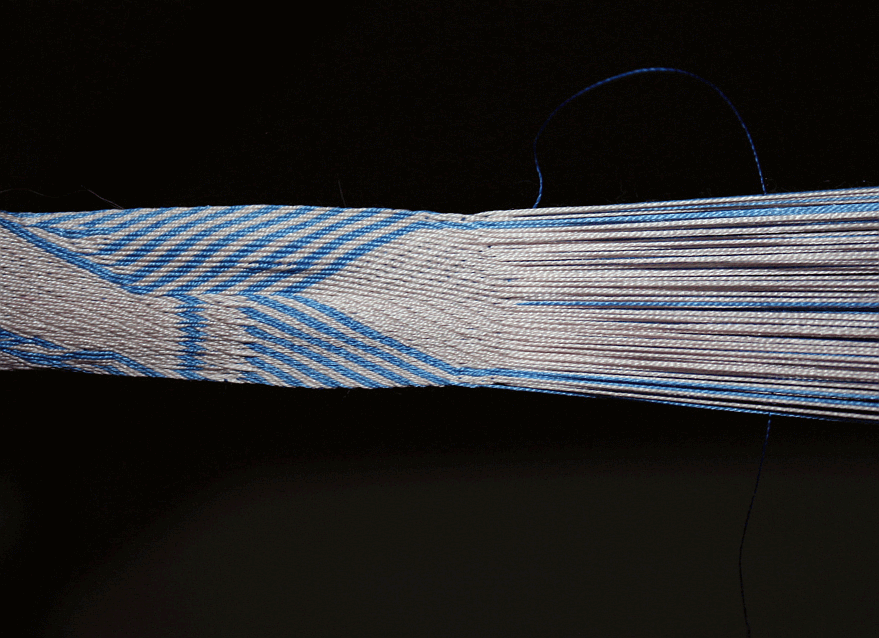
tabletweave_shield

You see some bits of wild playing around, followed by the start of weaving a coat of arms. You can also see the width difference between plain tablet weave (the diagonals) and twill, which is a good bit looser and thus the threads snuggle closer to each other, making the band narrower.

What you cannot see is that there is a mistake in the last pick, which needs, thusly, to be un-woven. What you also cannot see is that I did get a few more lightbulbs, but there's still a crick in my brain when it comes to finishing the coat of arms with the stuff that comes on top... well. I'll be working on that some more in the next days. I still have a few of them left.

I will probably not manage to do this and find the time (and brain!) to blog, so - while I'm sorry to announce a bit of blog silence right after a bit of blog silence - I'll say, for my sanity and peace of mind, that I will be back after the Textile Forum week and a bit of recuperation. Which means November 16.

Somebody really packed my calendar full of stuff...
0

By accepting you will be accessing a service provided by a third-party external to https://pallia.net/

Kontakt