Latest Comments

Guest - Katrin Sprang Discussion
18 September 2026
Hi Rachel, I have looked for more photos of you, but that was not very successful. I found a link on...
Guest - Beatrix Sprang Discussion
15 September 2026
That lozenge pattern element is not a photograph, but a scan. So it should be to scale. But I pinned...
Guest - Katrin Sprang Discussion
15 September 2026
I was not referring to Rachel's reconstruction (is the reconstruction you refer to the one photograp...
Guest - Beatrix Sprang Discussion
14 September 2026
There is something Rachel did not mention. She told me: "Well, I worked with the measurements we too...
Guest - Katrin Sprang Discussion
14 September 2026
Well, this is certainly developing into an interesting discussion. Firstly, going from that lovely l...
OCT
11
0

Many Holes Were Made.

One of the things I really love about my line of work? Getting to work with professionals from adjacent fields and learning new things. Another thing I love is getting to work with many different materials - especially since I'm also working with textile techniques and tools, that does not just encompass the many different variations of fibres, yarns, and fabrics, but also other materials. Wood. Clay. Metal.

It has definitely proven helpful to have a little bit of basic skill working with these things, and a small but versatile selection of tools. One of my favourite ones: The so-called "Bssst". (You may guess why it's called that.) 

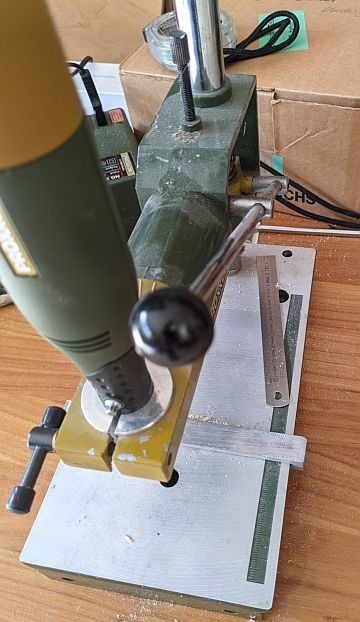
 I have this stand and another stand/holder for it, and it's been drilling holes and polishing things for me a lot. (My dad bought the original Bssst many years ago, and I've just recently had to replace it with a new one, as it absolutely refused to do anything anymore.)

This time, it was my little helper drilling many, many holes in a stick:

That will be the connecting part between the horizontal top beam of a warp-weighted loom and the fabric. While it's technically possible to sew the fabric starting band directly to the top beam, adding in the Stick Of Many Holes makes things easier, and more comfortable, and uses less string overall. The larger holes are to attach the stick to the beam, and the smaller holes to sew the fabric to the stick. 

That will happen on Monday - and I'm already looking forward to that!

0
SEP
24
0

Needles, once more.

I've finally made more photos of things to go into the shop - needles, to be specific.  

When I'm sewing, I like to use non-ferrous needles for wool fabrics, but strongly prefer iron or steel needles for linen. Usually also for silk, but that may be due to the fact that I can usually get thinner needles in iron than in brass or bronze.

Anyways, these are hand-forged in Germany, and they will finally go into the shop in the next few days! 

0
SEP
03
0

Webinar Traditional Bervanik Print

EuroWeb has something more coming up: A webinar on traditional wax batik printing! It will take place on September 6, 10 am CET start.  

I'm already looking forward to this - it's always interesting to see traditional textile techniques!

0
SEP
02
0

Back home...

The Great Wheel had its little outing, I once again got to appreciate how much more evenly I can spin with the spindle and distaff as compared to the wheel, and on the other hand how much faster the wheel is. 

As usual on an event like this, I got to take one quick break (when the guys from the next tent over were doing their fighting show) to dash out of my spot, re-fill my water bottle, get a coffee and a bite to eat, and go back. It was also very sunny on Sunday, so even though the tent provided shade, it got quite hot. Enter the Glorious Medieval Cooling System: The linen underdress and linen headwear will be very, very cooling if wet. Thus part of my water bottle's contents did not go inside of me, but into my dress to wet some of the underdress, and on my head. That worked very well, and kept me comfortable even through the hottest bits of the day.

Then, at the end of our festivities, I found one of the friendly museum ladies to take some pictures of me spinning:

As you can see on the floor, I didn't even make too much of a mess! 

0
AUG
30
0

The Travelling Wheel.

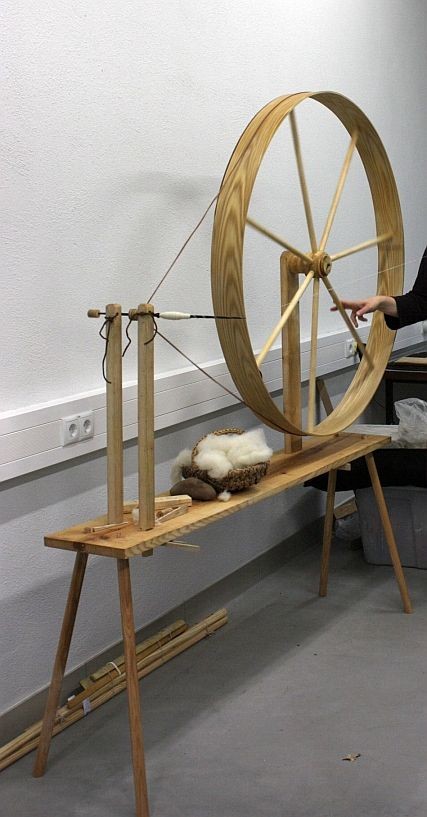
The thing about a medieval-style Great Wheel? It's really Great, as in Large. Looking at images, the wheel appears to be really huge, compared to the spinners. And when one thinks about it, that is sort of understandable - after all, the aim is to get a lot of twist quickly, and there are no gears involved. So the size difference between the wheel and the disc on the spindle (often called whorl, but I find that confusing) has to be as large as possible.

When I built my reconstruction, I was thus looking for a size that would compare to the illustrations we have, and of course with a look at its intended use - demonstrations. Which meant it also had to come apart easily, and the single pieces had to fit into the car. 

Which they do. The wheel itself has its own special spot right under the roof, where it's built to fit perfectly:

The board end in the foreground belongs to the bottom (main) board. The rest is one box with the small pieces (like the wedges, drive band, and spindles) and one pack with legs and the holders for spindle and wheel. 

So now I just have to add the rest of the equipment, and we're ready to roll!

(Ingelheim. Sunday. See me there if you can, and say hello!)

0
AUG
28
0

Finnish Bands, 19th Century

If you're interested in Finnish tablet weaving as it was done in the 19th century, you can find a selection of bands on the twisted threads website. Mari Voipio, a Finnish researcher, has put this together from photos and books. The website also includes weaving instructions - so if you're looking for inspiration, maybe hop over there!

0
AUG
27
0

The Wheel is Turning.

The wheel is set up, and it's been far too long since I've last taken it for a spin - it took me a bit to get it all running smoothly again. Though that is also due to trying the other spindle, which (still) does not work as nicely as the one I usually have.

Why? Well, it would be nice to know... The wheel is always a little wobbly, and depending on how the individual bits are aligned (and they have a tendency to shift a bit during use), the drive band stays on... or not. The "other" spindle has more of a tendency to shift, and there's only one good groove on it, so as soon as the drive band manages to hop out of that groove, it's gone and off completely. 

As there's no grooves or higher sides on the rim of the wheel, the drive band will also tend to slip off if the wheel is not well enough aligned. That can happen if the fixing wedge of the wheel support works itself loose, or if the whole thing is leaning a bit to one side and the wheel wanders on its axle, or if it's put on the wrong way around (though it is theoretically symmetrical, it isn't quite).

So. All those are reasons enough to take it out and give it a little test drive before it appears at a demonstration, but the main reason is actually for me to get some practice in... or I will have a very, very tired right arm very quickly otherwise! 

0

By accepting you will be accessing a service provided by a third-party external to https://pallia.net/

Contact