Latest Comments

Guest - Katrin Sprang Discussion
18 September 2026
Hi Rachel, I have looked for more photos of you, but that was not very successful. I found a link on...
Guest - Beatrix Sprang Discussion
15 September 2026
That lozenge pattern element is not a photograph, but a scan. So it should be to scale. But I pinned...
Guest - Katrin Sprang Discussion
15 September 2026
I was not referring to Rachel's reconstruction (is the reconstruction you refer to the one photograp...
Guest - Beatrix Sprang Discussion
14 September 2026
There is something Rachel did not mention. She told me: "Well, I worked with the measurements we too...
Guest - Katrin Sprang Discussion
14 September 2026
Well, this is certainly developing into an interesting discussion. Firstly, going from that lovely l...
MAR
13
0

Spinning Experiment Calculations

I'm still not finished with preparations for the Experiment test run. I have forgotten to ask the lady running the pottery workshop how much the clay will shrink upon drying and firing, so I'll have to make a wild guess at somewhere between 3 and 10 per cent. Then I have some serious doubts about whether some of the spindle whorls will be workable, since trying to reduce weight while keeping the same Moment of Inertia leads to a thin disc of a whorl... made from ceramic. Used for real-life spinning... where a thread can break. And so can the whorl (unless it breaks when firing first).

Ah, science is fun. I can't wait to break the first few whorls on my next day of fumble-spinning. And should those thin and fragile discs really work... I'll make a bunch more for the experiments. And maybe we can substitute the clay for the big-but-thin whorls with some material with the same density of the fired clay - preferably material that is not as fragile as a 3 mm thin disc of ceramic.
0
MAR
12
0

Time just flies by...

After some very hectic and rather stressful weeks, I feel like things are slowly getting under control again. I have managed to meet all the deadlines even with new and unexpected extra deadlines dropping in, so the struggle to get everything done in time was really worth it. Even my little folder/brochure got finished, printed and delivered in time and doesn't look all bad - two of the pictures turned out a little more "technicolor" than I had intended, but I'd say it is still okay. The two important pics and the text have both turned out fine. I'll never, ever work with Quark Xpress, though - I thought I'd do myself a favour and work with a proper layout programme. It did not turn out well. In the end, it was faster making the layout anew in good old CorelDraw, even if that means not as good control over text layout.

Unfortunately, there is no time to lay back and relax - yet. I hope I can get a good writing flash in this week, and I have to finish preparing yet another presentation. And finally write all the emails I didn't get around to write yet.

The weekend will be spent doing things with clay, mostly in service of the Spinning Experiment that will run during the Textilforum, since I need to have a test run first making and then spinning with the whorls we will use for the experiment. Hopefully there will be enough time to do some other ceramic stuff for my own amusement - and maybe a cooking pot or two will come out of the weekend.
0
FEB
27
2

Hairnets, part III - Lacis basics

Let's say you could not resist the temptation and started netting yesterday. Now you'll need to know how to do the embroidery, right?

The stitch used for the bird motifs is called linen stitch, because it emulates the binding most commonly found in linen cloth: tabby. It is simple darning, first filling in threads in one direction. Then, in a 90° angle to that, you weave the thread in with your needle, alternately going over and under the threads already in (including the threads of the meshwork).

In case you have never tried darning in this way before, you can have a look at Thérèse de Dillmont's instructions, straight out of her wonderful book "Encyclopedia of Needlework". And if you don't know her book yet, consider getting a copy - either an old one, or one of the reprints. Or go for the online version at encyclopediaofneedlework.com. In any case, don't miss out on this book: If I could choose only a single book for textile crafts to keep, it would be this one.

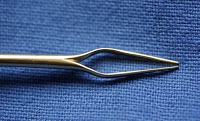
Bonus pic: The netting needle tip, without thread on.

Clickable for larger view
0
FEB
23
0

Netting Needles, part II

These days, I am in netting needle heaven. I have gotten the most wonderful, enormously gorgeous needle for my birthday, and it is breathtakingly beautiful craftswomanship.
I'm sorry that I can only give you a picture with the needle wound with thread, and thus you won't be able (yet) to see the wonderful finish of the passage from shank to tips - but this is my "no brains needed" craft, and I could not keep from winding it again the evening before taking the photos, when it had run empty.


It is made from brass, after one of the London finds given in "Textiles and Clothing", and it works like a breeze for my normal mesh size of about 4 mm. I'd like to try my hand at smaller mesh sizes one day, but first I will enjoy this utterly wonderful netting needle with the fast-to-work larger meshes, currently on a net that was inspired by the twocoloured one I blogged about here.


Here you can see the mesh size. I tried a new version of casting on, but I had a few problems with it, so there are some irregularities in the net especially in the first few rows. After the long cast-on loops, there are five rows of normal-sized mesh, then one row for doubling the number of meshes. After that I am now continuing with red thread (madder) for a while - I still have to get a feeling for how much thread on the needle will last for how many rounds.
In the picture below, you can also see my normal gauge, which is a shashlik stick shortened and smoothed with fine sandpaper, resulting in the 4mm mesh size.


I have a free day tomorrow (hooray), so the next blog post will be on Wednesday - have a good time until then!
0
FEB
20
0

Netting Needles, part I

AnyZM7 craftsperson will tell you that tools are important. In fact, if you are reading this blog, I'd be surprised if you did not know yourself that a good needle makes for better stitching than a bad and crooked one, and that a smooth-running spindles, scissors, shears or what-have-you will help you have more fun and less stress when working.

While getting pins and needles made from copper alloy is very easy today, compared to the situation only a few years ago, there are more problems waiting for the unsuspecting dabbler in textile arts who ventures into lesser known territories. Like netting. It can be incredibly hard to get a proper netting needle nowadays.

When I first started learning how to net, I searched and searched for a netting needle. The results? Zero, nil, zip. But I wanted to net!

So first of all, I tried with a needle. You can use very little thread with a normal sewing needle, plus the chance of pricking yourself is very high. Not good at all. Even nastier, because a pricked finger will heal: There was a good chance of hitting a thread with the tip of the needle (I was really stupid and used a sharp sewing needle), thus sewing into the net and not knotting.

The next step was trying to make a simple makeshift netting needle by winding two pieces of wire together, forming the ends into netting needle shaped ends. This was better, but not much: The thread kept inserting itself between the two wires, and the makeshift thing had a tendency to bend, twist, and fall apart. I needed a proper netting needle.

So I whined and begged until I got a netting needle made from a hobby metalworker, made of thick copper wire. I had to twitch it a little, and it would only serve for rather large mesh sizes, but I had a netting needle that was actually useable. Hooray! It was much too short for significant lengths of thread, though, and rather hard to wind on and off. But at least it worked. Some time later, I tried to make one myself, which was also of the rather-crude-but-working sort.
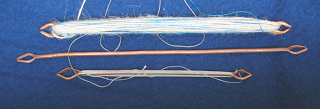

Imagine my happiness when I found out that a proper modern company still manufactures netting needles, sells them via normal sewing shops (though they had to order it) and cheap, too! And with three gauges thrown into the packet! I ordered one at once.

Believe me: it is a good thing this was so cheap. You do not want to buy this. It is so crudely made that I laugh about myself every time I see it. I actually did try the "needles" once. Here is pictorial evidence for you:
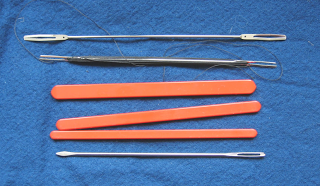

Frankly, they are a bad joke if you are going for medieval-style netting. The material is very cheap and you can see that they are also cheaply made - no wonder, since they have a retail price of about 7 Euros. The shanks at the ends bend easily, they are much, much too thick and will catch the threads of the net much better than sliding through the mesh. If bent together too much, winding and unwinding is hard and abrasive on the thread; if there is a gap between them wide enough for easy winding, the tip is even wider and bulkier. Well, maybe they work if used with the "gauges" that accompany them (plastic sticks), which will result in mesh sizes of approximately 8 to 15 millimetres. Which is rather... huge. I would not recommend buying them, unless you have no other choice whatsoever (read: unless there is nobody at all in your acquaintance that you could beg until he makes you a crude-but-workable netting needle).

... to be continued tomorrow on Monday. (This is what happens when you don't keep track of what weekday it is.)
0
JAN
07
0

Spinning Threads

Over the holidays, I have finally found the time to pick up my hand spindle and do some spinning.

I like to spin, I just never get around to doing it - there are so many other textile things that beg for my attention or that lie around half-finished. And so my spinning implements lie dormant most of the time. Since there was not much space at the lodgings where we spent the days around New Year, and since I was not up to complicated work anyway, I sat down and spun on the hand spindle. The output of the two hours timed spinning - normal thin thread and thicker thread, for one hour each - is still on the spindle stick, waiting for evaluation. It will be useful for preparation of the spinning experiment, one part of the Textilforum that I am very excited about: An experiment to find out more about the influence of the spindle and the spinner on the thread produced. If that has piqued your curiosity, you find the whole outline for the experiment on the forum pages, here.

The date for the Textilforum is not yet fixed (and thus not up on the website) - we are working on it, though, and hope to have it nailed down and ready for publication by the end of the week. Unfortunately, it is not too easy to find five days where we can have most of a museum and not get a date cross-over with one of the other textile or experimental archaeology events taking place in autumn - so if you have some fingers unoccupied, please keep them crossed for us!
0

By accepting you will be accessing a service provided by a third-party external to https://pallia.net/

Contact