Latest Comments

Guest - Katrin Sprang Discussion
18 September 2026
Hi Rachel, I have looked for more photos of you, but that was not very successful. I found a link on...
Guest - Beatrix Sprang Discussion
15 September 2026
That lozenge pattern element is not a photograph, but a scan. So it should be to scale. But I pinned...
Guest - Katrin Sprang Discussion
15 September 2026
I was not referring to Rachel's reconstruction (is the reconstruction you refer to the one photograp...
Guest - Beatrix Sprang Discussion
14 September 2026
There is something Rachel did not mention. She told me: "Well, I worked with the measurements we too...
Guest - Katrin Sprang Discussion
14 September 2026
Well, this is certainly developing into an interesting discussion. Firstly, going from that lovely l...
MAY
05
0

More Alpirsbach.

About everybody who has done reconstruction work on late medieval legwear and used the Alpirsbach pattern as one of the sources has mentioned (if they have written about it, obviously) that the crotch as drawn on the pattern will not work.

I can confirm. It's too pointy, so that you will have the full length for the crotch drawn in on the pattern, but it is not usable in its full length - the little pointy point will be pointless, you could say. So why did I go for the pattern style anyways? Well, because a) I wanted to see how it did not work, and b) I didn't want to make something up before having an idea of what to make up.

I have now changed it to a sort of narrow U-shape for the second leg, and it looks much better. 

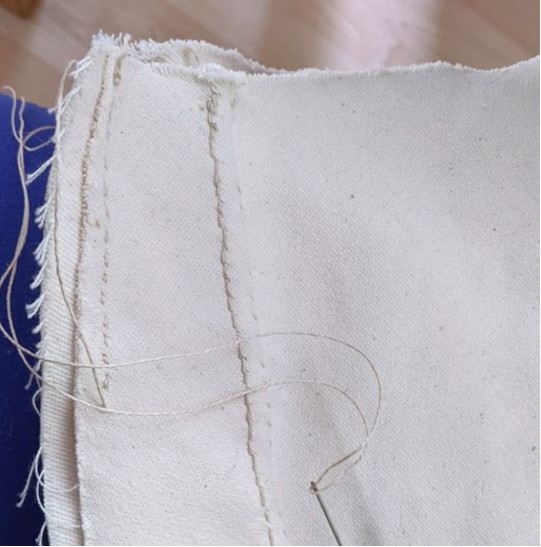
I have also mapped all the long and short seam allowances so I can do the felled seam in the right direction. And I have cursed (frequently) my choice of test fabric, which is rather heavy and stiff and needs some wrangling to work with the relatively narrow seam allowances.

Yes, this will be just enough to fell. No, it's not enough to be nice and easy... but the original seams were relatively narrow, too.

One leg is sewn (though not hemmed) all the way down, the other halfway, and the butt seam is in (that's the one being done in the picture). They have a tendency to twist around the wearer's legs, which is a little weird and may be a) normal and totally okay or b) something that will turn out to be not so good, and will need an adapted pattern making process in future iterations. But it might also be one of the reason why these hose were footed: So that the seam stays where it's supposed to stay. 

Now the only step left (apart from the feet, and finishing the long seams) is to figure out the final version of the codpiece, and cut, sew, and install that. It will also be very interesting to see if the thing really stands nicely on its own or whether it needs to be filled with something.

All very interesting : )  

0
APR
09
0

Trouser Ponderings.

I've been wondering in the back of my brain for most of the night, since looking at the Alpirsbach pattern yesterday: How would it have been constructed?

You see, the pattern, as published in Fingerlin, I., 2001. Textil- und Lederfunde, in: Landesdenkmalamt Baden-Württemberg (Ed.), Alpirsbach. Zur Geschichte von Kloster und Stadt, Theiss, Stuttgart, pp. 715-818 on p. 737 looks like this:

The whole thing is placed at an angle onto the fabric, as indicated by the little arrows - so you can use the elasticity on the bias to make everything work better.

So far, so good. But... we're in the late 15th, early 16th century here. There's definitely no Burda-style patterns made from paper, and the thing is not lined, so you can't use the lining for construction. Which leads me to the question, as always when looking at garments from medieval times: How do you construct this? Which measurements do you take, and how do you transfer them to the fabric to cut out your thing, especially since there's bits not cut in one piece due to the fabric width?

Of course you can construct one leg first and then use that as template for the other one. But in this case, which one do you do first, the one with the bits of the front and the back strip cut extra, or the one with the solid bit of the ass part cut extra? 

Questions over questions. First step for trying to solve them is printing out the thing and marking it up with all the known bits - which pieces are definitely the same length, which bit correlates to a known body measurement, how are the warp and weft aligned in the extra bits. Which is exactly what I am going to do today, in a bout of slightly brain-bending fun!

0
FEB
20
2

More Sprang Stuff.

I have been dabbling a bit more with the Lengberg cap sprang - on and off, though mostly off in the last months, and now it's more on again. (I am on row 48 or so of almost 200, and I realised that I will need the frame for the Sprang workshop in June, which gave me a nice bit of extra motivation to finish before then.)

While I did make the pattern for the hands-on piece for an exhibition about women's networks by marriage, due to start in May, the piece was done with slightly thicker threads and ran much longer than the original for the same amount of rows. Our solution was for me to make fewer rows - it's enough so you can still get a nice impression of the pattern, but it also was a good compromise for the museum budget. In this case, being a bit "off" from the original was thus not really bad.

It still irked me a little, especially after taking more looks at images of the original and realising how incredibly dense it was. So I made another set-up (with probably way too long threads, but I wanted to have room to manipulate at the end still), with slightly thinner threads, and made it my main task to get the fabric really, really, really, really dense.

By now I am far enough to see how well it worked - and I am actually not too far off the original this time!

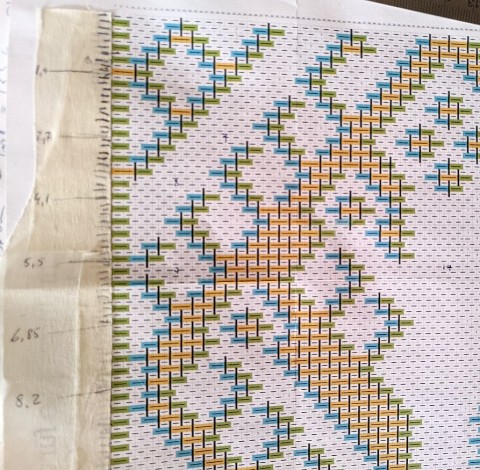
This image shows you part of the pattern chart written by Carol James, with my marks of "done" rows and, more importantly, small numbers giving the length in centimeters at that place on the original, calculated from the amount of overall rows and the full length of the original piece. It's a guideline, thus, nothing more - but I find it very helpful.

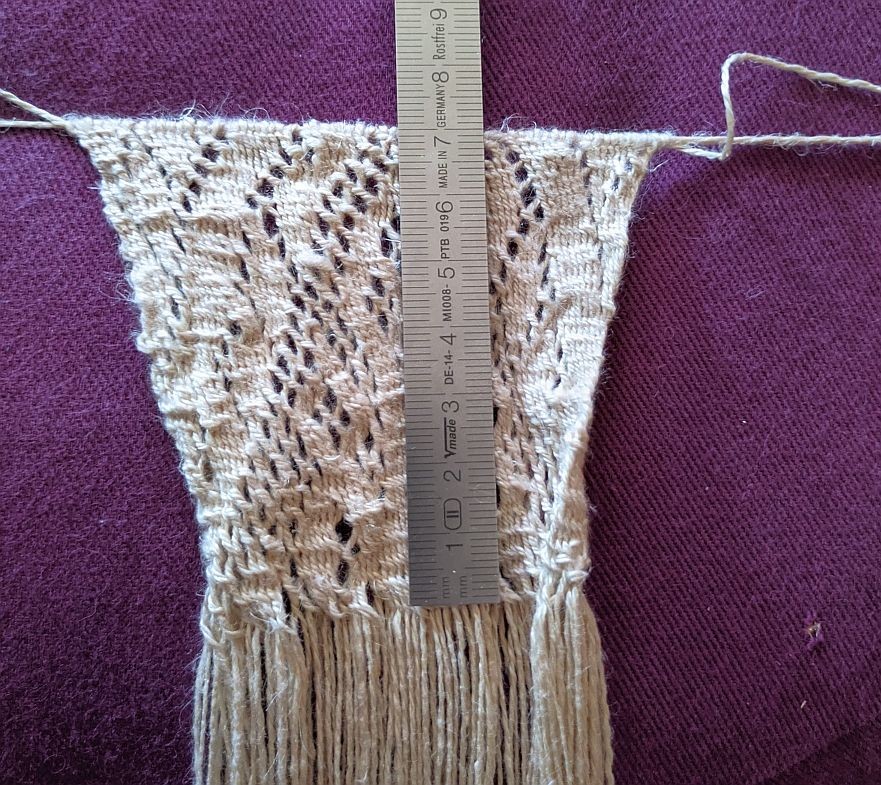
As you can see (more or less well), I should be at about 6.85 cm of length now. I am at... 

...about 7 cm. That is not too bad! The bottom piece is a little more irregular, and I measure something between 7 and 7.3 cm there, but I still have hope that it might even out again some more.  

The trick to getting there was, apart from having the right thickness of threads, working with very little tension and pressing the new row in very, very, very hard. That includes pulling the threads against the weaving sword in small bunches, and repeating it across the width several times. It doesn't take quite as long as the braiding row itself, but it feels almost like it!

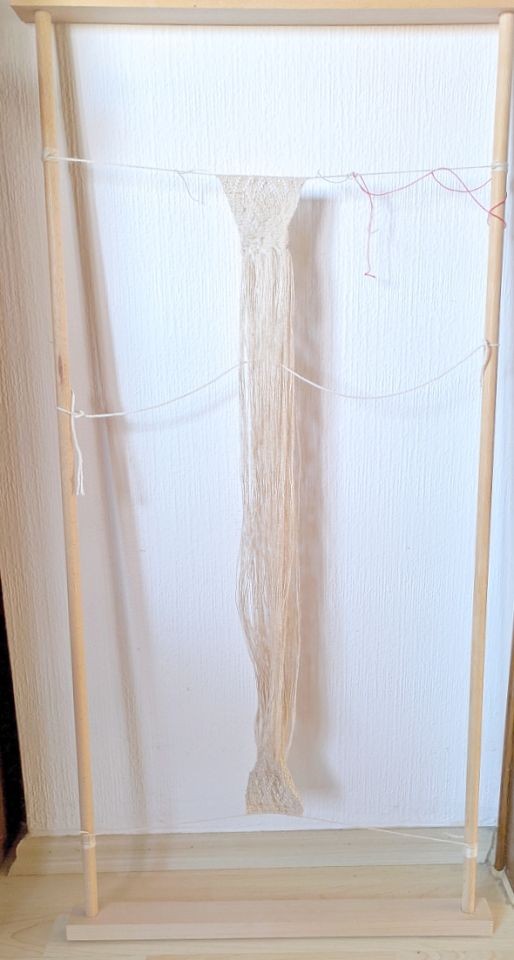
So this is how the frame looks, and yes, that is my working "tension".

It does work, though! And I can have a little more working tension when doing the manipulation, too, as I am working close to the top fell. Now only about 150 rows to go, and I will be done! 

0
FEB
03
0

More Stitching.

Well, well, well. There has been some more stitching, and as soon as I have typed this blog entry and pulled my arm out from underneath Madame the Cat, I will stitch on some more... but here's a bit of interesting stuff for you.

There's the One Big Linen Garment find from archaeology - the Viborg shirt. That piece has been analysed and reconstructed very nicely, with a result of finding a lot of different whipstitch seam variations, all cunningly and neatly adapted to a) what was available in terms of how many pieces of fabric to join, b) whether these were cut edges or selvedges, and c) how the seam was supposed to look (hint: most times, the answer to that was "flat").

Imagine my delight when I found out that the braies I'm looking at currently seem to employ similarly creative and very smart uses of whipstitch seams. Also my puzzlement when I realised that the seams I'd taken for the normal, common, household variety of a felled seam was something else.

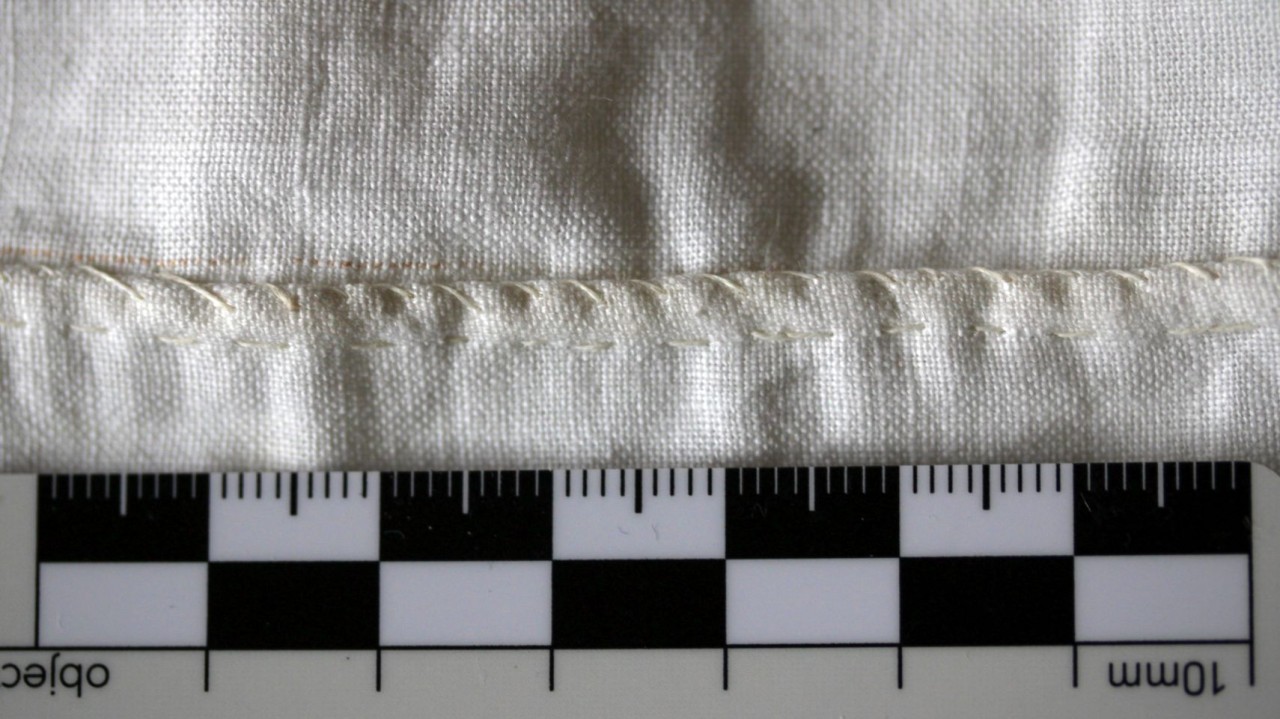
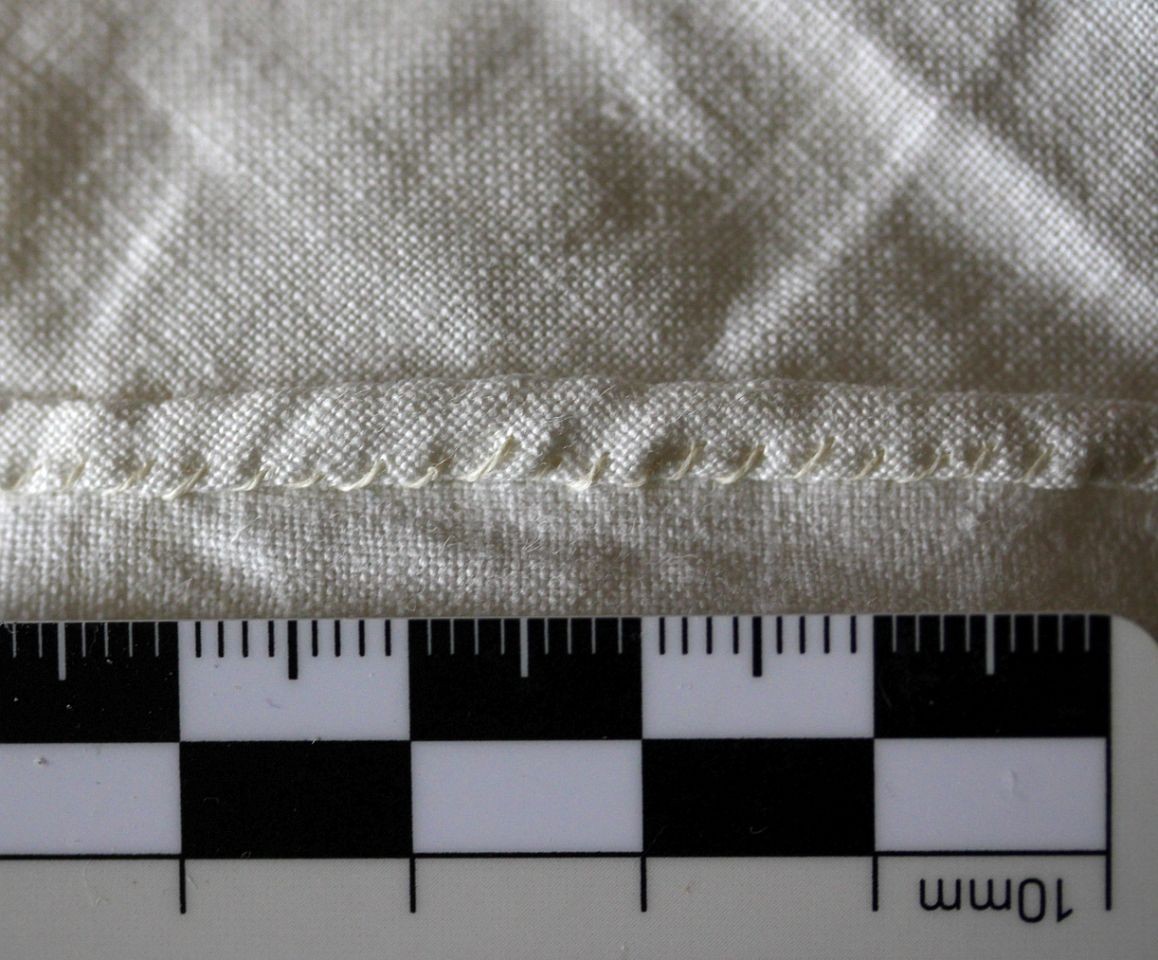
I'm not a hundred percent sure yet whether my attempt has cracked it, but at least you can enjoy these images of crazy seams in comparison. First of all, the "normal" felled seam variety:

You can see that there's a clearly visible stitch line from the first seam, then the whip stitches from the felled seam allowances. Now here's the variation: 

I hope you can also see (and appreciate) how crazy tiny these are. It's about 3 mm seam width on the original, and I tried hard to match this, with more or less success, depending. At some point I'll need to see the back of these seams to find out whether my solution matches the original, but whether it does or not, it's a fun variation that makes use of the selvedge - it's not a normal seam through the two layers, with the edges staggered apart by one final seamwidth, but a fold of the fabric with the cut edge (two seamwidth wide) whipped to the selvedge of the other fabric, and then the allowance folded and whipped down. It's much nicer to work than the fiddly very narrow normal version, and makes smart use of the selvedge, in a way that (at least to my way of thinking) fits in very well with the general tendency to make use of the very useful selvedge when making clothes.

So. What do you think? Or have you even seen something like that before?

0
AUG
29
1

Done.

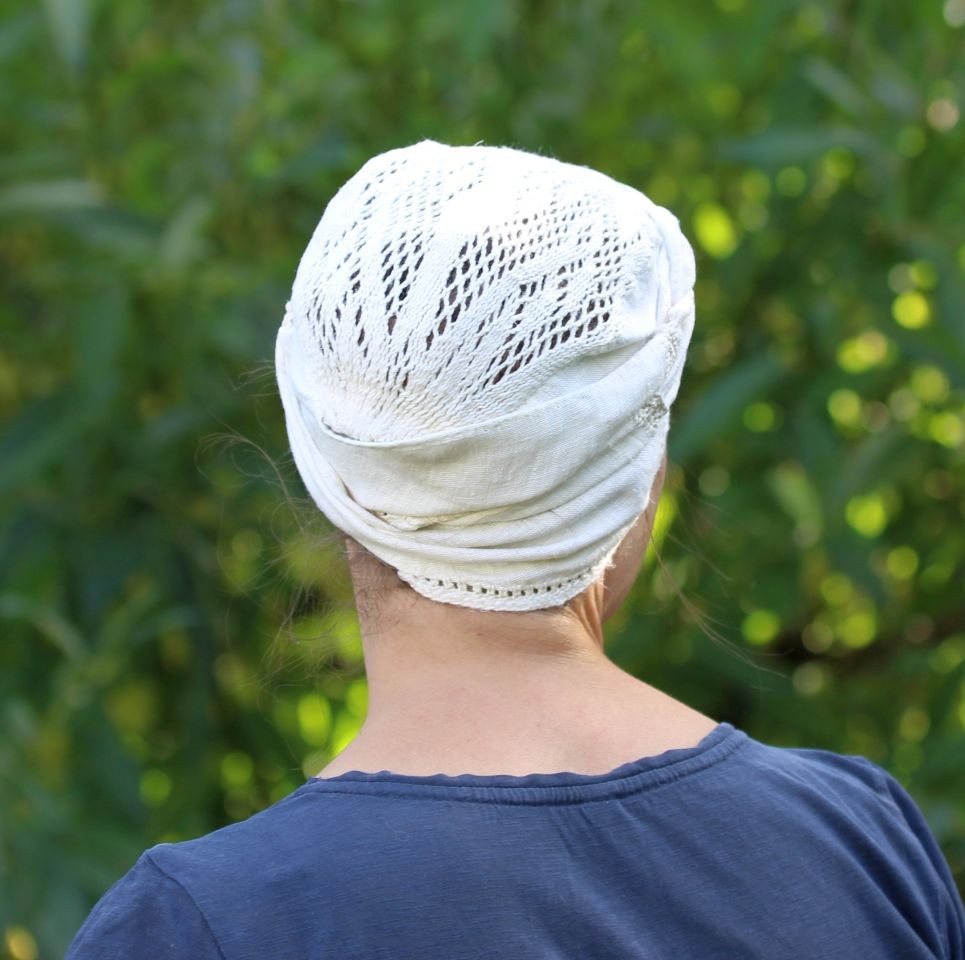
The Lengberg caps are done, and will go off into the post start of next week. I'm very happy with how they turned out - and very glad that in the end there was the decision to include the trimmings. The needle lace around the main edge really adds a lot to the look, as do the lace connection bits between the main part and the bands. 

The Most Patient Husband of Them All didn't only help with the pictures (arranging it to be photo-perfect and taking the photos), he also tried it on so I could be sure that it doesn't only fit my rather small head. (Though with my hair bunched up it tends to be larger, too - in different places.) 

 I found it quite pleasant to wear; the sprang is a little elastic and will help with the fit, but it's never going towards shapeless as the firm front band will keep it at a set width in the front. The way the sprang shows the lace pattern with darker hair beneath it is also very beautiful, if you ask me!

Only downside is that making a sprang panel like this will take a good bit of time. In the original it's 197 rows plus seven rows of doubled threads in plain sprang, and it's 120 threads to handle in each and every of these rows. In addition, the original has an extremely dense fabric as the result, so some extra time after doing the crossings each row is spent tightening the latest and, as far as possible, re-tightening the previous rows.

I'm also a little miffed that the bits that I found really annoying to sprang - the double-crossings, where you have two threads from the back and then two from the front, and which are always trying to mess with their relative positions in the next row - turn into that really beautiful large-hole pattern. Meh. I guess there's nothing to do but getting used to them, then.

0
JUN
10
0

Long weekend and a new addiction.

I spent a part of the long weekend (thanks to Pentecost) taking extra naps (thanks to a cold I managed to catch). As Murphy wills it, now that the weekend is over, I'm back to health again, and of course also back to work.

(Not really complaining here, though. Even though I could have done very well without the cold, at least the timing was only mildly annoying, slowing down the weekend, as opposed to horrendous, as in "could have hit me while abroad and needing all my brain and energy".)

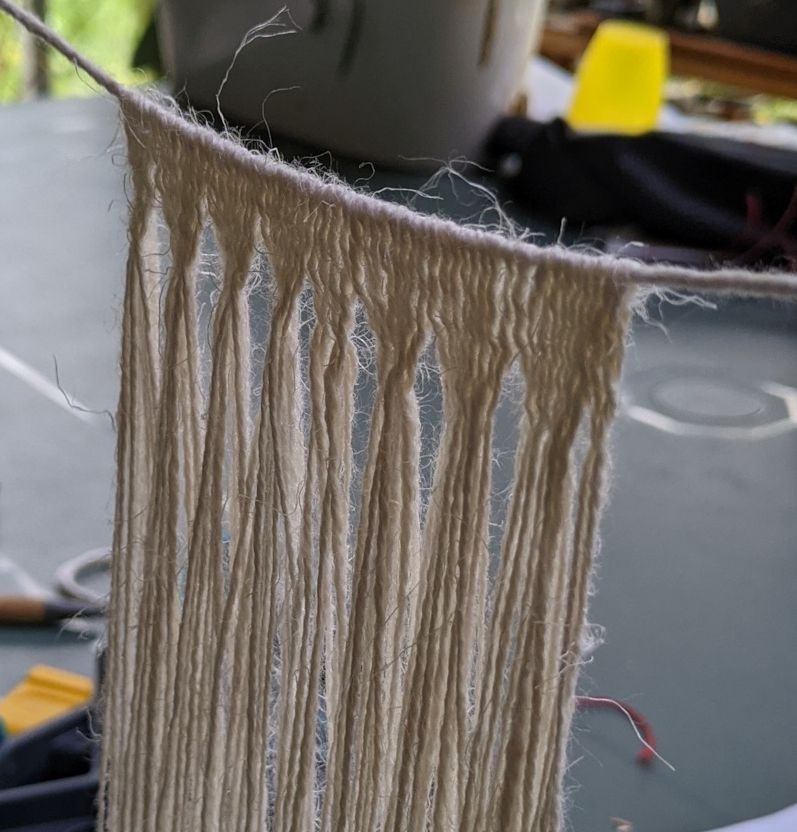
Plus side of having some extra time to just sit and do stuff: I managed to do a little bit of sprang. The story behind it is that I might need to make a piece of sprang for a museum project, and that means I have to do at least a rough calculation on how much it will be, and that is, obviously, hard to do without a basis.

For things that I've done before, I have all the data written down and collected, so I know how long something takes when it goes smoothly (or, as it usually does in best case, mostly smoothly) and how long it will take if something explodes. (Figuratively, not literally.) Yes, I always take time measurements when working for work purposes. Yes, I still do it even once it's clear I am way beyond my initial estimate. Even if it hurts to see how much it's going off estimate - it will be really, really helpful for planning the next similar project.

(In case you are planning to track your work times now, too: My recommendation is a simple stopwatch to place at where you work. That way, you can pause whenever you get up for tea, or a phone call, or whatever - just in case it takes longer than planned and then you forget when you stopped.)

So now I'm spranging again. Last time was a good while ago, and this time I am supposed to follow a pattern to get, well, a pattern, so it was a little different. It took me a bit to get back into the flow and figure out how to get a fabric density similar to the original, but now I'm getting there. 

The threads are not optimal, but they have about the right thickness, and were what I had on hand quickly. 

As always with textile techniques, it pays to have a good, even set-up - differences in tension when doing the setup will mess with your work later on. And then...

There's a pattern to sprang, to the normal, very basic crossing pattern. It involves two threads from the front getting closer together as you pull one thread from the back, and then you split the pair and pull one more from the back and have a new pair to split. It's rhythmic and beautiful and mesmerising, and it only gets tricky if you have a tension issue, or if you get to the edge (where tension is normally a little bit off, too). This pattern will be persistent throughout work, only broken at edges (which includes edges of holes, making everything a bit more interesting). 

So basically, this means you have a running feedback on whether you are still correct, or if you have messed up. That requires adequate eyesight (very thankful for that!) and adequate light (thank you, Joseph Wilson Swan, Thomas Edison, and successors) and adequate concentration.

And then it's just... beautiful. It helps if you have a firm fabric, and if you take care to keep all threads nice and orderly, so I like to work close underneath the top fell. One of the hardest things, really, is now to stop in time before concentration wanes and I mess up, or to stop and do other things that need to be done. (I'm looking at you, bills I need to pay and orders I need to send out.)

By the way, my hack for getting an even warp when warping, or an evenly tensioned sprang setup: Don't tension your threads more than necessary to just keep them from sagging. You are measuring them off on a horizontal thingummy, so start with the thread completely slack and only tension it so it just goes straight. Continue with this technique throughout. 

Gravity helps you get it right here, because you always need the same amount of tension to just get it straight, no more. If you always adjust to that exact tension from slack, there's no danger of you building up more tension gradually as you are working - which is a rather common, if unwelcome, effect. In case you have accidentally tensioned more than desired (because your yarn stuck, for instance, and the ball/cone/reel/spool un-helpfully tensioned it for you), just let it go all slack, then re-tension to just straight. You do not need to make the set-up at the exact amount of tension that you want to have later! You can add all the tension you want or need for working with your  bits of string measured off this slacky way later on, and they will be deliciously even. Works with every technique where you do a set-up step measuring off threads that have to be the same length.

0
APR
03
2

Weird Medieval Headwear.

From time to time, I dabble in medieval headwear. Especially... weird medieval headwear. 

Recently I've been involved in a project that, in turn, involves women's headdresses in the Late Middle Ages. And that means I finally got around to trying out this weird piece of headgear: 

I've seen it worn solo on a Rogier van der Weyden painting (Mary Magdalen), and since also worn below a mostly normal headcloth (exact way of draping yet unsolved). It seems to be not totally common, but also not a complete singular fantasy piece either.

Should you have found images of this, worn solo or underneath a veil, please let me know! I'm still collecting evidence. And I will keep you updated on the veil draping progress...

0

By accepting you will be accessing a service provided by a third-party external to https://pallia.net/

Contact