Latest Comments

Guest - Katrin Sprang Discussion
18 September 2026
Hi Rachel, I have looked for more photos of you, but that was not very successful. I found a link on...
Guest - Beatrix Sprang Discussion
15 September 2026
That lozenge pattern element is not a photograph, but a scan. So it should be to scale. But I pinned...
Guest - Katrin Sprang Discussion
15 September 2026
I was not referring to Rachel's reconstruction (is the reconstruction you refer to the one photograp...
Guest - Beatrix Sprang Discussion
14 September 2026
There is something Rachel did not mention. She told me: "Well, I worked with the measurements we too...
Guest - Katrin Sprang Discussion
14 September 2026
Well, this is certainly developing into an interesting discussion. Firstly, going from that lovely l...
FEB
13
0

More about Lightfastness Tests (part 1)

There's been comments about the lightfastness test setup which, in most cases for hobby and smallscale professional dyers, consists of picking a south-facing window and sticking stuff in there for a given amount of time... which is very obviously not a scientific way for evaluating lightfastness.

First of all, though - let's take a closer look at the things that happen when light hits that textile. I've brushed up my knowledge a little bit, but please note that I'm not an expert, and I'm going to put what happens, as I understood it, into very simple terms. If you want the nitty gritty details, you can check out "Chemical Principles of Textile Conservation" by Agnes Timar-Balazsy and Dinah Eastop (published 1998), where pages 88-92 and 225-232 will bring you many insights.
Basically, what happens is that the light hitting the fabric inserts energy, and this energy can cause chemical reactions on molecular levels. One of these processes is photolysis, where bonds in the dye molecules are destroyed, leading to a different chemical structre and thus a change or loss of colour.

The second process, and even more important than straight photolysis, is photo-oxidation. When this happens, a carbonyl group in the dye molecule changes to  carboxyl group, leading to a shortening of the dye molecule and thus a colour fade. This process is usually slower if humidity is very low, and can also be slowed down by an atmosphere with less oxygen (though some colours may fade faster in a vacuum - so you can't be sure if that is good or not). Metals including iron and copper, as well as their compounds, can aid photo-oxydation. Even nastier about this process is that it can result in active radicals such as hydrogen peroxide, which is a bleaching agent, speeding up the fading of the textile.

Different dye molecules are more or less prone to these reactions to light, which explains the varying lightfastness levels of dyes. Both UV light and visible light provide energy for these reactions, but the wavelengths do make a difference.

So... now that we all know, more or less precisely, what happens when the dyes fade, we can get back to testing.
0
FEB
04
2

Pfakofen - the answer...

Bruce's comment about the multi-spouted pot being maybe used as a lamp (thank you, Bruce!) was, it seems, not the first one. There's a German article about special forms, though, that comes to the conclusion that these multi-spout pots generally do not work well as a lamp. (See "Lampen im Barbaricum", p. 222, in Armbruester, Tanya, and Morten Hegewisch. Studien zur Archäologie Europas, edited by Joachim Henning, Achim Leube and Felix Biermann, vol. 11, Bonn 2010).
So... the spouty pot is probably not a lamp. Though it may have been used for some kind of drinking games, the one in Pfakofen was found in context with a spindle whorl, and there were cochineal lice inside the pot - placing it nicely in a textile work context.

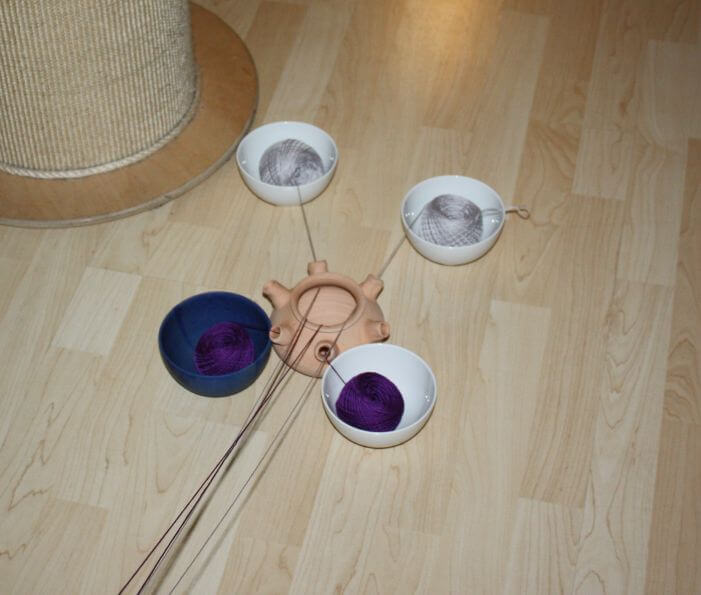
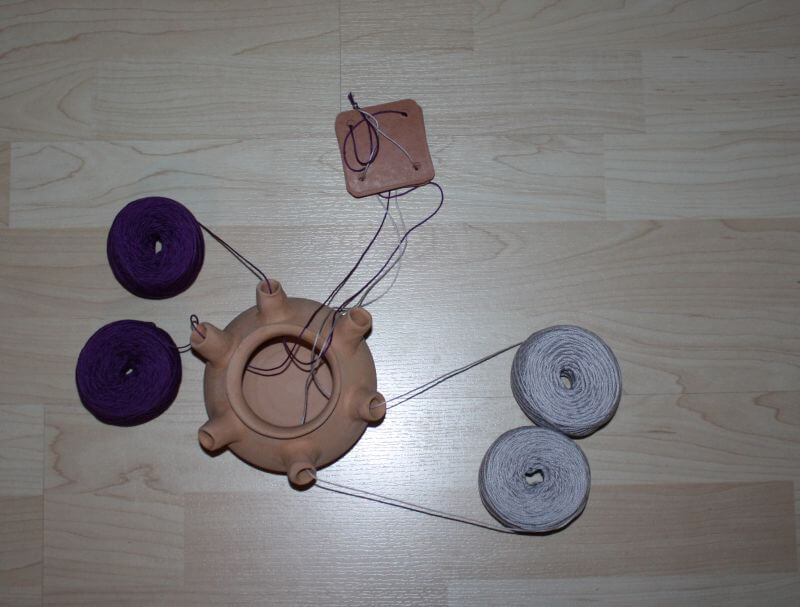
When we were in Eindhoven with the first Textile Forum, there was also one of these pots replicated - and Viktoria Holmqvist mentioned that she'd always wanted to try one as a warping helper for tablet weaving. And so she did - with very good success.

It works like this: You thread the yarn ends through the spouts into the pot and out the middle hole, and then thread your tablets with them.


Then you place the balls of yarn into bowls or similar containers, so they don't roll about the floor like crazy, and you can start warping.


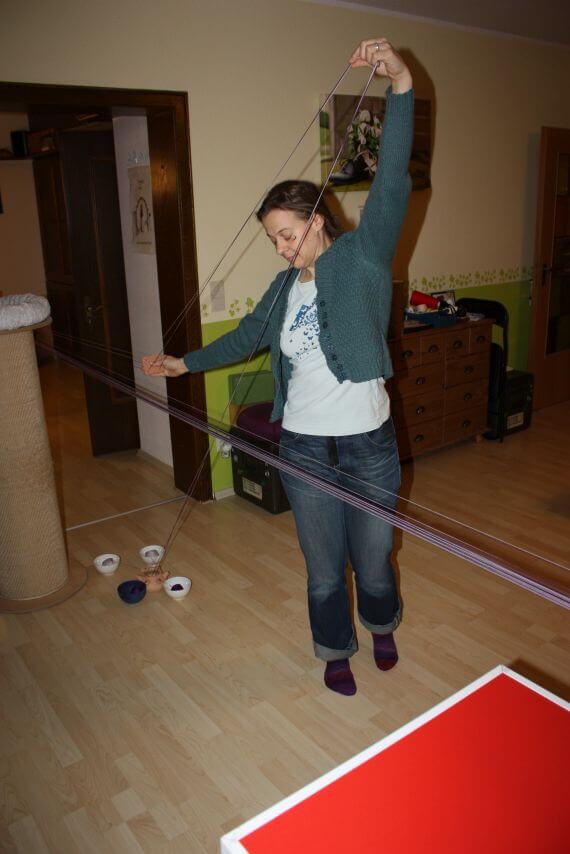
The trick is to pull upwards - if you do that, you will get a really smooth, evenly-tensioned flow of yarn from your spouty pot. I've tried this with a 5 m stretch between the warp end posts, and it still worked nicely, provided you pulled up (or as up as possible); for an even longer warp, I'd set a zigzag course instead of a straight line for warping, and then more length would not be an issue at all.

I've made quite a few warps, and pulling up is always a good idea, but using the pot makes things just... smoother, more evenly tensioned, and much, much more fun.

Bonus feature: It looks like dancing.


Second bonus feature: I now have a 5 metre warp with 20 tablets to play with...
0
FEB
01
2

Pictures!

Yesterday was a day for taking photos - because, well, the Newsletter for January was still to go out, and I actually had an exciting new thing for that one, which unfortunately had to be put into the shop before I was able to link to it...

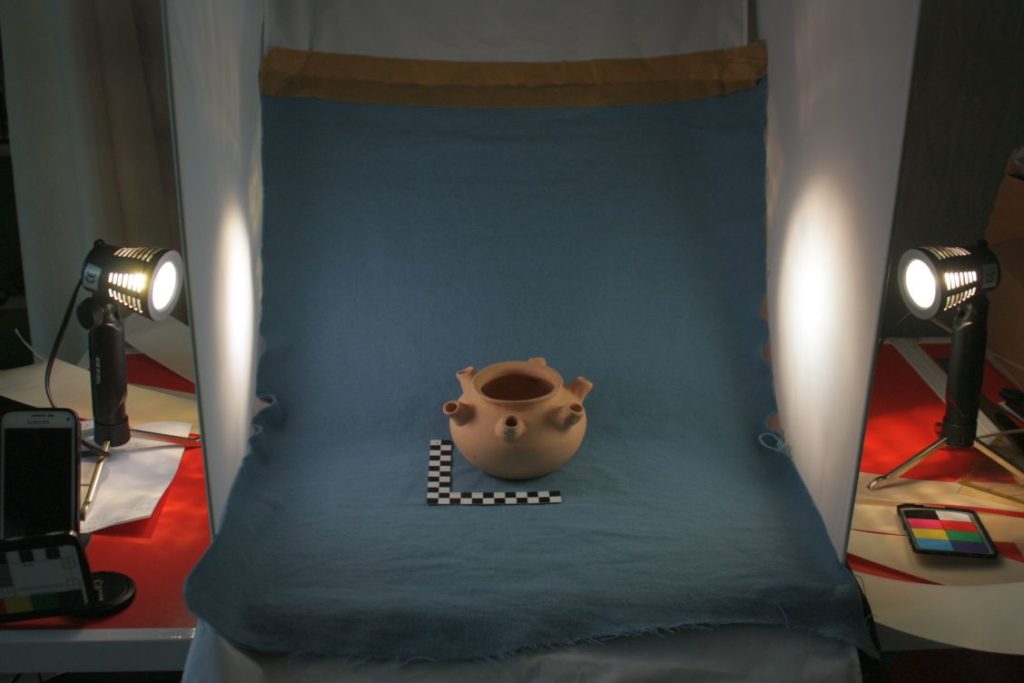
so there I was, having to take product photos. I'm sure I have complained in the past about how hard it is to take good product photos. Usually, I try to go for a nice, bright day and set up the photo equipment in the wintergarden, but yesterday, I missed the time of bright sunshine... so I was very, very glad that the photo tent thingie came with suitable lamps:


So... who knows what this is, and what it can be used for?
0
OCT
26
0

What goes into a Workshop.

Since I've been talking about needing guinea pigs, I thought I might give you a little bit of background on the development of my workshops in general.

I love giving workshops, or courses, or lessons, or whatever you want to call it. I really enjoy being able to pass on knowledge - theoretical and practical - and see how people start to become friends with a new technique. No matter whether it's braiding, knitting, weaving, or any other craft, every single person has his or her own, personal pattern of movements, and preferences on how to do things, or handle elements and tools. It's always fascinating for me to see this unique, personal finger dance develop, and it makes one part of why I like teaching so much.

Just like with many other things, though, a lesson does not spring from nothing to full perfection - it needs an astounding lot of work and preparation to develop a workshop or course.

This starts with making a basic concept. What do I want to teach? Are the students adults or children? What do they want and expect from the course? How likely is it that they have previous experience with the technique? How long can I make the course, and how deep into the technique can we go?

Usually, I try to put a lot of information into each workshop, to make sure that everyone goes out with a good, solid understanding of the basics and the tools to develop this further. This means structuring the workshop carefully so that I can set a relatively high pace, while still allowing enough time to try out things and get a bit of practice.

Once the basic concept stands, it's on to test runs and thinking about logistics. I usually do several test runs of the course, working the course programme and babbling to myself. I'm also checking how long each step takes me (and then, obviously, extra time gets factored in for having several people doing this the first time ever), and trying to find the best sequence of tasks. For some workshops, I've also done "live test runs" with a few willing people, testing out if things all work like they are supposed to do.

Logistics are another thing that needs consideration. How much space do I need per person? Table space and floor space can both be an issue depending on the venue. How many tools do I need? What are the materials necessary? How much extras need to be available in case of calamities? Will participants want to bring (maybe to test) their own tools as well?

Keeping in mind that there are several persons who need to do something at the same time, tool count can rack up quickly. One of the reasons why it took me so long to develop the tablet-weaving course range was that I had to bite the bullet and buy a freakishly large amount of clamps. To fit up to 8 people into the course, I need four clamps each for the warping method I use - and that means 32 clamps. These have to be bought (and it is worth it to get good quality ones, as they are gently but consistently abused), transported, and stored. Similar things are true for other crafts. I need to have enough netting needles for a course - these, at least, are lightweight and easy to store, though having them made is an investment as well. Sprang courses require having a frame available for each participant, plus some large demonstration frame to show the whole class the movements and what happens with the threads. These, too, need to be designed, made, paid for, and stored.

Once all this is done, I can sit down and write the final workshop script that will keep me on track while I'm teaching, and make sure I don't forget mentioning a crucial detail when it is necessary to do so (because these crucial details often get so ingrained if you have done the craft for a while that you are not aware of them anymore).

And then, finally, I can work on the course description and set the price. So if you've ever wondered what goes behind a workshop I give, and why I charge as much for it as I do - there you are.
0
OCT
18
0

Testing. Testing.

I've wanted to try my hand at making video lessons for ages and ages now - and with the tablet weaving lightbulb finally going on in my head, it is finally time.

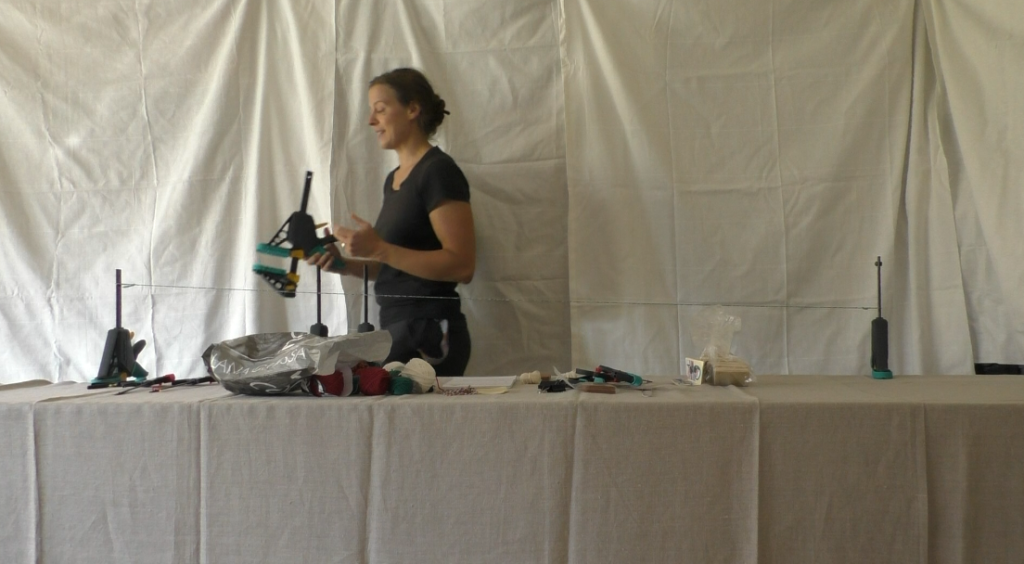
So now there's a little camera hanging out in out living room (and yes, it is rather small, that gadget) and there is a table set up long enough for warping, and I am working on scripts for the first few sections of the video course, and there is, of course, testing. Lots and lots of testing.

Testing of the camera. Testing of the remote control for the camera via smartphone (which sounds better than it is, unless you want to have gratuitous weird sound effects). Testing of angles, and light, and going through the moves according to the script, and looking for things to wear that will be contrasting enough with the things in my hands to make the latter actually visible. (Black t-shirt is out. I knew that beforehand, but I was too lazy to change for that first going through the moves...)


(I think I might have to do some ironing here...)

Just like with product photographs, it is amazing how the eye and brain gloss over things until they are frozen in place in a photograph - and then you suddenly realise that something is at an angle, or looks lopsided, or that the crinkles, yes, are really visible.

Also testing: backgrounds for the weaving sequences to make sure the tablets and threads will be clearly visible.


There will be larger, thicker tablets with thicker threads for the real video, but it can't hurt to try out with some already available ones beforehand, right?
0
SEP
21
0

Finding out things.

It's always nice to find out things... especially when they are connected to medieval textile tools. So when, a while ago, a colleague handed me a reproduction of a weaving knife (or beater, however you opt to call it) from Viking Age Dublin to try out, I was more than happy to do so. It fit in perfectly with my plans to do the tablet-weaving shenanigans... and so I sat down and wove and gave it a try.

Well. Before, I was firmly in the camp of "I just use my finger to beat in the weft, and that's good enough for me". Let me tell you, though: I am not ever going back to that. Well, maybe for a narrow, simple band, where weaving is fast and I'm handling the tablets with one hand and the shuttle with the other and it's more like just speed down the warp, and that's it. But for things like the twill patterning, or wide bands? Aaah. It does make such a difference - and it actually makes a huge difference, for me, to pressing the weft in with some other tool.

In the past, I had tried to use the shuttle edge, or a special small shuttle with a "beating sting" attached to it (which I have mislaid and cannot currently find, which tells you already how much I use it...), or a ruler, or a bone folding tool. None of them cut the mustard for me - they were one more thing to handle, and my finger did not need picking up and setting down in contrast to these all, and made about the same job.

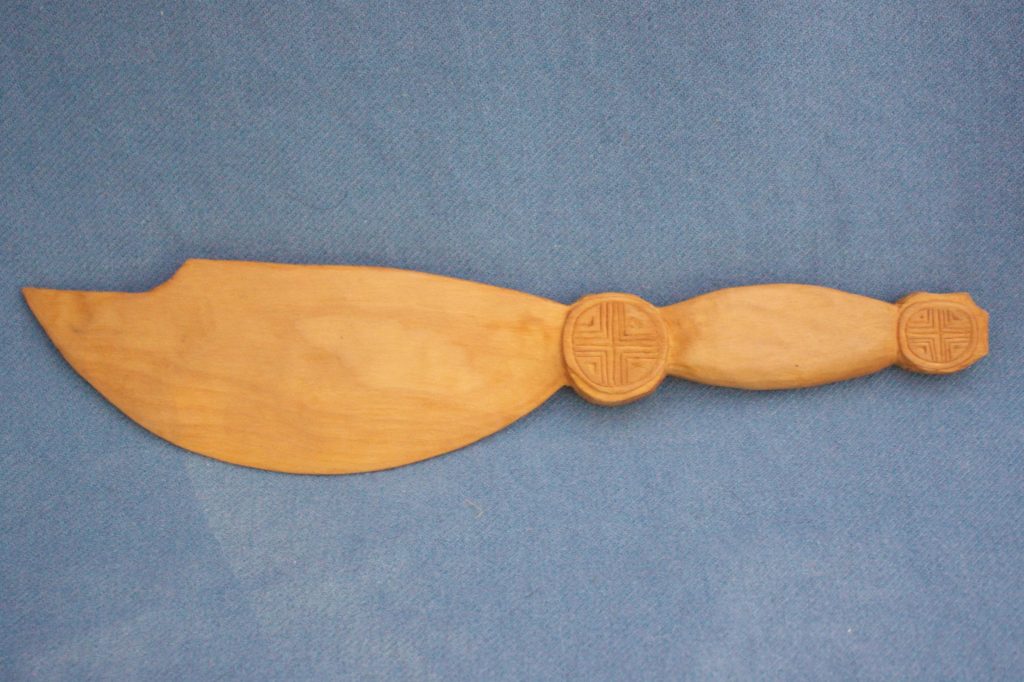
The difference? Size and shape of the new thingie. This is how it looks:


You will note the very broad, very curved blade with the curious indentation at the very tip - things that my colleague found slightly weird. There is a second find from Viking Age Dublin with this shape, so one might surmise that it's not a fluke, but that there is some reason behind it. I had no clue about this possible reason, only a guess regarding the curved blade: It might allow to press the weft in very precisely yet gently, using a rolling motion of the curve across the fell.

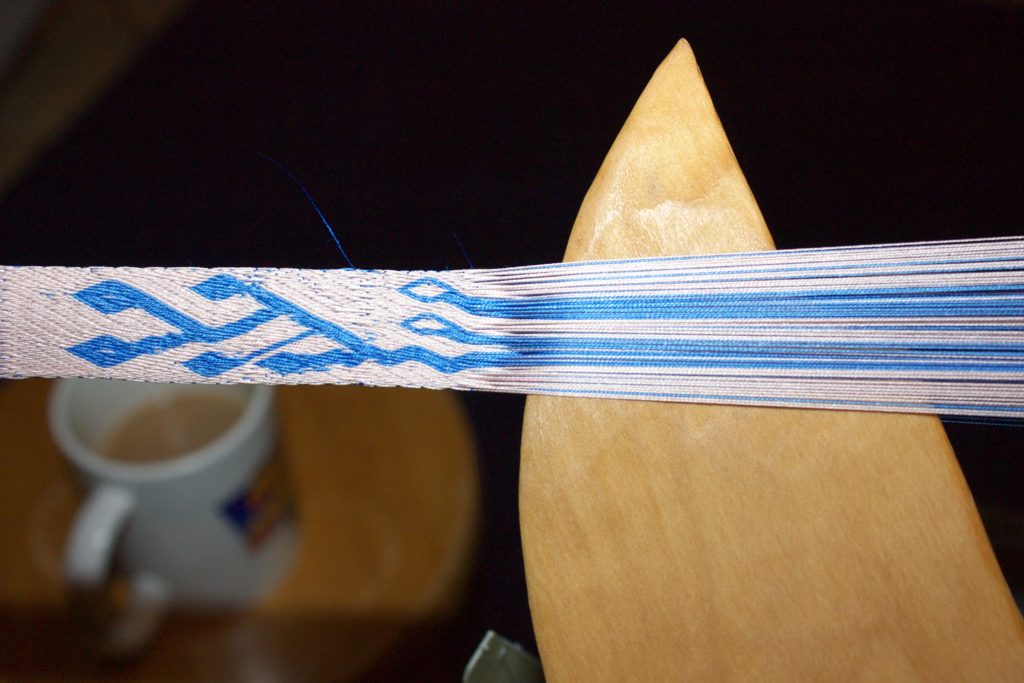
Well. That guess certainly proved correct - the tool's form is just perfect to roll it across the width of the band, making sure all the fell is pressed back firmly and evenly. As there is only a smallish contact point, it is easy to apply a little more pressure where necessary and a little less where the warp is softer. Calling this thing "beater" does it no justice at all, by the way - movement and action are all nice and soft and gentle, as befits a delicate tablet weave. With the warp under just enough tension to work well, but not more, beating in the shed would not be a good idea, as it might disorder the tablets. It also puts more stress than necessary on the warp, as well as on the tensioning method - so the curved blade is a total boon.

[caption id="attachment_4054" align="alignnone" width="640"] Gently pressing in the weft.


For this, a smaller tool would actually work for me - but I have also found it wonderfully useful for correcting mistakes.

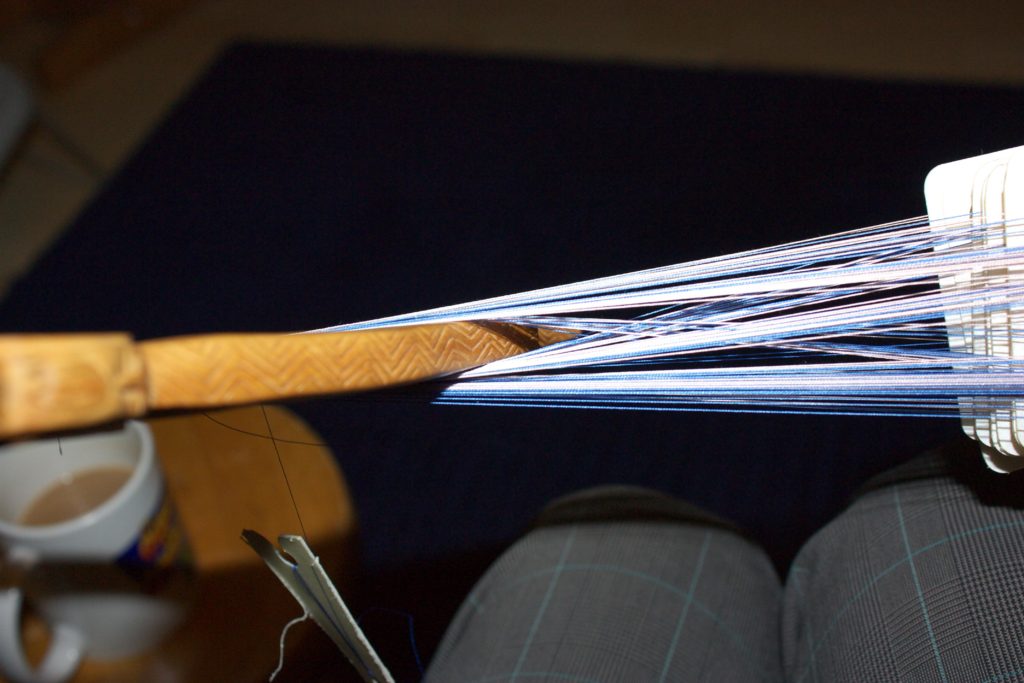
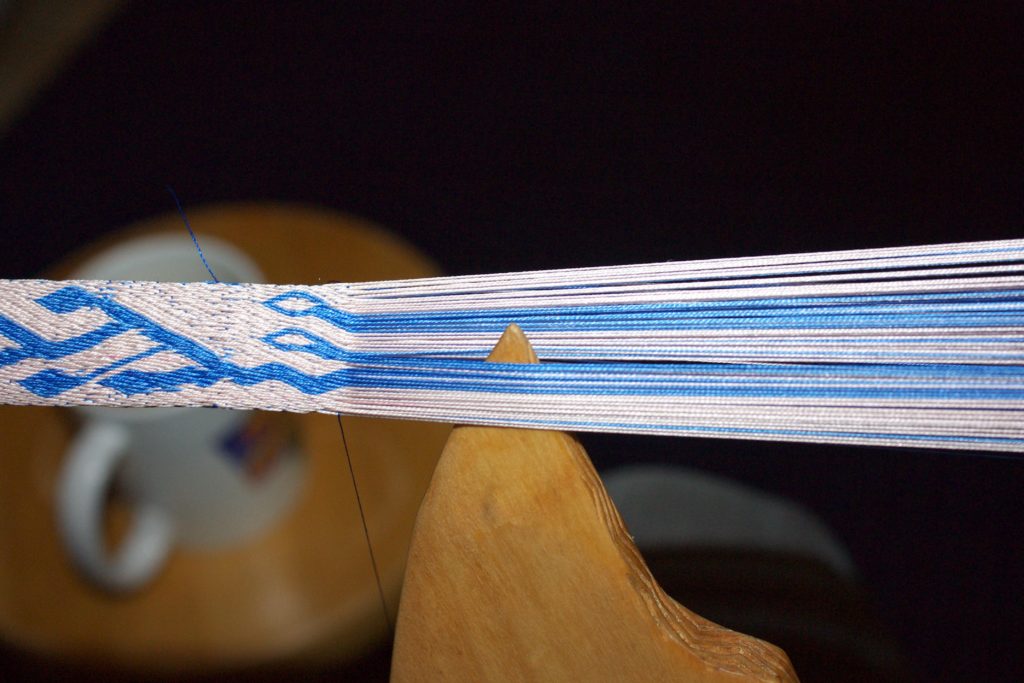
When I need to go back a pick, I loosen up the last weft, pull it towards the tablets, and then I open the shed it runs through with my fingers. I then usually stuck something in there - my finger (which binds one hand, so not very good for longer or more complex corrections), some stick, or whatever (a bone folder, for instance). The purpose of this is to keep the old shed open to individually turn each tablet back the way it came, re-establishing the position before the mistake. Obviously, it's a) helpful if you see how the threads run over your tool, and b) important that it does not slip out too early. Both of these were, hm, let's call it sub-optimal with a stick or a bone folder.

With the almost 30 cm of total length, and the relatively long blade part, the tool easily accommodates my warp for these corrections. The back of the blade is wide enough to stretch the shed apart nicely so I can see what is happening, and the total length is just long enough to either set the handle's end on my knee or hold it between my legs, making sure it stays put.

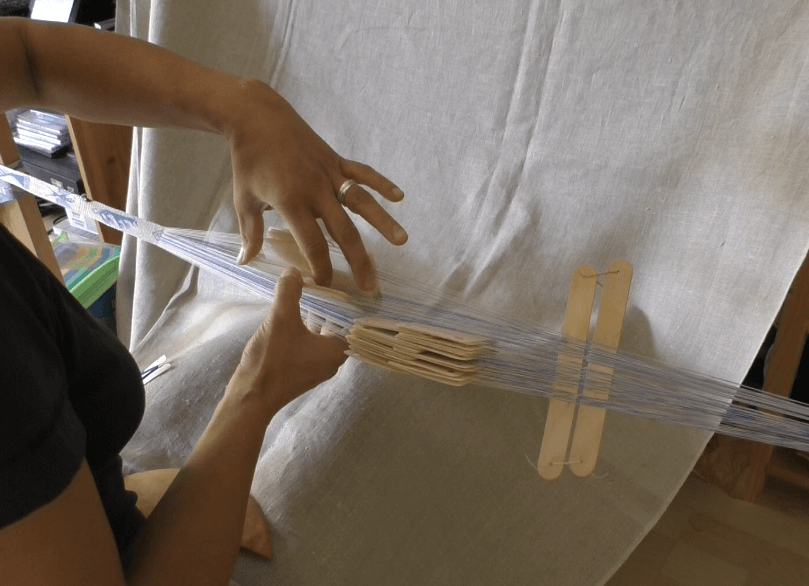
[caption id="attachment_4051" align="alignnone" width="640"] Fixing a mistake by weaving back - the crossings from the previous turn are carried towards the tablets.

Most often (fortunately!) the mistakes are not so bad that I need to go back for the whole pick - they are just one or two tablets that accidentally turned into the wrong direction. Or sometimes, I'm not sure whether the edge of a pattern section is where it is supposed to be. In these cases, I pick out the tablet cord in question close to the fell and follow it back to the stack of tablets. For this, something more pointy and accurate than a finger is very helpful. Bone folders will work, as will needles... but, guess what works even better?

Yes. The pointy tip of the tool. With the indentation making the tip of the blade effectively a lot narrower than the curve would dictate, it is just perfect to pick out the offending place, stick it in and follow the yellow brick road, excuse me, the tablet cord in question back to its origin.

[caption id="attachment_4053" align="alignnone" width="640"] Catching the questionable pattern section edge to check whether the tablets stand correctly.


It works much, much better than the bone folder. Or a ruler. Or my finger.

It's also not a bad thing that this tool is totally beautifully made, and very smooth, and beautifully decorated with carvings, and made from service tree wood, which is my absolute favourite wood ever.

So worth the extra step of picking up the tool! And in the future, my fingers will not see that fell again... because I'm not going back, nothankyouverymuchindeed.
0
AUG
24
0

Whorl Weight Choices

"What whorl weight should I choose?" is one of the questions I get very frequently - and as with so many questions, there is no single clear answer.

In my experience, whorl weight and spindle weight are a very personal thing. I've made good experiences with whorl weights of about 25-35 g for beginning spinners, and that is also what I pack into my starter kits. There are, however, always a few people who feel better spinning with a lighter or a heavier whorl.

According to my experience over the years, and also to the results of the Spinning Experiment back in 2009, the only thing that the weight of the whorl will definitely mean for spinning is what I call a "running quality control". If your spindle weighs 40 g, you can be sure that the thread will, at any point, be able to sustain a 40 g load or tension (provided you spin suspended). For somebody who spins for a weaver, as most spinners, historically, will have done, this is a crucial thing. If the thread breaks while spinning, it's not something you rejoice over, but it's also no big deal. You pick up the spindle, fluff up the end of your thread, re-connect it to the fibre supply, and on you go. A thread breaking on the loom is an entirely different story and much less fun, plus much more work to fix, so the last thing a weaver wants are unreliable, breakage-prone threads. Hence a running quality control would be a very good thing. That does not mean a yarn spun on a lighter spindle may not be able to hold the required weight, but you don't have this running quality control built into the process.

The rest of the spindle weight is, within a rather large range, doing nothing to influence spinning in regard to thread thickness. This mostly happens in the head of the spinners, who have, in many cases, heard "light spindles for thin thread" so often it becomes a self-fulfilling prophecy. A lot of beginning spinners are also afraid the spindle will drop if the thread is thin. My advice is that you should pick a spindle weight (and a whorl shape) for something that feels good to you and that twirls nicely in your fingers. Here, biomechanics come into play. If the spindle is too heavy, or too light, it will not be as easy to flick into a quick rotation as one that is in your personal good weight range. It's a little like throwing a ball - if you want to hurl it a long distance, and the ball is very light, it will be awkward and hard to throw. If the ball is too heavy, it's also hard to throw for a long way; but inbetween, there is a range of weights that you will be able to throw far (and not hurting your shoulder in the process).

Personally, I tend to use heavy spindles, even for the relatively thin threads that I usually spin. As my spindle stick fills with yarn, there comes a point when I feel the spindle doesn't turn as nicely as at the beginning, and at this point I will exchange the whorl for a lighter, smaller one. For me, that results in maximum efficiency when spinning (and also in maximum pleasure).

So depending on what kind of yarn people want to spin, their biomechanics, what they are used to, their spinning style, preferred fibres and probably some other squishy factors, there is no firm rule or guideline to tell which spindle weight and whorl shape they will find best. The good thing about medieval spindles, though: You can stick on about anything that has a hole in it. So if you are unsure, get a spindle stick and try out random stuff as whorls - wooden toy wheels, glass beads large or small, stone beads, stone donuts, clay whorls, clay beads, things in different densities and shapes. Stick on a small apple if you feel like it. Or a potato (not for historically correct medieval spinning, though!). Then once you have an idea of what works for you, you can get exactly the whorl you want.

Or whorls. Spindle sticks and their knobbly companions, after all, are herd animals...
0

By accepting you will be accessing a service provided by a third-party external to https://pallia.net/

Contact